White Screen of Death: How to Fix a Blank White Screen in Windows 10
All Windows users are familiar with Blue Screen of Death issues, but few have encountered the White Screen of Death (WSOD). It’s when the screen turns completely white and, unlike BSOD, doesn’t display any messages.
Stumbling upon a WSOD can be quite scary, especially since the operating system doesn’t provide a stop code you can use to look up an online solution. Nevertheless, you can still solve White Screen of Death problems without having to factory reset Windows 10.
What Causes The White Screen of Death?
White Screen of Death can be triggered by any number of issues, such as hardware failure or software corruption. Sometimes, the screen can turn white right after Windows boot. It can happen not only on Windows but also Mac or iOS.
For example, if you dropped your iPhone or iPad, its display may turn fully white, stop responding to commands, and show only the Apple logo.
How to Fix a Blank White Screen Error
There are multiple approaches to repairing the White Screen of Death error. However, before getting started, it’s highly recommended to create a system restore point. You will be able to revert any changes if you need to start troubleshooting from scratch.
1. Clean boot Windows 10
If the white screen was caused by a malfunctioning driver, service or process, then you can run a clean boot in Windows 10. It facilitates a safe environment that turns off all non-essential components.
- Click the Start button, type System Configuration, and press Enter to launch this app
- Switch to the Services tab
- Clear the Hide all Microsoft services option and click Disable All
- Go to the Startup tab and click Open Task Manager
- Disable all startup processes with the Enabled status
- Restart your PC and check if you still get the white screen
2. Update your graphics driver
White screen issues are often related to display problems, so you should take a look at your GPU driver to check if it’s incompatible, outdated, or just not working properly anymore.
How to quickly reinstall your display driver:
- Right-click the Start button and go to Device Manager
- Expand the Display adapters group
- Select your main graphics driver, right-click it, and choose Uninstall device
- If you have multiple GPU drivers, uninstall all associated devices
- Restart your computer. Windows will automatically reinstall the drivers
This method should help fix the white screen issue if your video driver was not functioning correctly. But if it’s too old, you need to update it to the latest version.
How to update your display driver:
- Press Win key + R, type devmgmt.msc, and press Enter to run Device Manager
- Extend the Display adapters category
- Right-click your video driver and select Update driver
- Click Search automatically for updated driver software and wait
- If it doesn’t find a driver, click Search for updated drivers on Windows Update
If you still can’t update your video driver, write down its manufacturer and current version. Then, visit the official website to find, download, and install a newer driver for your GPU.
But if you don’t want to go through all this trouble, then you can turn to a driver updating application. You can use it to update all your drivers simultaneously, without having to worry about getting an incompatible driver.
3. Unplug your hardware components
Since hardware failure is one of the main causes of the White Screen of Death error, it’s up to you to inspect your computer gear and discover the malfunctioning component. It can be difficult to do this, especially if you have multiple external devices.
However, if you started receiving the white screen error after attaching a new device to your PC, like a Wi-Fi adapter, a webcam, an external hard disk, or a USB pen drive, that could be the guilty party.
Shut down your computer and unplug all peripheral devices, except for your mouse and keyboard. Then, turn on your PC to confirm that you’re no longer receiving the White Screen of Death.
After this step, you can start re-attaching your hardware components one by one until you get the white screen again. It should mean that the last connected device is malfunctioning and must be repaired.
4. Update Windows 10
It’s critical to keep your operating system updated to the latest version so that you can take advantage of the latest features, improvements, hot fixes, and security patches.
If the White Screen of Death error is affecting multiple users due to a specific software problem, then Microsoft is likely pushing a new system update that repairs it.
How to use Windows Update:
- Click the Start button, type Check for updates, and press Enter
- Wait until Windows finds updates. If there are any, click Download
- Downloading and installing the updates could take a long time. Make sure to not turn off or restart your PC during this time
- Reboot your computer when prompted by Windows
- Check if you still get the white screen
5. Uninstall recent system updates
Contrary to the previous solution, you might have to remove recent Windows updates from the computer which may have caused the white screen error.
- Press Win key + R, type control panel, and press Enter
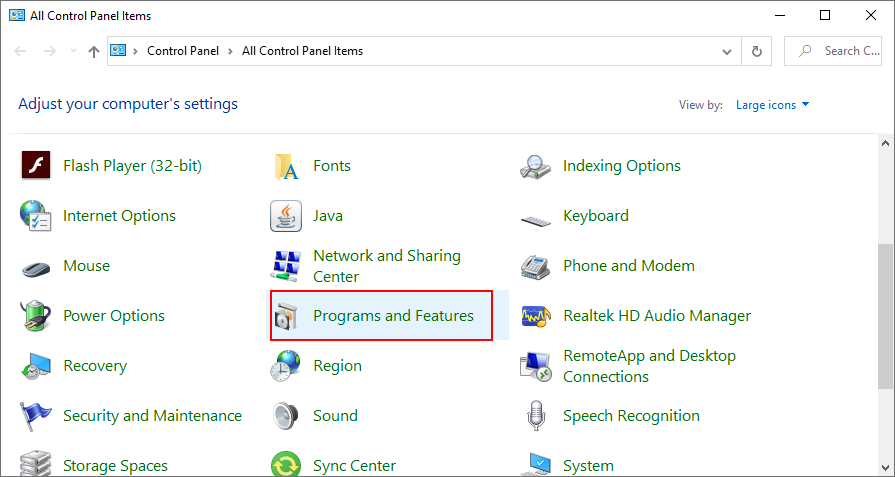
- Go to Programs and Features
![Windows 10 shows how to access Programs and Features from Control Panel]()
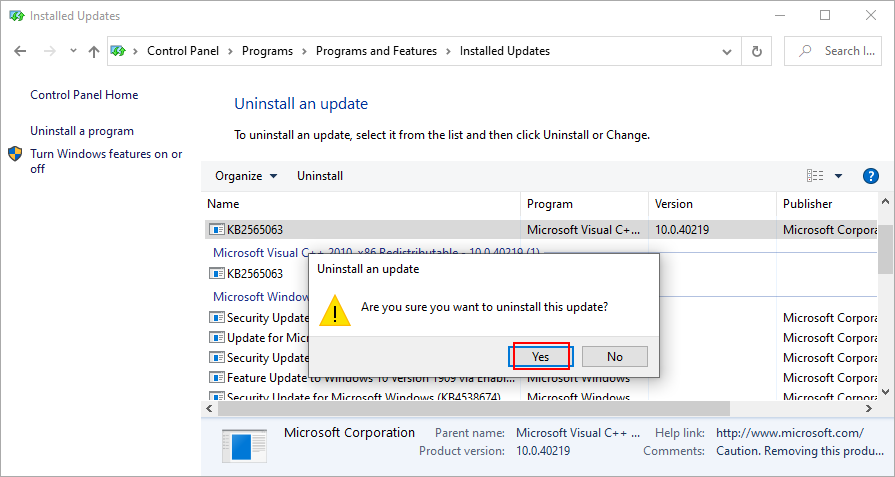
- Click View installed updates
- Click the Installed On column to sort the updates by date (newest first)
- Double-click the first update displayed and click Yes to confirm uninstall
![Windows 10 shows how to confirm Windows updates removal]()
- Reboot your PC and check the white screen error
6. Check the system memory
If the White Screen of Death error is persistent, you should check your RAM card and fix any errors. No special third-party tools are required since you can count on Windows Memory Diagnostic, a built-in application.
How to use Windows Memory Diagnostic:
- Save all projects you’re working on and exit all programs
- Click the Start button, type Windows Memory Diagnostic, and open this app
- Click Restart now and check for problems (recommended)
- During reboot, Windows will check and repair any RAM errors
- Once the task is complete and Windows boots, check for any additional white screen issues
Advanced users looking for a second opinion can take MemTest86 for a spin.
7. Add more disk space or remove files
WSOD can be caused by insufficient disk space on the primary partition where your operating system is installed (usually C:). If there’s not enough disk space available, it prevents Windows from running its critical processes, performing updates, and carrying out other essential tasks.
However, you can take care of this problem by adding more disk space. To do this, you can use the built-in Disk Management tool to shrink a large partition and then use that free disk space to extend the C: volume.
How to use Disk Management:
- Press Win key + R, type diskmgmt.msc, and hit the Enter key
- Choose a large partition besides C: (or where you keep Windows installed), right-click it, and select Shrink Volume from the menu
- Specify the new volume size after subtracting a piece large enough to set aside for C:
- Click Shrink and follow the on-screen instructions
- Right-click the OS drive and pick Extend Volume
- Write the new volume size by adding the amount of free space
- Finish the task, restart your PC, and check for white screen errors
Another sure way to free up disk space is by getting rid of old files and large applications you don’t use anymore. For instance, when it comes to personal photographs and homemade videos that take up a significant amount of disk space, you can copy them to an external hard drive, upload them to a cloud account, or burn them to data discs.
Furthermore, it’s essential to delete junk files that don’t do anything except add clutter to your hard disk. To make this happen, you can turn to a third-party disk cleaning tool such as CCleaner. But if you don’t want to install any more applications, you can use the Windows Disk Cleanup tool.
How to use Windows Disk Cleanup:
- Sign in to Windows 10 with the administrator account
- Check the Downloads and Recycle Bin locations to make sure there aren’t files you wish to save or restore
- Press Win key + R, type control panel, and press Enter
- Go to Administrative Tools
- Open Disk Cleanup
- Select the C: drive or where you have Windows installed, and click OK
- Select all items from the list and click Clean up system files
- After the file scan, select everything again and click OK
- Reboot your PC and check for white screen errors
8. Fix hard disk and system errors
Bad sectors and damaged system files can trigger the White Screen of Death error message due to hard drive and OS data corruption. However, you can fix these problems without having to turn to outside help, thanks to some Windows integrated tools: CHKDSK (Check Disk), SFC (System File Checker) and DISM (Deployment Image Servicing and Management).
You can run and control these utilities from the command-line environment, so you don’t need to install any special software. No previous experience is required with CMD, as long as you follow the instructions below.
How to use CHDKSK to fix disk errors:
- Press Win key + R, type cmd, and press Ctrl + Shift + Enter to launch Command Prompt with administrator rights
- Type
chkdsk c: /fand press Enter if Windows is installed on the C: partition. Otherwise, replacec:with the correct drive letter - When CHKDSK asks you to schedule the checkup at the next system boot, type y and press Enter
- Restart your PC and wait until CHKDSK does its job
If you still receive the White Screen of Death after using CHKDSK, you should turn to SFC to fix corrupt system files.
How to use SFC:
- Open Command Prompt in an elevated window (press Win key + R, type cmd, press Ctrl + Shift + Enter)
- Run
sfc /scannowand wait - Once the task is complete, exit CMD and restart your PC
If SFC doesn’t fix the white screen error, you can use DISM to verify the component store of the Windows image.
How to use DISM:
- Launch Command Prompt with admin rights
- Type
DISM /online /cleanup-image /scanhealthand press Enter - If the search reports any issues, fix them using
DISM /online /cleanup-image /restorehealth - Restart your machine and run CMD as admin again
- Type
sfc /scannowand press Enter - Reboot your PC and check for WSOD errors
9. Update BIOS to the latest version
If your BIOS is outdated, it might cause computer performance issues. Left unchecked, these problems can lead to white screen and blue screen errors. The easiest way to fix this problem is by updating BIOS to the newest edition.
- Press the Win key, type System Information, and launch this app
- Go to the System Summary area and write your BIOS Version/Date as well as BaseBoard Manufacturer
- Visit the official website and look for a newer BIOS version
- Download the BIOS archive and unzip the file to a portable storage unit
- Reboot your PC and press the key displayed on the screen to access BIOS
- Create a backup of the current BIOS version and save it to your USB flash drive
- Proceed with the BIOS update and follow the steps shown on the screen
- The update could take a while. Make sure to not turn off or restart your PC during this time
- After Windows boots, check for white screen errors
10. Restore BIOS to factory settings
You can control many computer settings from BIOS, such as overclocking and caching. However, if you don’t have enough experience with BIOS to know exactly what you’re doing, you could end up doing more harm than good.
In time, this can lead to White Screen of Death errors on unsuspecting computers. To handle this issue, all you have to do is reset the BIOS configuration to factory settings.
How to reset BIOS to default:
- Restart the PC and press the key displayed on the screen to enter BIOS mode
- Locate the section with advanced settings
- Turn on the setting that resets configuration data to default
- Save the current settings and exit
- After Windows boots, check for white screen issues
11. Run a malware scan
If your computer was severely hit by a malware attack, critical system files could have been crippled, leading to hardware failure and White Screen of Death errors. You can easily tell that something’s wrong when you can’t access system tools anymore, like Task Manager, Registry Editor, or even Command Prompt.
To fix this problem, you can use your antimalware application to find and remove any infected files from your computer. If you don’t have a third-party security solution installed, it means that Windows Defender is in charge of everything.
How to use Windows Defender:
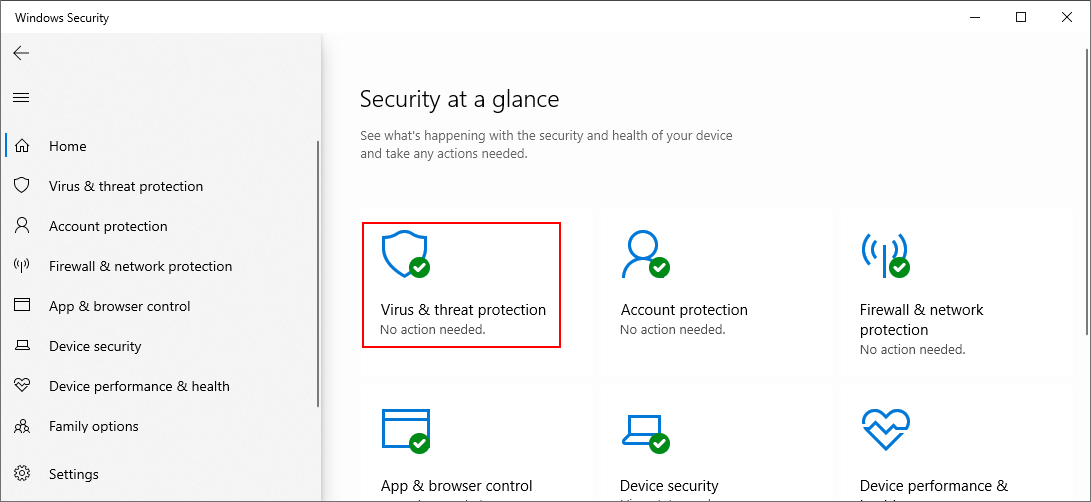
- Press the Windows key, type Windows Security, and launch this app
- Select Virus & threat protection
![Windows 10 shows how to select Virus and Threat Protection]()
- Click Scan options
- Select Quick scan and click Scan now
- If it doesn’t find anything suspicious, run another scan using the Windows Defender Offline scan option
- Restart your PC and check for white screen errors
12. Remove suspicious applications
If your computer starting having trouble with white screen errors after installing a new piece of software, then you should shift your attention to that program. Perhaps it made some significant changes to the Windows registry or mixed its DLL files with system libraries.
Or maybe it doesn’t fully support Windows 10, causing compatibility issues instead. To fix this problem, you can uninstall recent and suspicious applications, such as free antivirus or VPN tools for Windows.
How to uninstall recent programs:
- Right-click the Start button and go to Apps and Features
- Set Sort by to Install date
- Check on the first app in the list, click Uninstall, and proceed with the on-screen steps
- Restart your computer to see if you still get white screen issues
Unfortunately, the Windows built-in uninstaller isn’t capable of fully removing a program from the computer. If you want clean uninstall jobs, you can check out third-party app uninstallers. This type of software not only uninstalls tools but also removes any leftover files and registry keys.
13. Use System Restore mode
You can count on Recovery mode to revert Windows 10 to a safe checkpoint that was created before your computer started experiencing the White Screen of Death. Before proceeding with this solution, though, know that all recently installed applications will no longer exist on your PC.
How to use Recovery:
- Sign in to Windows 10 with the admin role
- Press Win key + R, type control panel, and hit Enter
- Go to Recovery
- Click Open System Restore
- Select a checkpoint and click Next
- Follow the instructions and restart your PC
- If system recovery was successful, check for WSOD errors
A summary of White Screen of Death fixes
To recap, white screen issues are not that uncommon. They are typically triggered by hardware failure and can also be caused by various software conflicts.
You can try to fix WSOD errors by running a clean boot, updating your graphics driver, unplugging your hardware components, running Windows Update, or uninstalling recent Windows updates.
It’s also a good idea to inspect the RAM card, add more disk space or remove files to free up disk space, as well as fix hard disk and system errors.
Moreover, you can update BIOS to the latest version, reset BIOS to default, run a malware scan, uninstall recent programs, and use Recovery mode.
Which solution worked for you? Share your experience with the White Screen of Death error by leaving a comment in the section below.


