Quickly Switch Power Plans In Windows 10 With Command Line Shortcuts
Windows power plans allow users to create different profiles that can consume as much or as little battery/power as is suitable at a given time. When on battery, users opt for lower display brightness and a shorter time out period for the system to go to sleep. Likewise you can configure a power plan to up the brightness on your display and keep your system awake longer if you’re connected to a power outlet. These two power plans trigger automatically when they detect a change in the power source but to switch to a different power plan, one that isn’t triggered by you plugging your laptop in/out, you have to go through the whole ‘Power options’ window. You can instead create command line shortcuts which when executed will switch to the power plan they were created for. Here’s how.
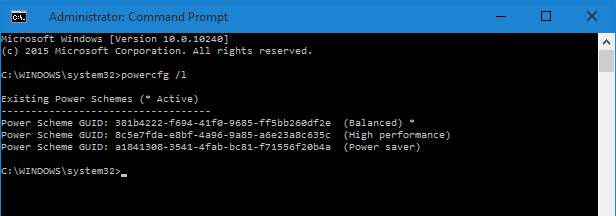
Before you create the shortcut, you need to know the GUID that is assigned to a power plan. Each power plan has its own GUID and you will need it to create the shortcut. Open a Command Prompt window and type in the following command. You will get a list of all configured power plans and their respective GUIDs.
powercfg /l
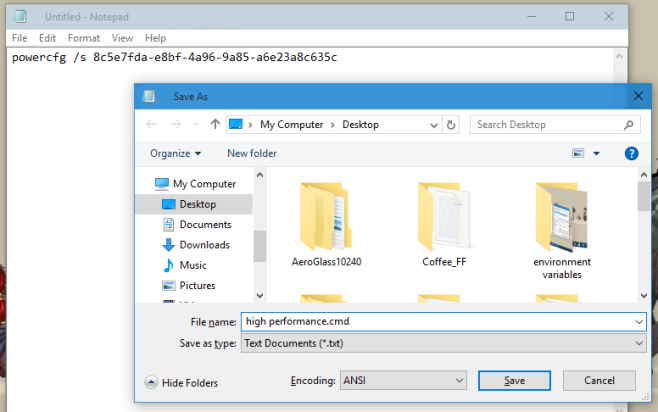
Note the GUID of the power plan you want to create the shortcut for. Next, open a text file (use notepad) and type in the following;
powercfg /s [THe GUID of the power plan]
and save the file with a CMD extension. You will want to name it the same as the power plan it is meant to switch you to so that you can identify the file later on (see screenshot below).
That’s about it. Every time you run the file, it will switch to the power plan it corresponds to.


