PngOptimizer: Drag & Drop To Batch-Compress PNG, GIF, BMP & TGA Files
PNG (Portable Network Graphics), is hands down one of the most useful image formats to share high quality screenshots and photos with others. Along with lossless data compression, it supports image transparency that helps graphic designers easily add image layers to the photo, but when it comes to uploading PNG files on image sharing websites, let’s say Imgur, one thing that bugs most people is to find a perfect balance between quality and size of the image. Although, JPEG format perfectly does the job in day to day image editing and image sharing (as the difference between JPEG and PNG quality is barely visible to the naked eye), people simply prefer to keep original copies of images in PNG format. Today, we discovered a very neat application called PngOptimizer that may help both graphic artists and photo hobbyists alike. This open-source application is designed to compress PNG files by cleaning useless pixel information from images, thus reducing their file size. In addition, you can copy screenshots to the application and quickly compress them. It also lets you work with other image formats, for instance, GIF, BMP and TGA files, and comes packed with various settings and options to tweak the compression process. Details to follow after the jump.
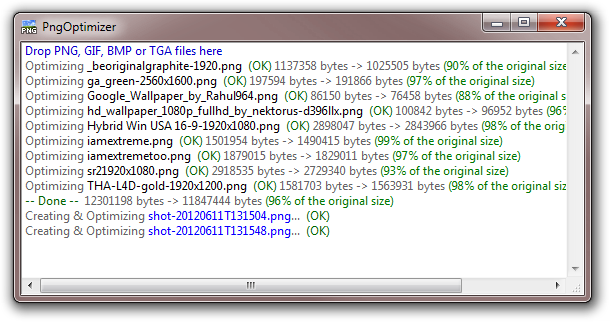
To get started, all you need is to drag your images over the application and leave the rest of the job to the application. It automatically optimizes and compresses your image files and then saves the compressed files in the same directory, while backing up the original file. From the right-click context menu, you may click PNG Options to open the configuration console.

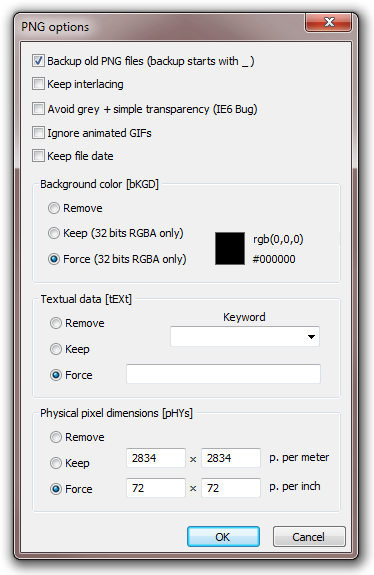
The Options dialog includes various settings, some of which are generic while others are related to file compression itself. You can toggle options like Backup old PNG files, Keep interlacing, Avoid grey + simple transparency (IE6 Bug), Ignore animated GIF and Keep file date. Additionally, you can Remove, Keep or Force Background color and Textual data of the image file, and resize image resolution under Physical pixel dimensions section.

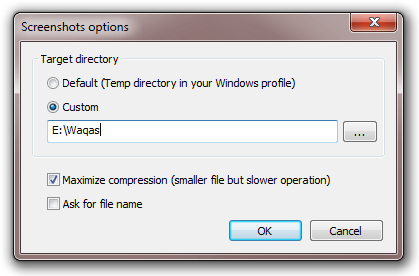
As stated earlier, it’s the ability to paste the clipboard image into the application. You can do so using the right-click context menu (or Ctrl + V hotkey). To set a few screenshot related settings, go to Screenshots options from where you can select output directory for your screenshots and enable Maximize compression and Ask for file name options.

PngOptimizer is a portable application and works on Windows XP, Windows Vista, Windows 7 and Windows 8. Testing was carried out on Windows 7, 64-bit OS edition.

That’s what i was looking in order to tweak performance of my blog 😉