Move An Installed App To A Different Drive In Windows 10
The Windows Store, by default installs apps to your C drive on Windows 10. If you have a small drive, or you would like to keep as much space free in your C drive as possible, you might not want apps installed there. If the app in question is a Metro app installed from the Windows Store, you can easily move it to a different drive without having to go through the whole uninstall and reinstall process with a built-in Windows feature. Here’s how.
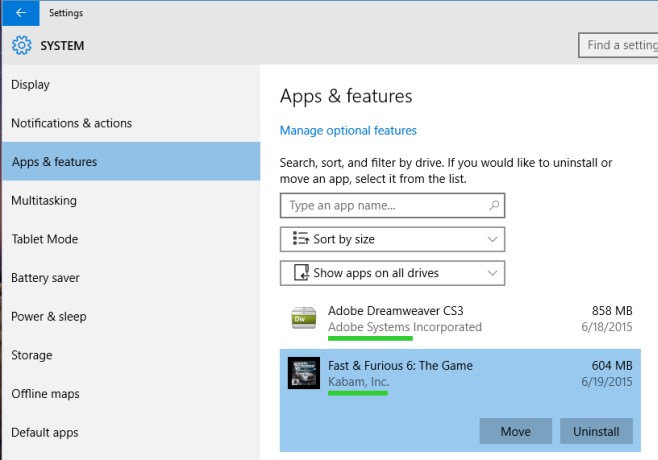
Open the Settings app. As of Build 10130, the settings can be accessed from the much improved Start Menu. Go to Settings>System and click the App & features tab. Wait for the list of installed apps to populate. Once the list has loaded, click on a Metro app and you will see two buttons; Move and Uninstall.
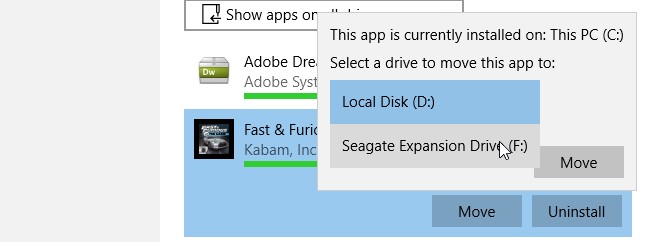
Click the Move button and a pop-up window will appear telling you which drive the app is currently installed in. From the drop-down on the pop-up, select the drive you want to move the app to. It works just as well for a drive partition as it does for an external hard drive. Once you’ve selected the drive, click Move and the app will be relocated.
Relocation might take time and if you moved an app that deals with files, it may forget which files you recently opened, or the last folder/directory you accessed. Other than that, there are no other side-effects of moving apps from one drive to another. The feature makes a very strong case to install apps from the Windows store since it gives you the option to move them around easily.


If that menu will also contain an option to move to the SD card, this is going to be perfect.
@ addictivetips
>/