How To Setup Personal FTP Server Using FileZilla [Step-By-Step Guide]
FTP clients like FileZilla, Cyberduck, WinSCP etc. are widely used to access, download and upload files to web server by creating an FTP connection. The FTP connection uses a special network protocol namely File Transfer Protocol to not only send and receive data requests, but also transport data by making direct connection with target host. Unlike HTTP, which is specifically designed to transport hyper-text over a TCP connection, FTP connection makes sure that server will respond to request as soon as it receives one from source host. Not only does it provide quick file transfer facility, it also brings bulk file handling capability in terms of both downloading and uploading data, and file transfer resume feature. Today, we bring you a step-by-step guide on setting up your personal FTP server, so that you can access it from anywhere via FTP client, and allow others to download and upload to your server.
The FTP Server creation and configuration process is a bit hard, but using FileZilla FTP Server, you can virtually turn your local PC into an FTP server, and then use it for establishing connections with client PCs. For those who aren’t familiar with FileZilla FTP Server, it’s an open source application for Windows, providing FTP and FTP over SSL/TLS secured connection to the server. Using the SSL connection, you can encrypt the communication between source and target hosts in order to prevent the data transfer processes from prying eyes. Moreover, it allows users to set the server address and port (which is to be used for listening incoming connections). You can also choose to password-protect the Server interface to prevent unauthorized usage and modifications from any type of external source.

FileZilla Server Interface provides not only the convenience of creating and managing users, it also lets you set the read/write access parameters for each user, so that clients can’t exploit the data which is being shared. Apart from users, you can create Groups, which help you combine users into different categories. The Groups feature brings the ease of setting data read/write permissions and options including bypass user limit of server, max connection count, enable/disable SSL for user login, max data transfer speed limit etc, over all the users that belong to the group. This makes it easy to configure and define access parameters for users of same type. For instance, you can create a work group for office client PCs. Once group is created, you can add as many client PCs as you want to the group, without having to manually specify the shared locations and define user login settings.
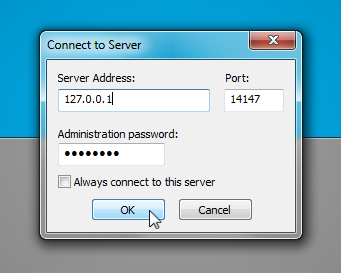
Setting up Filezilla FTP Server is easy. Once installed, launch the Server Interface and specify localhost (127.0.0.1) as server address, and then enter administration password. You can also the change default port 14147, but we don’t recommend changing it unless it’s being used by other application/service for listening connections. Once done, click OK to open FileZilla FTP Server main screen.
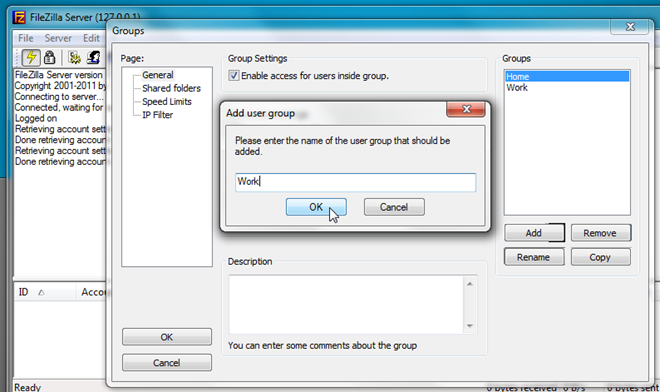
As mentioned earlier, Groups will help you gain control of all users belonging to same category. We will first create groups and then add users to each group. To create Groups, click Edit menu and then select Groups.

It will open Groups dialog for creating and configuring Groups. First off, click Add, enter the name of the group, and then enable access for users inside group from Group Settings section. Now, you have to specify the folders, which are to be shared with clients; move to Shared folders from left sidebar, and then add folders you want to share with them. There is, apparently, no limit defined on number of groups that can be added. Once you’ve defined the groups, close the Groups dialog to add user(s) to each group.
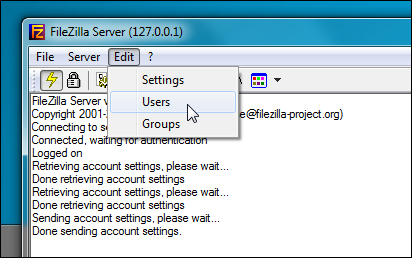
Open Users from Edit menu.
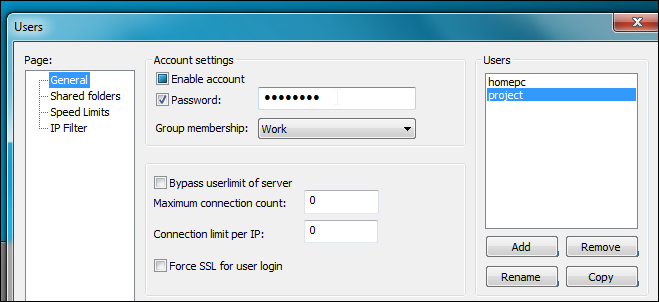
Just like Groups, you can create Users, and then set their access and read/write parameters. Click Add from Users section, enter username and choose group from drop-down menu. Once done, click OK to add user to list. Likewise, you can create more users and assign them groups as per you requirements.
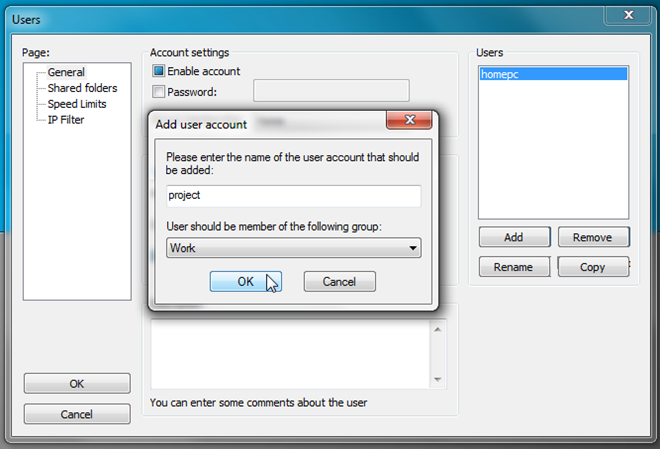
By default, it creates username with blank password, but you can enable Password option in Account settings section to password-protect user access. Once user is created, enable the Password option and then enter the password. Here, you can also change Group membership, enable Bypass userlimit of server and Force SSL for user login options, and define max connection count and connection limit per IP address.
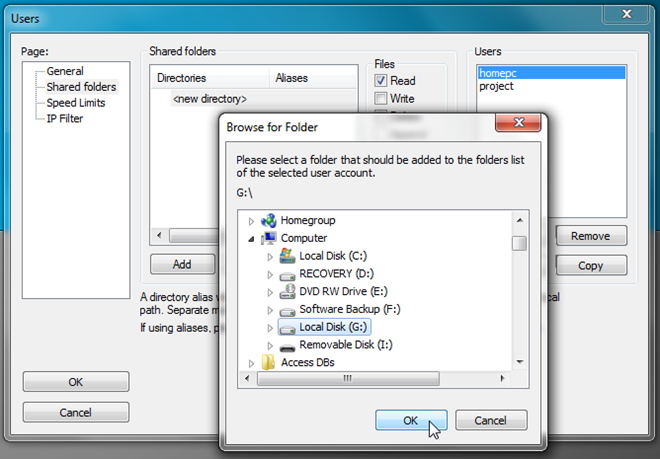
If you didn’t specify shared folders while creating Groups, you can manually add folders that can be accessed by users; just head over to Shared folders, and click Add from Shared folders section to specify the drives/folders.
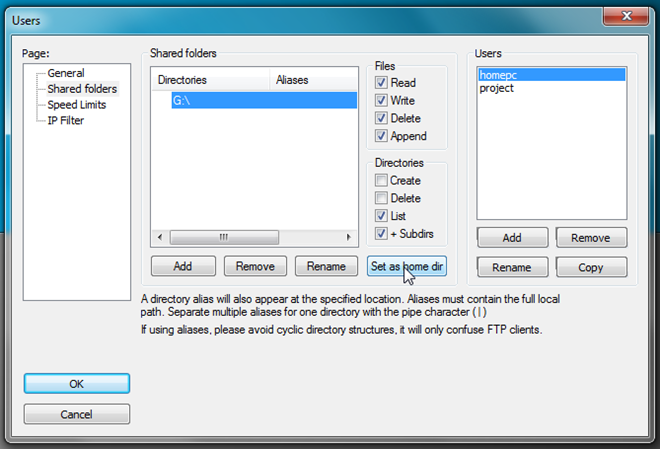
The Files and Directories sections let you define file and folder access parameters including read, write, append, list and delete. By default, it grants access to all subdirectories present within the specified shared location. However, you can disable +Subdirs option to revoke recursive folders access. The Shared Limits tab allows setting maximum download and upload speed limit for each user. It also lets you define download and upload speed limit rule to limit the data transfer speed at specified day and time. From IP filter tab, you can forcibly exclude specified IP addresses.
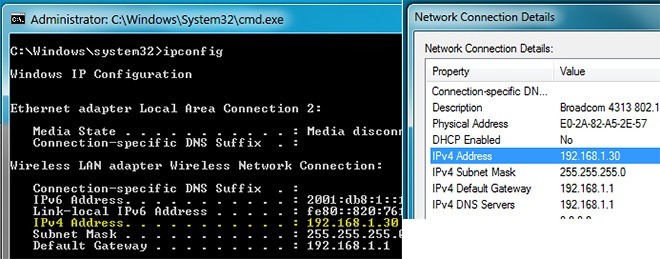
Once Users settings are in place, move to client system to establish connection with your FTP server. If you want to transfer data over local network, you can use local IP of the server PC to establish connection with it from the client PC. In order to find server’s local IP, run ipconfig command in Windows CMD utility or open Network Connection Details (accessible from Network and Sharing Center) to view IPv4 address.
Using FTP client, you can connect with FTP server to download and upload data. For FileZilla FTP client, open Site Manager from File menu, and enter the required information. If the client PC is connected on same network, enter local IP of server PC in Host field to connect with server, and then choose Normal from Logon Type. Now, enter the username in User, and password (if enabled) in Password field.
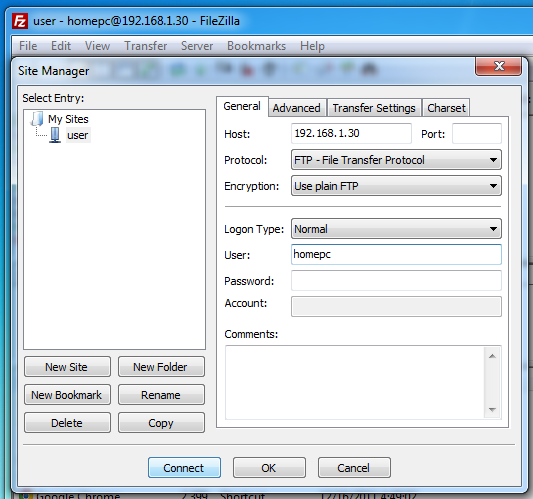
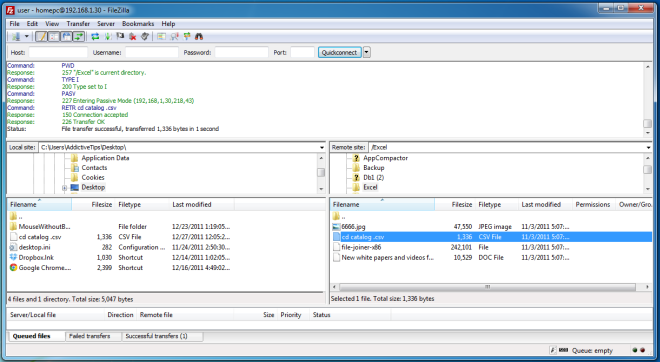
Once done, click Connect to access the specified shared folder(s).
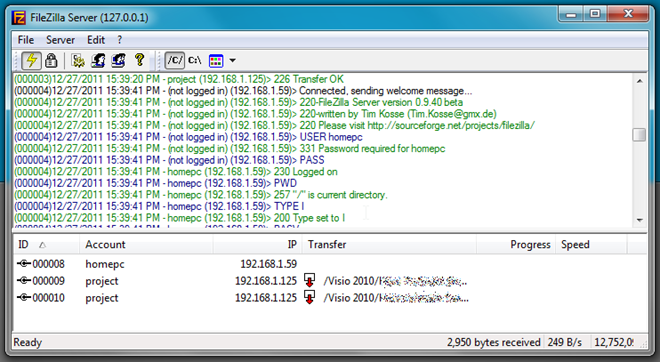
FileZilla FTP Server maintains a log of all data send and receive requests. You can view the log file content on Server Interface. Underneath the main window, it shows all the connected clients, with their usernames, IP addresses, files being transferred and data transfer speed.
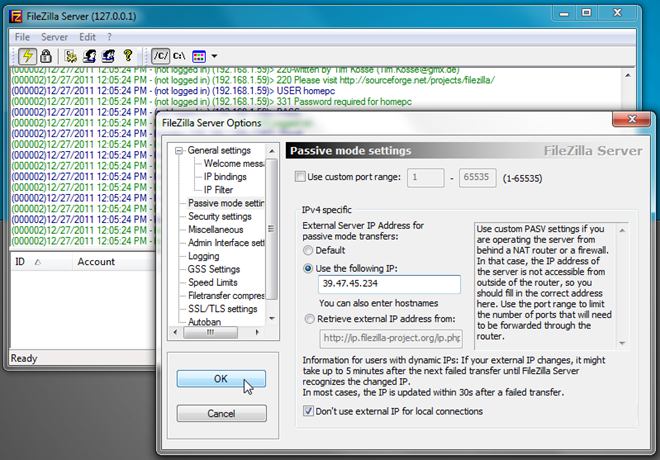
You can share server PC’s external IP address with those clients who are not on the same network. To specify external IP address for passive mode transfers, open FileZilla Server Options from toolbar, and move to Passive mode settings tab. Now, enable Use the following IP option, and then enter your external IP address. You can also choose to retrieve external IP address from ip.filezilla-project.org/ip.php, or any other service of your choice.
Once done, just share external IP address of server PC with clients, so they can connect with server and access shared folders. If it fails to connect with server over internet, you may need to add your FTP application to Firewall exclusion list to allow connections from outside the local network. In case your router is restricting access to server, you need to manually open a port to bypass router’s build-in firewall.
FileZilla FTP Server provides an easy way to transfer data to home PCs as well as to access your PC from remote locations. There could be endless scenarios where FTP Server setup can be used. If you have multiple PCs in your home, you can set one as FTP server to create regular backups of other systems. Since FileZilla FTP Server accepts FTP connection over internet, all you need is an FTP client to communicate with your server from anywhere. Unlike traditional file sharing, where read and write access to shared data has to be manually configured, you can use FileZilla Groups and Users features to password-protect user access, specify the shared locations, and read/write access parameters to secure your system from external data theft attacks.

Got to be a better way. My wireless laptop uses my networked hard drive no problem. Filezilla goes belly up and says the only game in town in the C: drive on my laptop. Seriously?
I can connect using Filezilla client , as soon as I disconnect client the connection is lost.
How can i keep always connect, mine it disconnects after a 5 minutes
Ah! but when I change the Cryptographic to: Use “Use simple FTP” (Insecure), it works
Good day to all! I’m having hard time to get connected to my Host using Filezilla Client. It say it can not connect to the server while waiting to get a Welcome message. Any idea of what could be the problem?
Thanks
Excellent!!
I get the message:
“You appear to be behind a NAT router. Please configure the passive mode settings and forward a range of ports in your router.
Warning: FTP over TLS is not enabled, users cannot securely log in.”
I don’t have access to the NAT router. Any other way around this?
FIX: You appear to be behind a NAT router. Please configure the passive mode settings and forward a range of ports in your router.
1. Goto setting
2. click on tab passive mode setting
3. Checklist use custom port range, input 50000 – 51000
4. Click use the following IP and input your server IP
5. Checklist Don’t use external IP for local connections
FIX: Warning: FTP over TLS is not enabled, users cannot securely log in.
1. Checklist enable FTP over TLS support
2. Checklist disallow plain unencrypted
3. If you don’t have certificate, just click generate and create your own certificate
Thank you! You are absolutely amazing, this worked!
Then can I access this FTP server remotely ?
Like from my office can I access my home PC ?
its really works…
Great article…
Thanx once again……………………….
Worked for me, thanks!
i need one that runs in Yosemite. Will this? Tell me about it.
Very good information. thanks
Please help
After installing the server,for me to get my IP for the client to connect,i couldn’t.
Does this work on windows8
Yes, it does. Just run the Server app in compatibility mode for any previous client version of Windows, XP, VIsta or 7. Pick your favorite! Also make sure that default port is free and not being used by any other app before assigning it to server.
Many Thanks , it help me on great and simple way.
thank you very much…………..
Thank you. It works and solved my problem. 🙂
I tried other tutorials but this one actually work!!! Thanks
this doesn’t work i used and tested all the software you get to create a ftp and still no luck.change all the settings on m router still nothing
this doesn’t work i used and tested all the software you get to create a ftp and still no luck.change all the settings on m router still nothing
Samba isn’t bad…better than filezilla. I prefer Maytech though. I use a PC.
I have tried to setup this up but the stupid router that Fios gave me blocks port 20 21 for FTP, the only way to set up something like this is to use a bridge and or Mo-ca connection. Has anyone been able to successfully do this using Verizon Fios?
thankzzzzz
Wanted to setup FTP server for a while but didn’t know how to. Have tried IIS Manager in windows 7 but didn’t work so I gave up. Will give this a try when I have time. Thanks for the tutorial.
I never thought of doing it this way. Still, I somehow prefer Samba as it allows my Mac to easily connect to my Windows machine. I’lll be sure to try this out though.
Its Awesome