How To Set WiFi Connection Order In Windows 10
Most offices have more than one WiFi connection available. Multiple connections serve either as a backup in case one of them fails, or they are meant to distribute the load from many users across multiple connections. That said, Windows 10 doesn’t consider which of the available WiFi connections has stronger range before connecting to one. Instead, it gives priority to connections based on which one was added first, and which one was added later. That is the default behavior and it can be problematic especially if you often have to manually change which WiFi connection your computer is connected. Here’s how you can change the priority of a WiFi connection in Windows 10.
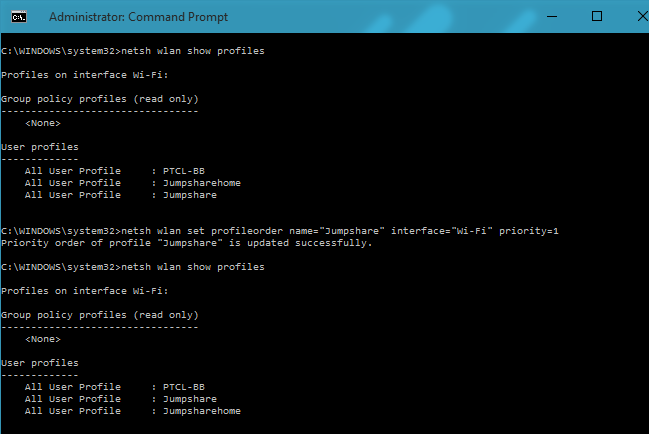
In order to change the priority of a WiFi connection, you must have administrative privileges on your system. Run Command Prompt as an administrator and type the following command;
netsh wlan show profiles
This will list all WiFi connections currently saved in Windows 10. Next, enter the following command swapping out ‘connectionname’ with the name of the connection you want to change the order of. Pick the name from the list you got in the previous step. The number against priority should be updated to reflect the order you want to give the connection.
netsh wlan set profileorder name="connectionname" interface="Wi-Fi" priority=1
The connections it seems are sorted by priority and location. For locations that have only one WiFi connection saved, the order of said connection cannot be changed. If however, you have multiple connections saved for a location, you can reorder them with this command. Run the ‘netsh wlan show profiles’ command again and you will see the new order of the connections.


Hi for some reason it comes up with this
The wireless autoconfig service (wlansvc) is not running
turn it on
open run on windows
services.msc
run the above start the wlan by right ckicking on it and press start