How to set up MongoDB on Windows Server
MongoDB is one of the most popular “NoSQL” database management systems out there. It is designed to help users store and access data efficiently, and fast. In this guide, we’ll show you how you can get MongoDB working on your Windows Server.

Installing Chocolatey on Windows Server
Chocolatey is a package manager for Windows. If you don’t know what a package manager is, it’s something Linux distributions use to make installing software easier by getting it from central repositories, rather than random websites.
Installing Chocolatey is a great idea for any Windows Server user, and it will make deploying programs like MongoDB easier. To set up the Chocolatey on your Windows Server, start by launching a PowerShell window.
Once the PowerShell window is open, you need to execute the installation command. This command will download Chocolatey to your Windows Server, and it’ll do some things in the background to make the software available to you.
Set-ExecutionPolicy Bypass -Scope Process -Force; [System.Net.ServicePointManager]::SecurityProtocol = [System.Net.ServicePointManager]::SecurityProtocol -bor 3072; iex ((New-Object System.Net.WebClient).DownloadString('https://community.chocolatey.org/install.ps1'))
When the command finishes executing, you’ll have Chocolatey installed and ready to use. Here’s how you can use it on your system.
Using Chocolatey
To search for software available in Chocolatey, you can use the choco search command. Simply enter the command, followed by a query. After you do this, Chocolatey will provide search results you can look through.
choco search <query>
To install software on your Windows system, you can use the choco install command, followed by the name of a package.
choco install <package>
You can also uninstall packages with the choco uninstall command in roughly the same way.
choco uninstall <package>
Lastly, if you wish to upgrade your software from Choco, you can do the choco upgrade command.
choco upgrade
How to install MongoDB on Windows Server
If you wish to install MongoDB on your Windows Server, start by launching a PowerShell window on the Windows Server desktop. You can open up a PowerShell window by searching for “PowerShell” in the Windows Start Menu.
Once you’ve opened up the PowerShell window, use the choco install command and install the “mongodb” package. Chocolatey will download the package directly from its repositories via the internet, and start the installation process. This process may take some time to complete, so be patient.
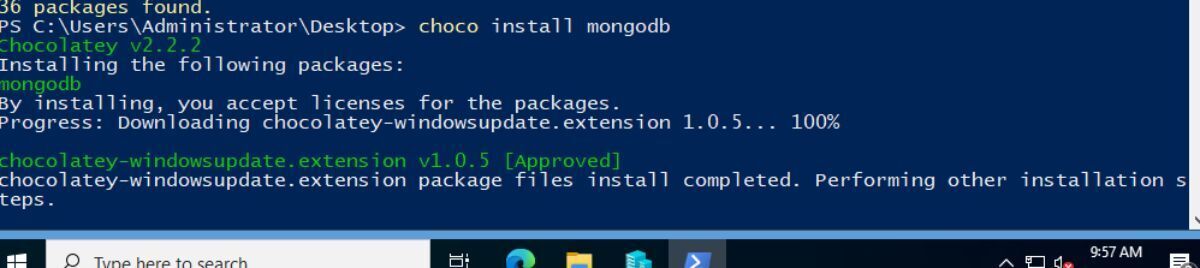
choco install mongodb
With the command above run, you will see a message. This message asks you if you want to run the script. Press Y to confirm you wish to run the script. Alternatively, press A to confirm you always want to run it.
Once MongoDB is installed, you can start up the MongoDB server at any time by executing the mongod command.
mongod
How to create a MongoDB configuration file
If you plan to use MongoDB regularly on your Windows Server, it is a very good idea to create a configuration file. In this guide, we’ll show you a basic example configuration file. This basic file has a lot of useful features that users new to MongoDB will find useful.
To start, you must create the file. Open up Notepad in Windows Server, and save a new file with the filename mongod.cfg. Save this file on your Windows Server in a location of your choosing.
Once you’ve saved the file, paste the following code into the Notepad. This configuration will define where to save the MongoDB logs, enable journaling, set the MongoDB port, etc.
# mongod.cfg

# Where to store the data.
dbpath=C:\data\db

# Where to store the log.
logpath=C:\data\log\mongod.log

# Enable journaling.
journal=true

# Port to listen on.
port=27017

# Verbosity of log messages (0 = quiet, 5 = verbose).
verbosity=2
After adding the new code to the configuration file, save it once again. Then, open up a PowerShell window and start-up MongoDB with your configuration file using the following command.
mongod --config "C:\path\to\mongod.cfg"
Now that Mongo is loaded with your config, open up another PowerShell window, and enter the MongoDB database using the mongo command.
mongo
Once you’ve connected to MongoDB, it is ready to use on Windows Server for all of your database needs. For more information on some of the more advanced functions and features that MongoDB has to offer, check out the official MongoDB documentation.
