How to Screenshot on Android Devices
A screenshot is exactly what it sounds like, a captured image of whatever is on your phone or tablet screen. They are usually saved to your device’s photo gallery so you can treat them like any other picture you have stored away. If you want to know how screenshots on Android devices work, there may be a little variation depending on your specific model. We’ll cover all the most common devices and methods, including step-by-step instructions.
Quick Overview
Here’s a quick summary of how screenshots on Android devices can be taken:
- Pressing the Volume Down and Power buttons at once
- Taking a scrolling screenshot with the Capture More option
- Giving Google Assistant vocal instructions
- Using the S pen button
- Using the accessibility menu
- Using Google Chrome features
- Using scroll capture to take screenshots of longer images or files
- Using specific gestures to take a screenshots
How to Take a Screenshot on a Samsung
There are multiple ways to take a screenshot on Android Samsung devices. Here are the methods and steps for each:
Power And Volume Buttons
The power button is usually on the right side of the phone while the volume is usually on the left. You specifically want the volume down button, so keep that in mind. To take the screenshot just press the Volume down + Power buttons simultaneously. It should instantly take the picture and send it to your photo gallery.
If your Galaxy phone has an actual Home button, you can push the Home button + Power button at the same time to take a screenshot. It all depends on your model.
S Pen Method
Certain Samsung phones may have an Surface pen (read our article on how to fix a Surface Pen not writing ) that fits inside the phone itself, acting as a stylus. It has other useful features, including the ability to take a screenshot. Some S pens do this by simply holding the button on the pen down for 3 seconds. Nice and easy.
Other models require a bit of setup. Here’s how to set up the S Pen Method to screenshot on an Android device:
- Remove the S pen from the phone
- The Air Command menu will either open automatically as you remove the pen, or you can activate it by hovering your S pen over your screen and tapping the pen icon

- From the now open menu, tap the settings gear icon on the bottom left of the screen
- This opens S pen settings
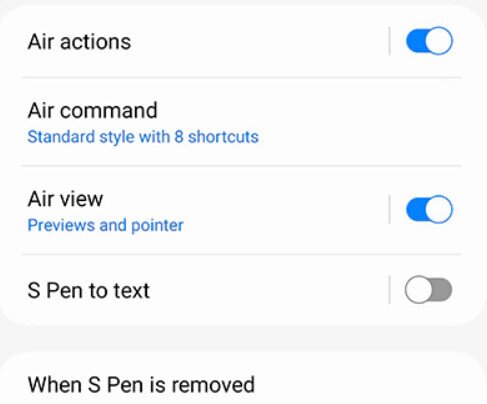
- Tap Air Actions
- Tap Press and hold the Pen option
- A new menu will appear with various Press and Hold Pen settings
- If you wish, you can choose features such as screen write, which allows you to use your S pen to write on screenshots you take
- Close S pen settings
- Now you can take screenshots with your S pen by holding the pen button. You can also make a scribbling motion, moving the pen downward as though you’re scribbling on an invisible piece of paper. This will take the screenshot. Another way is to simply hold the S pen button for 3 seconds to automatically take a screenshot.
- Tap the downward arrow button to save the screenshot
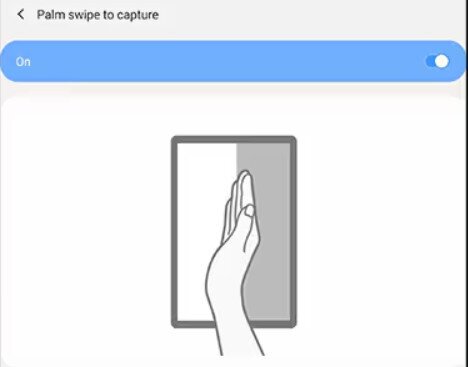
Palm swipe method
Not all Android devices support this feature, but most do. The Palm swipe method lets you use the edge of your hand to take a screenshot by dragging it across the screen. Here’s how:
- Go to Settings
- Scroll to find Palm swipe to capture
- Toggle this option on
- Use your palm to swipe and capture your screenshot

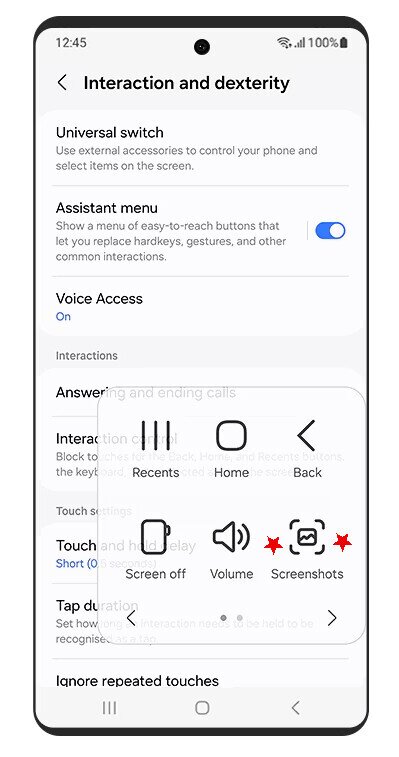
Using the accessibility menu
This allows you to take a screenshot using an accessibility button on your screen. Here’s how to activate:
- Open Settings
- Select Accessibility
- Installed apps
- Go to the Accessibility menu and turn on the shortcut
- Tap OK to accept permissions for it to control your phone
- Swipe in the Accessibility menu to find the Screenshot button

- Pressing it automatically takes a screenshot
How to Take a Scrolling Screenshot
Sometimes the image on your screen is longer than typical, such as a long list format. If you need to take a picture that requires you to scroll down to capture everything, there are a few ways to do this:
Scrolling screenshot via default settings
Most Androids from 12 and up have default scrolling screenshot capabilities. Here’s how:
- Go to the screen you want an image of
- Push the Volume down + Power buttons simultaneously
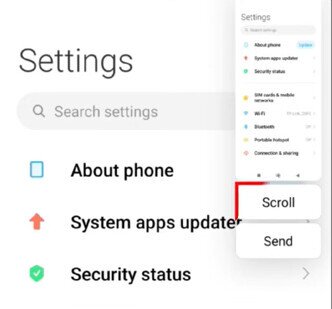
- Here’s where things can deviate depending on your model. If you see a “Capture more” option at the bottom of your screen, tap it and use crop guidelines to select the content you want to capture
- You may also see a Scroll option, in which case you tap that and the screen will automatically start to scroll down, capturing everything as it goes. Tap the screen when you want it to stop scrolling

- Save the image to your gallery
Use Google Chrome to take a scrolling screenshot
Chrome has a built-in way of taking screenshots so you can do this right from your phone. Here’s how:
- Open the Chrome browser and go to the site you want to screenshot
- Tap the three vertical dots on the upper right of your screen
- From there, a menu will appear. Tap Share
- At the bottom, you’ll see a Long Screenshot icon and tap it
- Manually select the areas you want captured by scrolling down
- Stop scrolling when you’re satisfied and tap the check mark icon.
- You’ll see a preview of the final screenshot and you can edit it with the options at the bottom of the screen
- Tap Next at the top right of the screen
- You can choose to share the screenshot, delete it, or save it to your device
Use the Scroll Capture Feature
This is commonly found on Galaxy phones and it lets you capture long content as a single image. First, you have to open the screen capture toolbar. Here’s how:
- Go to Settings
- Go to Advanced Features
- Tap Screenshots and Screen Recorder
- Toggle on “Show toolbar after capturing”


Now the scroll capture features will show immediately after taking a screenshot. Here’s how to use it:
- Take a screenshot with the Power + Volume down buttons pressed simultaneously
- Tap the scroll capture icon. It looks like this:

- The screen will automatically move down to capture the contents of the next screen
- You can long-press the scroll capture icon to capture the bottom of the screen
- To finish the capture, tap any part of the screen outside the toolbar area
Other methods
There are so many variations of Android devices. Some of these methods still may not work for your specific model. When in doubt, go to the manufacturer’s site for details. Many of them will have instructions or settings that can assist you.
How to Use Google Assistant to Take a Screenshot
Taking screenshots via voice command is easy with Google Assistant. Here’s how:
- Open the screen you would like to take a screenshot of
- Hold the Home button on your phone. This will start Google Assistant
- Tap the microphone image on your screen
- Say out loud, “Take a Screenshot.” It should automatically take the screenshot for you
How to Screenshot on an Android Tablet
Learning how to screenshot on Android tablets (see our list of best drawing tablets) is similar to using your smartphone. Here are some of the methods:
- Press the Volume down + Power buttons at once
- If you have a Home key, you can hold the Home + Power keys at the same time to screenshot
- Go to your tablet’s Settings and toggle on Palm swipe to capture. Now just swipe the edge of your hand across your tablet screen to automatically take a screenshot
- Use voice commands, such as “Hey Bixby, take a screenshot” or “Hey Google, take a screenshot”
- Other methods are identical or similar to the smartphone methods listed above
Frequently Asked Questions
Can you take a screenshot on Android without the screenshot button?
Yes! You can use a palm gesture, use a voice command with Google Assistant, or press the Volume Down and Power buttons simultaneously. Pixel 4a and similar models also let you use a quick tap to take a screenshot. Here’s how:
- Go to Settings
- System
- Gestures
- Quick Tap (enabling it)
- Choose “Take a Screenshot”
- Once you’re on the screen you want to capture, tap your finger twice on the back of your Pixel phone, aiming for the center
Where are screenshots saved on an Android?
Screenshots are saved in the same place as your other photos, such as your photo library or gallery app.
How do I screenshot on an Android Motorola?
If you’re wondering how screenshots on Android Motorola work, they are overall similar. You can still screenshot by holding the Power and Volume down buttons at the same time. You can also set up screenshots by gestures. Here’s how:
- Open your Moto application
- Go to Features
- Go to Moto Actions
- Choose Three finger screenshot and toggle it on
- From there, you use three fingers held on your screen to take a screenshot
Depending on your Model, another way is:
- Settings
- Buttons & gestures
- Quick gestures
- Three-finger screenshot