How To Reset Windows 7 To Original Factory Settings [Complete Guide]
We all know that the next version of Microsoft Windows OS – Windows 8 will have an immensely handy option to reset Windows to original state, also referred to as, restore system to original factory settings. Many Windows 7 users feel that it’d be better if there is any tool or system recovery utility which can effortlessly revert the system running Windows 7 back to its original state (provided you have not made a recovery disk). As far as Windows 7 is concerned, there are lot of methods available online, claiming to bring back the original settings of Windows 7 with default set of pre-installed programs, application compilers, and software packages, but sadly, all the contrived methods seem tiring and require a lot of effort, leaving user with no other option than to manually reset Windows to original settings.
In this post, we will look at to what extent a Windows 7 user can bring the original settings back to achieve super fast processing speed and best system performance. The process of resetting Windows 7 back to factory settings will ensure that Windows doesn’t contain any invalid Windows registry entries, superfluous Windows shell components and right-click context menu options, files and folders which were created by Windows for processing different kind of operations, bloated Temp folders, empty folders filled with junk files, application cache files, and other libraries which got registered in Windows System32 folder.
To start off with resetting Windows 7, first, make sure that you’ve backed up all the important data and portable applications with saved user preferences to external storage drive or to any other system.
Remove Third-party Applications and Programs
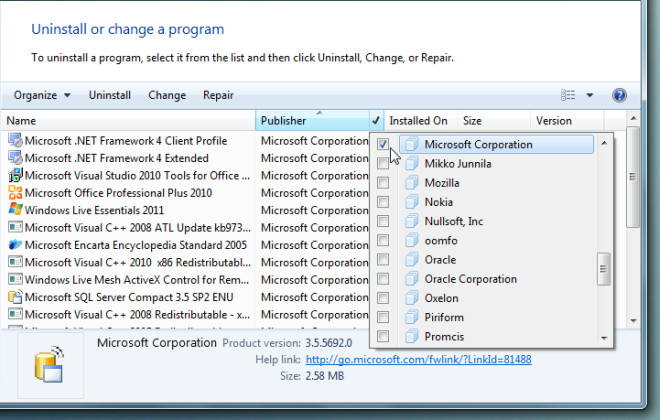
Obviously, the first step is to head over to Windows Control Panel for removing all the applications which you’ve installed since first run of Windows 7. To quickly open add/remove programs window, type Add or remove programs in Windows Start search and hit enter. Once the applications get listed, start removing all the applications, desktop utilities and software suite packages except those which come pre-installed with Windows 7. The fastest way to quickly remove all programs is to select them by Publisher name.
For example, the best way to quickly list down the all the items from Microsoft is to select Microsoft Corporation from Publisher column drop-down menu to view all the applications, utilities, compilers, library packs, codecs, etc from Microsoft. It doesn’t necessarily mean that all the applications from Microsoft come pre-installed in Windows 7, so remove only those applications which you’ve installed from Microsoft, like, MS Office, Silverlight, SQL Server, etc., along with all other third-party utilities.
Remove Application Cache, MRU List, And Clean & Fix Invalid Windows Registry Entries
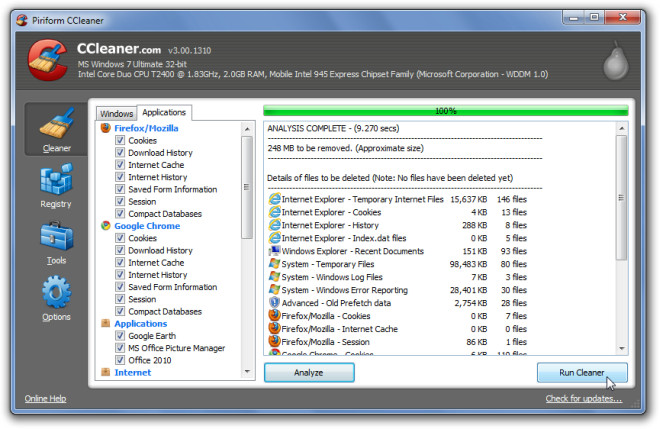
After you’ve uninstalled all the applications and utilities from Add/Remove list. It is advisable to reboot the system in order to completely remove applications cache files, registry entries, folders, and other temp files. To make sure that all the unnecessary application files / folders, cache are removed without leaving an invalid / unassociated registry key, you need to run a system cleaner. Piriform’s CCleaner is a widely known utility to unclutter the system in numerous situations and has various options to clean the junk off the system. It can clean MRU (Most Recently Used) lists, saved information in installed / previously installed applications, clear application cache, antivirus generated files, saved passwords and history, and so on. After analyzing the data which is to be removed, click Run Cleaner to perform the cleaning operation.
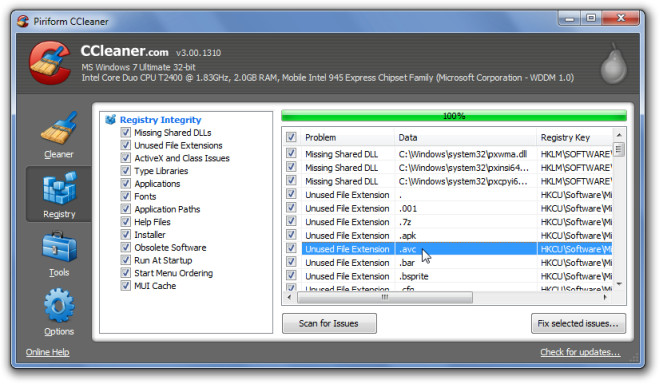
CCleaner, despite being efficient in cleaning various kinds of application data and info, also claims to be useful in analyzing the Windows Registry integrity and then cleaning invalid paths, application keys, Type libraries, MUI cache, un-bridged library keys, etc. To begin, Click Registry from left sidebar and select all the underlying options to thoroughly check Windows Registry integrity. Once it is finished with scanning registry issues, select all the items in main window, and click Fix selected issues to fix invalid registry entries.
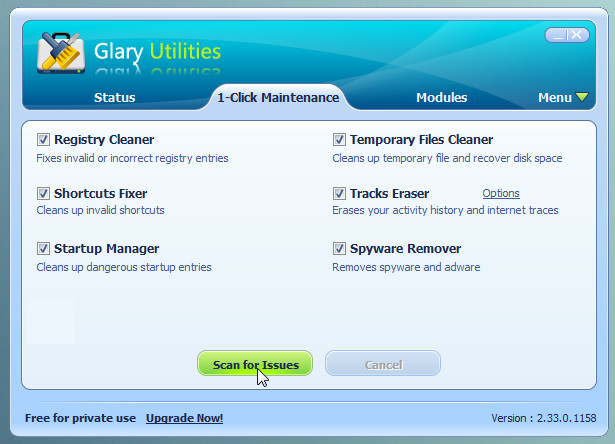
Glary Utilities is another popular all-in-one app to fix a slew of system issues. After cleaning the applications junk and scanning and fixing registry issues, use the free Glary Utilities to clean file traces, fix broken shortcuts, and find those incorrect and invalid Windows registry entries which slipped through CCleaner cracks.
After the scanning process is completed, click Repair Problems to fix all the issues it found during the scan process. You can also click Show Details prior to fixing the broken links and registry entries to review all the problems it discovered. The Modules tab refers to other complementary tools which ensures optimum system performance, including, memory optimizer, context menu manager, system file checker, and registry defragmenter.
Clean Unused Windows Shell Components And Right-Click Context Menu Options
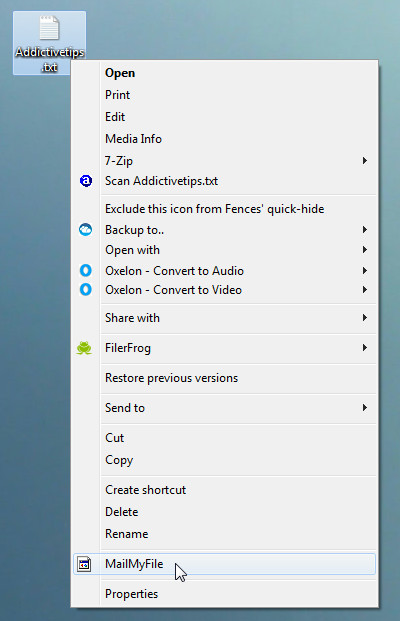
Even though CCleaner removes all the registry keys which are associated with unused or missing applications, there might be a case that after cleaning the system with CCleaner and uninstalling applications manually, you have a bloated Windows right-click context menu.
Cleaning useless right-click context menu options and other Windows shell components takes a lot of effort and time. I am aware of all the utilities out there to remove unused right-click context menu options and have tested all of them with varying results. Therefore, I can’t vouch for one utility on which you can rely on. To remove context menu options, try methods and applications in following articles.
- Manual Guide to Remove Useless Items from Windows right-click context menu from Windows Registry.
- Context Menu Editor: Edit items from Windows 7 right-click menu.
- ShellMenuNew: Remove items from ‘New’ Menu of Windows 7 right-click menu.
If there are some extra useless options present in Send to menu, you can follow this guide to quickly remove them and keep those which come by default.
Clean Unused Windows Startup Items
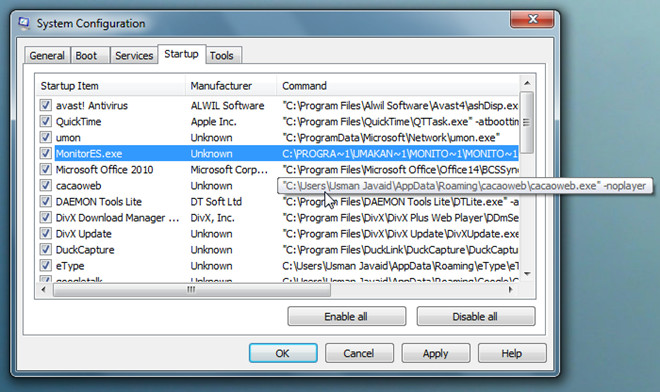
There are countless system cleaning utilities available to manage Windows startup items. If you don’t rely on third-party cleaning applications, you can always use Windows native System Configuration utility to view all startup items and disable them promptly. However, the main purpose of using startup manager is to identify those applications which surreptitiously add process(es) into Windows Startup items list. To begin, type msconfig in Start Search, and hit enter to open Windows 7 System Configuration utility. Now move to Startup tab to select and hover mouse pointer over an item which you want to delete from Windows Startup items list.
The best method would be to launch the application and manually disable the Startup item entry, however, the quick way is to un-check the item from System Configuration window followed by opening the path of application in question in Windows Explorer to uninstall or remove the application manually.
Remove Empty Folders, Stop Sharing Folders & Drives, And Delete Log Files
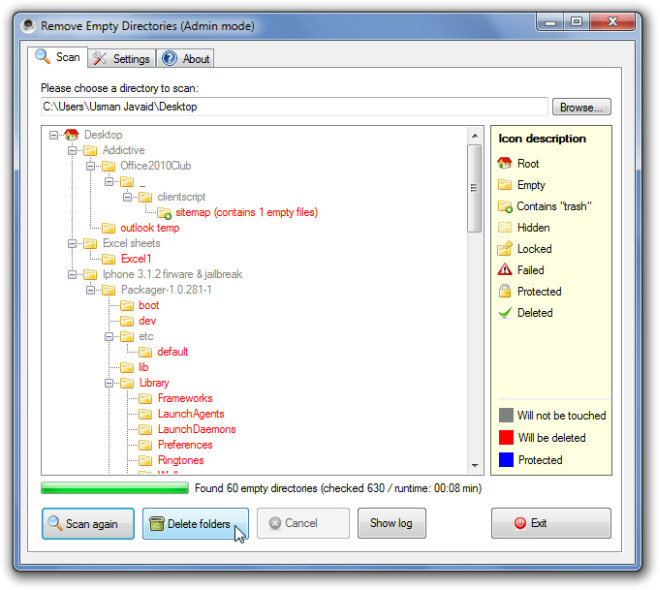
Even though using the Windows Add/Remove utility to uninstall the application is the recommended way for removing application files, linked libraries, and registry entries, there are times when applications folders don’t get removed automatically even after following the proper application removal steps. Therefore, to clean all the empty folders and other associated log files, you need to use a dedicated application for this purpose, such as, previously featured RED.
Launch the application and scan all the drives to find and delete all the empty folders. It offers some intuitive set of options to detect the empty folders according to user-defined rules, so you can create a rule to include those folders, which are, apparently not empty, but contain nothing but useless junk, such as, desktop.ini and image thumbnail cache files.
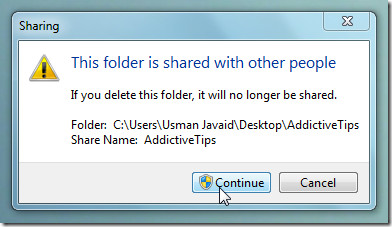
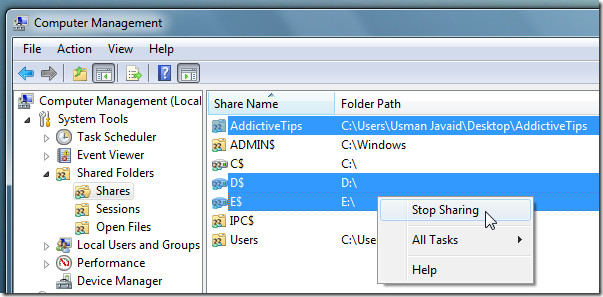
To make shared folders deletion easier, right-click Computer and click Manage to open Computer Management utility. From left sidebar, expand Shared Folder to view all the shares. Now select all folders and drives (while holding Ctrl on keyboard) which you want to stop sharing, right-click on any shared item and click Stop Sharing to immediately quit sharing all the selected items. Once all the selected items disappear from the list, you can easily remove all the shared folders.
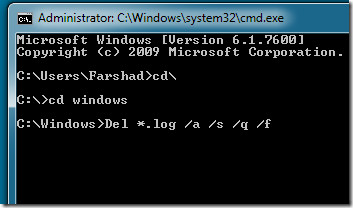
Out of all the cleaning utilities that we’ve tried so far to remove log files, we found Del log command to be the most efficient. When run in Windows Command Line environment with all the parameters – a, s, q, and f, it ensures that all the log files will get removed. The screenshot below exhibits removing all the log files from Windows directory, nevertheless, you can run this command in root path of any application folder which contains a complex hierarchy of sub-folders with lots of log files.
Activate Administrator Account And Delete All User Profiles
Windows 7 User Profile folders, usually, take more than a 3-4 GB of your system, and even in some cases, they use more than 10 GB of your hard drive, Just like Windows Vista, Windows 7 saves all the application preferences, user folders, documents, music, pictures, application cache, etc in Windows User Profile folders. If your system is used by more than 2 users, it becomes indispensible to clean the junk off these folders on regular basis to save precious disk space. Since our focus is to reset Windows 7 to original settings, lets take a look at the best way of removing User profile folders. If Administrator account is not active on your system, it is advisable to activate administrator account to start afresh.
To begin, run CMD from Windows Search with administrative privileges. Now enter following command to activate the administrator account.
net user administrator /active:yes
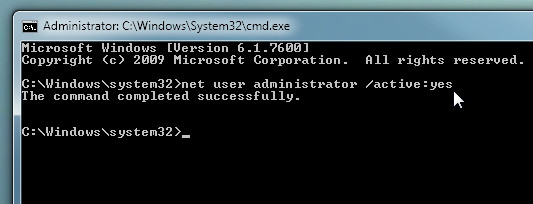
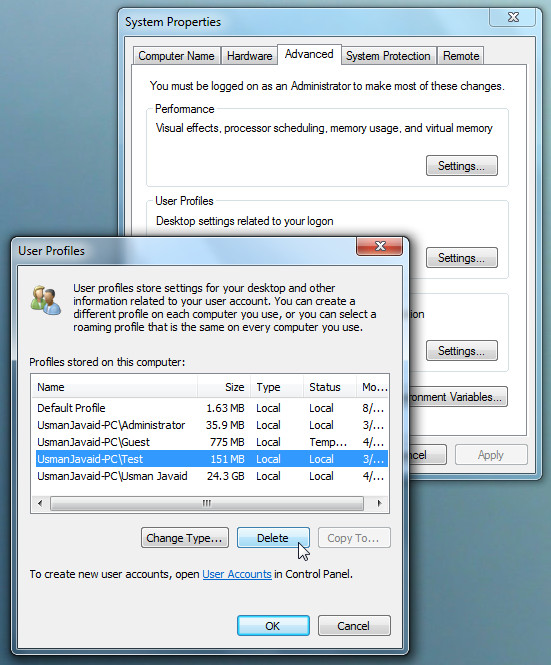
Once activated, log off from Windows and log into Administrator account. Now type Advanced System Settings in Start Search and hit Enter. Under User Profiles section, click Settings to view all the User Profiles. Delete all user profiles except one which is currently being used.
Conclusion
Hopefully, after following above steps, you would be able to reset Windows 7 to the original clean state. Don’t forget to defragment your hard disk volumes in the end. We’ve tried to touch the most prominent aspects to retain Windows 7 default settings and may have missed out on many. If you have any other important tool, method, or a script in mind which can assist user in resetting Windows 7 to factory settings, drop it off in comments section below.
Author’s Note: After moving to a new laptop, I wanted to clean my old laptop without having to reinstall Windows 7. It went better than expected. The guide above was written after many experiments and was made as simple as possible so that everyone can follow.

This is useful! For all you guys saying a clean install is easier, it’s not always true. There are plenty of systems where you re-install windows and you need to go and find drivers for 10-15 devices. Sure a clean install is better, but this is a very good alternative.
Control Panel > Recovery > Advanced recovery methods > Return your computer to factory conditions….
and you are done!
(You have to backup previously)
How to do it automatically:
Back up all the files you want to keep onto an external disk or drive, go to start menu, click “Control Panel”, click “System and Security”, click “Backup and Restore”, click “Recover system settings or your computer”, click “Advanced recovery methods”, click “Return your computer to factory condition”.
MY PC will not open Advanced recovery methods 🙁 there is nothing on this pc that is worth losing but i have no disk space left – please help
I’m having a problem with my computer, non of my files are opening and its say error or “The Keyset is not defined” the controll pannel wont open so i cant unibstall any files and the updates dont appyly when i shut down it just keeps asking for them over and over again.
I am having problems with my computer it is saying not verified and all my files wont open
nope… desn’t help. i seriously want that magical “state after install” switch. I want ALL drivers to go to default, especially USB drivers… I just don’t want to reinstall
Thanks alot for this article, very helpful. It appears that most people have missed the point, that they may not have a system image to recover from therefore are left with handling manually as best as possible.
Simply Ctrl+F11 when the machine is first turned on.
when i switch on my computer it starts with startup repair…can explain why
How would I go about totally resetting my Windows 7? I don’t care about ANYTHING on it, my laptop is totally dead and although I know this will not completely fix my problem, it will fix it enough for me.
Nice post Usman, I really digg the images between procedures for easier understanding. Good job! 🙂
You can save a step and not bother removing all programs that have nothing to do with windows because when you do a factory restore your disc is going to get wiped clean anyway.
i just want a command prompt that will factory reset my pc and i cant find anyone who knows one, my husband did it one our laptop and he had no problem finding someone on the net to give him the correct prompt ; why!!!
Why don’t you use a clone of your win partition(ex. Norton Ghost). Just make an image of your fresh win + programs installed and configured as you like. After some time, when you decide that your win needs a reset, just save your files and settings(you can do this with windows easy transfer in win7) and load the clone(image of win partition)on the same partition that you made the first time. Use Hiren’s boot CD. Loading the image takes about 15 min for a 15 GB win partition. After that you load your settings and files again and your done. This is what i do. it only takes a half an hour to do this. I hope this helps.
This really helped me alot and now my computer is faster know
Wow thank you so much for wasting my time and showing me absolutely nothing about restoring my
computer back to its original factory settings >….<
my windows got factory reset just before win7 boot up press f7 and it shows up that it will wipe the data like your torrents and etc. and resets win7 to it factory so I think not all of you got it activated but ones that do don’t need these useless steps for me they are
Isn’t it too much work…. and what if a system is effected with some unresolvable virus.. I prefer doing a reinstall which gives a fresh look!
Contrary to the comments above, I found this process much easier to do than a factory restore. Did this in less than half an hour. I think for those of you who have tried this already, you’re probably doing something wrong…
If you really went through ALL these steps did you also compared that is rather simpler to back-up whatever is to be backed up and re-install from the beginning?! Why would I want to go through all these utterly complicated steps when is safer, simpler and more reliable a clean re-install?!
you got to be kidding.. reinstall will take less time. this tutorial is absolutely pointless. i heard that windows 8 will come with such feature on 1 click.
Lol seriously?
Hey its a very informative post my computer was a tortoise but now after implementing your tips its rabbit cheers!!!
wouldn’t it have been simpler and saved ALOT of time just to say no – there is no option to return to factory defaults on this waste of money & time called windows 7 instead of mindnumbing exercise in repeating very obvious instructions how to delete a program?
i still have no idea why some clown parade in seattle thinks simply taking options away is an ‘upgrade’.
Hi there,
Nice for a techie, but usually going through all that trouble to just reset windows to factory settings is pretty cruel, don’t you think. There is ultimately a cleaner way of doing this.
1. Install a fresh windows, install drivers, patch windows to latest updates from microsoft.
2. run disk cleanup once to cleanup all temp stuff
3. create a system restore point by the name ‘Clean Install’ (or something like that)
4. enjoy and thrash windows as you like. When you are sick of it running like a snail, revert to the restore point and enjoy!!!
thank you – these endless pages of instructions are great if you’re being paid to vomit them back up but a simple NO is the answer – there is no factory default option.
No, the easiest way is to backup your data, which includes favorites, then just to a factory restore
how do you do this if you don’t own a copy of windows, like it came with the computer when you bought it?
well there are a few ways, I’m in the same boat as you are right now. You can create a recovery and repair discs, make a recovery “disc” out of a flash drive, and there is another way maybe. Not fully remembering right now. Just Google how to do a clean install on a pc with a preinstalled OS or something of the like. Should get you the info you need.
Seems like a clean install would be much easier and cleaner.
It would be worth the time to make yourself a nice clean install image and then back it up for future restores later. I use Acronis True Image.
Nice idea, but a time-consuming process than the original factory-resetting mode offered by some laptop manufactures.
what exactly is the point of this? like the earlier comment, you might be better off doing a clean install than going through all this headache. i actually thought this article was going to discuss how to create a recovery image which can be reverted to at any time just like you will find in today’s laptops and desktops sold in shops.
I’m not sure with this but I think you can simply reset the factory settings by entering your BIOS before the windows starts and look for the “Reset to Factory Settings” (i think it is in the second to the last tab)…I’m not really sure about this but I’ve already done this to a Vista laptop, I think it’s the same with Windows7, the laptop only boot but not starting so i reset it in BIOS then everything goes fine.
This is more of an extensive cleanup than a factory reset but OK.
Are you guys serious? Why go through all this trouble when you can simply perform a clean re-install? Assuming you back-up your files, it’s not that hard to do. Go grab a coffee and cup back when the installation is done.
Great article! It may come in handy at some point for me. It is way more work than just doing a clean install, but I can see doing all this if you don’t own a restore disk.
very nice article @zooropean
not every one likes to reinstall some ppl have alot of settings or email configuration that they just dont whant to loose thats the whole case when u start a mission like this but the article is a great one reps to the author
How exactly do you perform your quick mission?
how do u do that
do u have to buy the disk or can u do it from computer
Thank you! Finaly, someone who understands the concept of backup and reinstall. If people just understood this, factory reset would be a last resort.
well it´s easy to backup a pc for some office use … but it gets more dificult with 100 ds of software anfor a heavy user …
It’s not possible to back-up everything, and in many instances you would
need a big ‘back yard’ of back-up space to do this. If in the process
of using your computer all the important stuff is in a safe place
anyway, then that’s all well and good. I’m not OCD enough to want to
clean up my offfice desk by pulling out the cables, taking my monitor
off the desk, putting my keyboard on my chair for a moment, wrapping up
speaker cables, and so on and so on, just to tidy my desk. If I see
junk, off it comes. This same simple policy is what I think is being
shared here.
This got rid of the nastiest malware infection I’ve ever seen. Some people don’t have original discs and windows holds a lot of your settings. Pretty much the virus puts tons of scripts and counters via powershell etc it’s a nightmare
quick reinstall with the whole PS suite, 20 other softs, compelte UI custom setup, 100 VSTI etc … a “quick” setup turns into 2 days of cursing around and installation issues with old setup files or missing components .. yes yes great .. thank you so much 😀
Wow… great article!