How To Recover Lost Partitions And Hard Disk Data [Guide]
In our previous guide on securely wiping the hard disk and removable media via Ubuntu Live and DBAN boot CD, we discussed that Windows based disk shredding applications don’t allow wiping the disk partition where Windows is installed. Similarly, there are a great deal of data recovery applications available for Windows such as Recuva, Power Data Recovery, Undelete 360, RecoveryDesk etc, which can seamlessly perform the data recovery operations over not only auxilirary disks, but also removable disks including USB drives, external hard disks, SD cards and so on. What if you want to recover data from disk partition that holds Windows? What would be the most convenient way to run disk recovery operation over an entire disk (including all basic, extended, logical partitions and unallocated space), especially when system fails to boot up?
Since Ubuntu Live disk enables users to run the OS in an isolated environment without having to follow standard OS installation method, you can use it to mount the hard drive and run the data recovery operations over the entire disk. Ubuntu open source repository includes 2 widely used tools namely TestDisk and Foremost, to perform low-level data restoration operations. You may also find these tools in numerous system diagnostics boot disks such as Hiren’s Boot CD to recover hard disk data without having to install the operating system.
Unlike other system diagnostic tools, Hiren’s Boot CD comes packed with a slew of utilities that you may need to fix the hard drive and system boot issues such as HDAT2 (Test/Repair Bad Sectors), ViVard, SMARTUDM, HDD ERASE, Hard Disk diagnostics for Maxtor, Fujitsu, Toshiba and Seagate, BootFix, MBR Save / Restore, DiskMan and more. If your hard disk has developed bad sectors over time, we recommend using Hiren’s Boot CD to run and repair bad sectors prior to recovering data. However, if you just want to get your deleted back from all disk partitions, Ubuntu Live CD is probably a better option.
In this post, we will discuss how to use Hiren’s Boot and Ubuntu Live CD to repair partitions and perform hard disk recovery operations.
Using Ubuntu Live Disk
Last week, we showed you how to create persistent Ubuntu Live USB, and use if for changing Windows 7 administrator and standard user account password. You can follow the steps for creating Ubuntu Live CD from said guide to recover data from hard disk and external storage mediums. Once created, reboot your system into BIOS menu by pressing ESC, F2, F10, F9 or other system defined key, and set external hard disk/USB as first boot option from boot menu. Once boot priority is changed, save changes made to BIOS and restart your PC. It will take you to Ubuntu Live boot menu, select Run Ubuntu from this USB option to load Ubuntu OS.
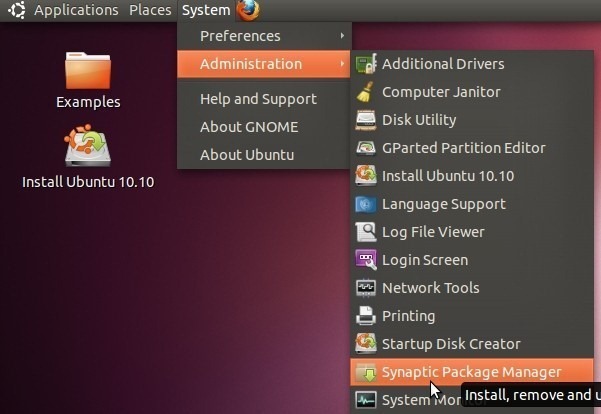
Ubuntu doesn’t come with TestDisk and Foremost tools, but you can download and install them by enabling community maintained open source software option in Synaptic Package Manager. This will download the list of open source software, so that you can easily find and install third-party applications. To begin, open Synaptic Package Manager from Administration menu, which is accessible from System menu.
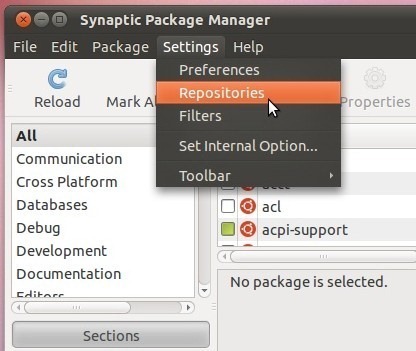
From Settings menu, select Repositories.
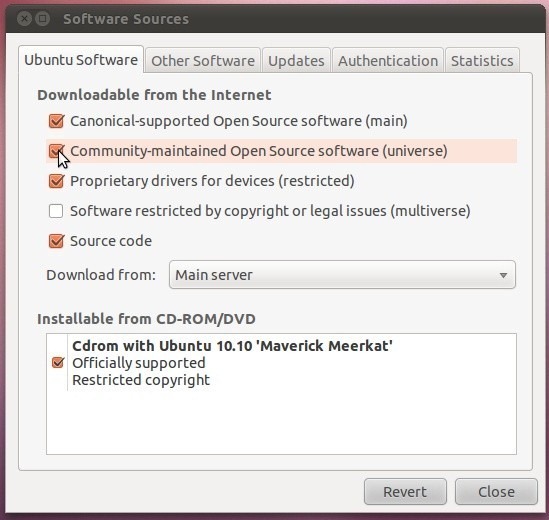
This will open Software Source dialog, letting you enable an option to download open source software list. Under Ubuntu Software tab, enable Community-maintained Open Source (universe) option, and click Close.
Now, hit Reload to refresh the repository list.
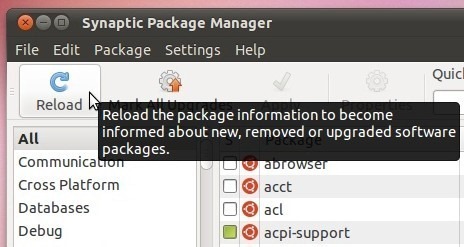
It will start downloading the open source package list.

After the list is downloaded, it will start rebuilding search index. Once refreshed, type testdisk in Quick search, and hit enter. Now, right-click testdisk and select Mark for Installation.
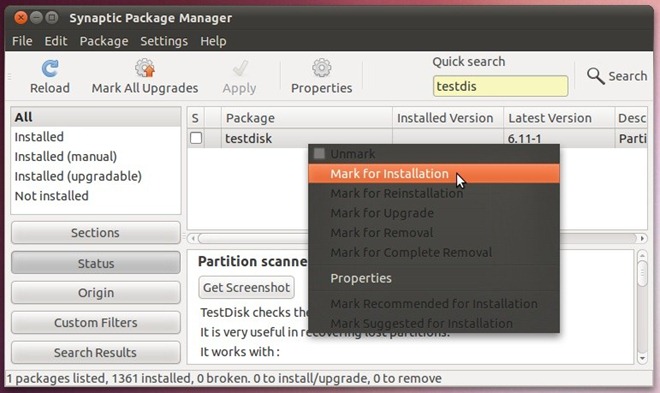
Now, click Apply on toolbar to download testdisk. Similarly you can download and install Foremost tool; just enter the Foremost in Quick Search, right-click it to select Mark for Installation and apply the changes.
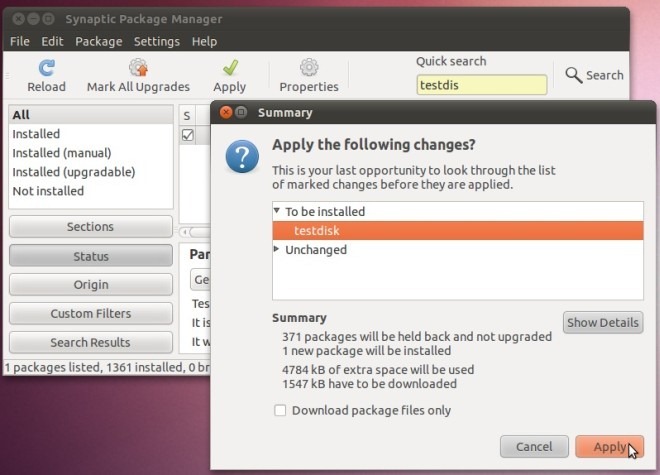
Once tools are installed, close the Synaptic Package Manager. Since TestDisk and Foremost are console applications, you need to open Terminal from Accessories menu (accessible from Applications menu) to use them.
While TestDisk is a widely-used specialized tool for repairing lost partitions, it has the ability to list down and recover deleted data from primary and removable hard disks. To begin, enter following command to run the tool.
sudo testdisk
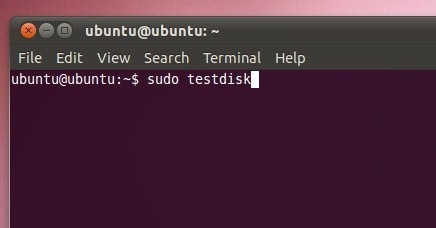
When you run the tool, it will ask you to create a log file to save the recovery processes issues and errors. Just press Enter to create a log file, and to move to next step.
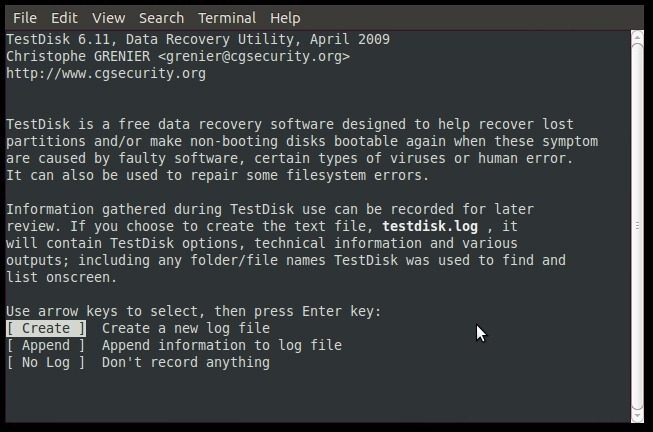
It will start finding internal hard disk and all attached removable drives. Once disk scanning is finished, select the disk that is to be scanned for recoverable data and lost partitions.
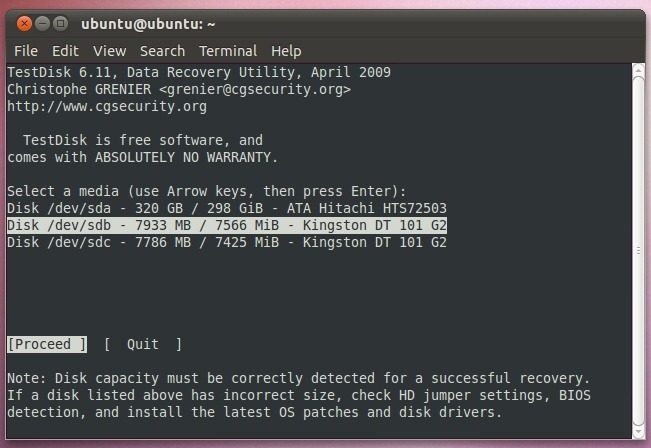
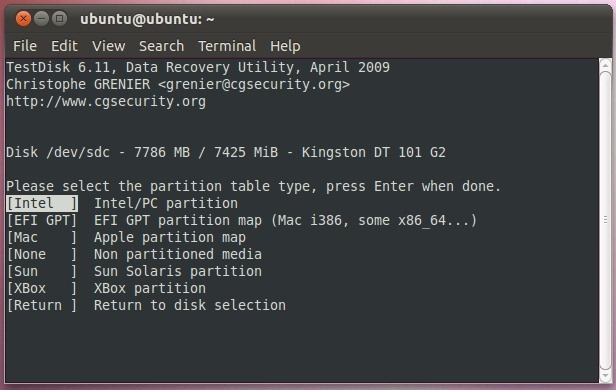
Now, you need to specify the drive partition table type from the list, which includes Intel, EFI GPT, XBox, Sun, and Mac. In our case, it’s Intel, so we will select Intel.
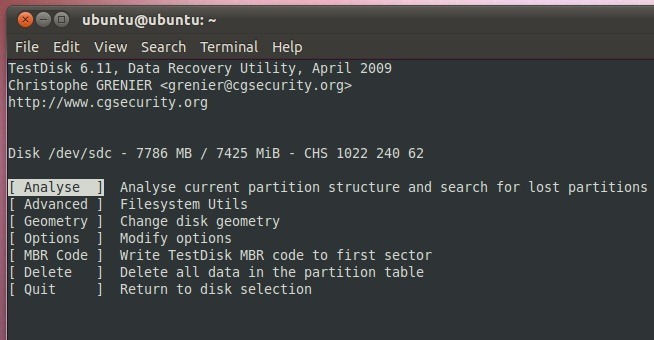
You will find TestDisk features in next step including Analyze, Advance (include Filesystem Utils), Geometry, MBR Code and more. Just select Analyze to analyze the partition structure and search for lost partitions.
It will first analyze partition structure and then list down lost partition(s). However, if it fails to find partitions, enter Quick Search.
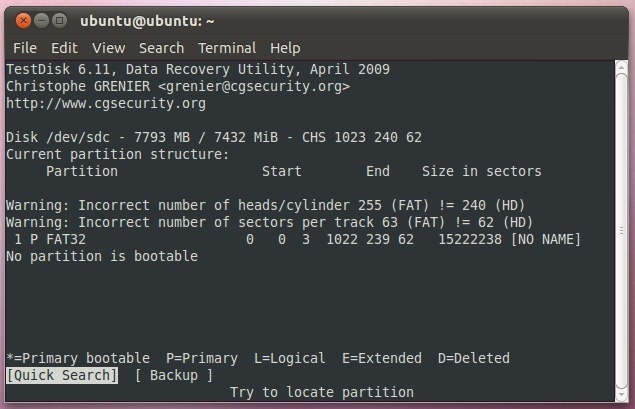
After Quick and Deep search, TestDisk will be able to find the partition. It lets the user specify the partition characteristics. You can press P to make it Primary, L to Logical, E to Extended and D to Deleted, or A to add a partition. Now all you need is to press Enter to recover the partition. It will take you to main menu, where you can select Write and hit Enter. It will ask you to reboot the system to repair the lost partition of specified disk.
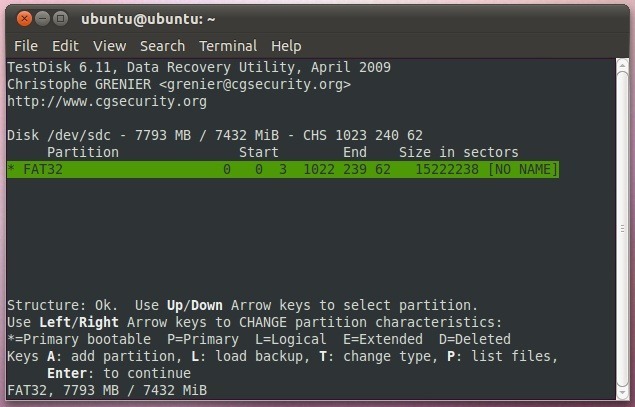
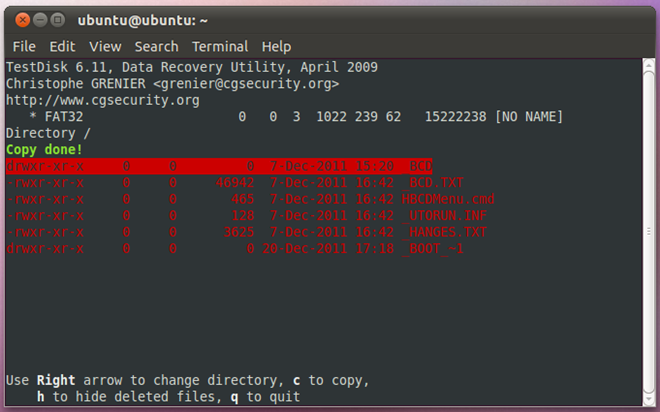
If you want to selectively view and recover deleted files, enter P to view all the lost files. The deleted files are shown in red color, while items in white represents current data. It shows files and folders at root location; you can change the directory by pressing R on keyboard, and then select the files/folders you wish to recover.

Recovering files and folders is easy. Select the folder/file, you want to recover, and press C. It will ask you to specify the output location where files are to be recovered. Just move to the location and press Y to begin copying item to specified location. However, if you want to explore a folder to, let’s say, copy data to Desktop/Recovered Data folder, move to Desktop location in the list and then press Enter, it will open the Desktop folder. Now, move to Recovered Data folder and press Y to copy the deleted item to it.
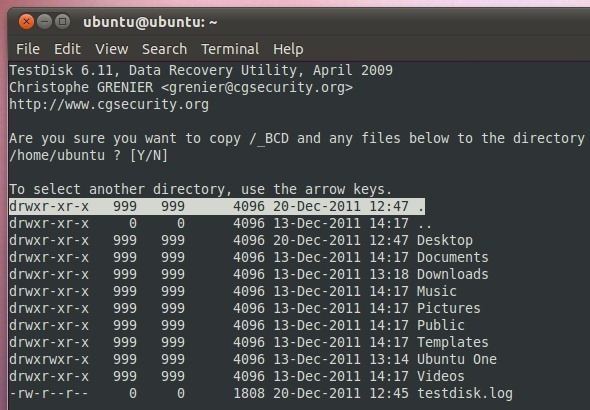
The time it takes to fully recover the data depends upon the size of selected file/folder. When done, you will see Copy done! message above the list of deleted files. Similarly, you can selectively recover deleted files and folders from primary hard disks and removable drives.
Like TestDisk, the Foremost console application supports a number of file systems including EXT3, NTFS and FAT. The application was specifically designed to recover data from image of the drive. It’s recommended to first create a directory in disk where recovered files are to be stored; mount the disk and navigate to location where you want to create a folder using following commands in Terminal.
cd /media
ls
cd <disk identifier of volume>
sudo mkdir <folder name>
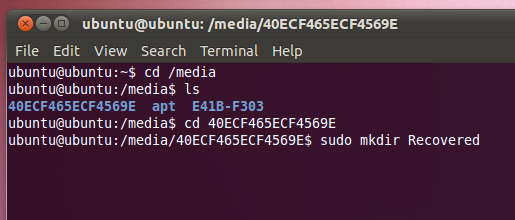
Once created, enter following command to begin recovering data from specified disk to newly created folder.
sudo foremost – i /dev/<identifier of disk which is to be recovered> –o /<folder name>
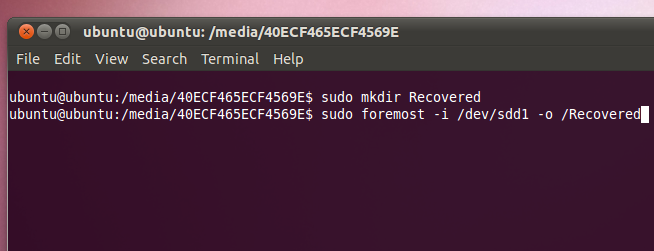
The standard procedure for recovering data through foremost includes –i and –o switches, which recover all the data on the specified disk to defined folder. However, if you want to specify the types of files that are to be covered, you can use –t switch. The syntax of foremost command with –t switch is as follows.
sudo foremost –t <file extension> –I/dev/<identifier of disk which is to be recovered> –o /<folder name>

Using Hiren’s Boot CD
Hiren’s Boot CD includes all the essentials tools and system formatting utilities to help you fix numerous types of PC issues, including corrupt boot sector, hard disk boot problems, invalid/corrupt Master Boot Record, registry discrepancies and more. Since it’s a Boot CD, it doesn’t require you to boot up the system with installed OS, and use the included system diagnostics packages. All you need is to burn the Hiren’s Boot CD ISO image to disc to run system performance and diagnostic utilities in an isolated and completely independent environment. To get started, download Hiren’s Boot CD ISO image (link given at the bottom of the post). Now, right-click Hiren’s Boot CD image file and select Burn disc image.
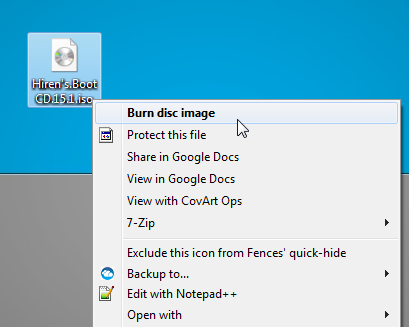
This will open Windows native Disc Image Burner. Now all you need is to burn ISO to disc to specify the CD Drive and then click Burn. Once the image is burned to disc, reboot your system into BIOS menu by pressing system defined key at system startup. Now, move to boot menu and set CD/DVD ROM as first boot menu. Once changed, reboot your system to access Hiren’s Boot CD system diagnostics menu.
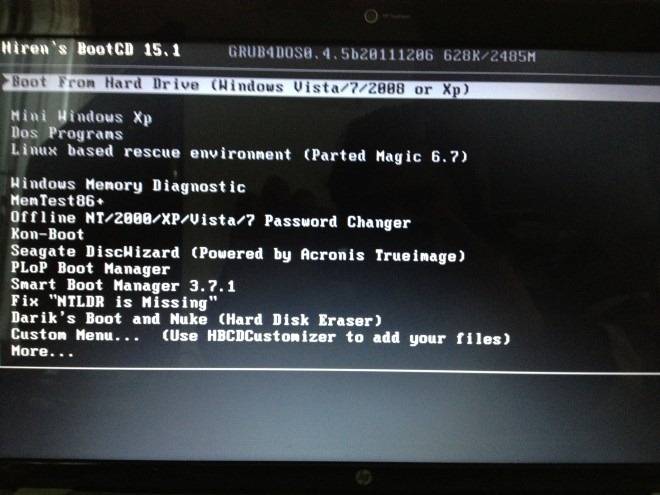
If the hard disk has bad sectors, you need to run HDAT2 to identify and repair bad sectors. You will find all the hard disk related issues under Dos Programs –> Hard Disk Tools.
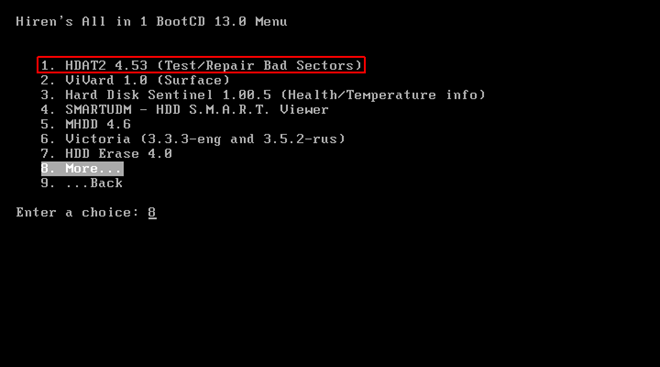
As mentioned earlier, Boot Hiren’s CD includes recovery tools namely TestDisk and PhotoRec. You will find these tools in Dos Programs –>Recovery Tools menu.
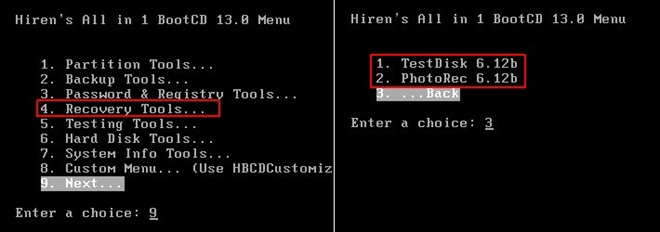
The PhotoRec is quite similar to TestDisk as far as usage is concerned. It’s considered as one of the most powerful data recovery application, as it ignores file system and starts searching the lost data (video images, archive containers etc). According to PhotoRec developer, it can recover data even if your media is severely damaged or formatted. It also searches for disk partitions, and lets you recover files from both only free unallocated space and full (free+used) disk space.
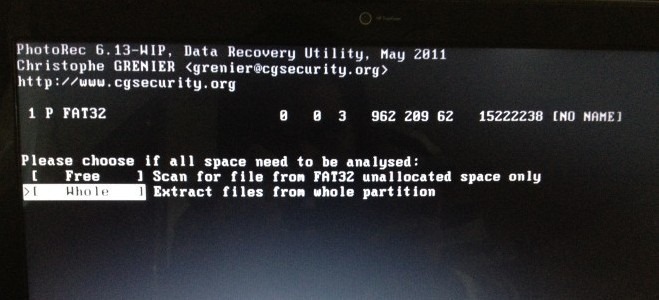
Since Hiren’s Boot Image in loaded from CD/DVD, the TestDisk will relatively take more time in searching, analyzing and recovering data, than running with Ubuntu Live Disk.

Note: You should specify remote directory or external hard disk as output location for saving recovered data, as attempting to recover data on the same disk where it’s being read from may lead to permanent loss of data, and in some cases, unrepairable bad sectors.

Thanks for sharing awesome tip. I have one HDD which is not working now and had few photos which I want to recover
Lost your files from Windows partitions? Its time that you
apply software named Remo Recover to get back partitions with hundreds percent
accuracy in restored files.
I have one external hard drive from my book its 3TB somehow it lost the partition. Now windows not able to detect, it can be seen by the disk management but its showing now unallocated space. I try to recover partition with EaseUS Partition master and some other software but it doesn’t work. Please guide me what will be a best solution for this Situation because I have almost 2 TB data in it to recover.
small addition, personally I boot Hirens from a USB 🙂 i have a number of tools on my USB that i created using YUMI
on my usb I carry (in my wallet geek-points++ ):
-Slitaz : quick to boot, check the hardware is still alive enough to run it
-Hirens : for all the tools to fix anything
-Ubuntu & Mint : For when i convince the user to use linux instead, they can take their pick of which one to install, I also have persistence enabled in Ubuntu so I can add useful tools to it, if Hirens is ever short of one (not likely :p)
-Simplicity Linux (puppy) : i like puppy, plus its persistent by default so I can use it as my portable os.
I used to cram windows on there too but It took up more space then all the others combined and it wasn’t any more useful then hirens mini-XP. And it would have been illegal to install it…
p.s. Great article on how to use these tools 🙂
Yes really very easy step to recover the lost data from lost hard drive partition, i have share another good solution like Kernel for windows data recovery software to recover all over data from computer hard drive.
How to recover from Hard Disk when lost installing ubuntu? I mistakingly selected “erase everything and install ubuntu” instead of “install ubuntu in a specified disk”. Help if you can, I have lost all my Data, please!
A bit late, but if you find yourself in this situation:
use photorec, through hirens (either live USB or CD), it will be able to recover data that’s been formatted. Just try not to “use” the hard drive.
basically when you delete stuff off a hard drive (or format) it just sets that area of memory to “over-writable”
so its still there, but if you install stuff, create new files etc then it might over-write that area of memory and corrupt / replace that data.
I wouldn’t install photorec on your new ubuntu install because you run the risk of over-writing your data, obviously ubuntu may have already but its a bit pot luck i’m afraid!
When I performed the deep search for the lost partition, teskdisk gave various results including:
NTFS found using backup sector!, 311 GB / 290 GiB
NTFS found using backup sector!, 319 GB / 297 GiB
NTFS, 239 GB / 223 GiB
all at the same time.
Which one seems to be the most suitable choice between them?
Beautiful!! I recovered my lost data. Thank you!
Great…it helped me to recover the partition table for 1TB hard disk..Keep it Up…Thank YOu
how to recover and restore data from logical linux partitions corrupted installing windows?
Thanks guys! you just saved a friend of mine alot of work, hes pc crashed with his masters degree documents. But we got it back thanks to you!
Awesome! Awesome! Awesome! You have saved my LIFE! Where is donation box?
Easy steps to recover the lost data from Ubuntu than one might think. That’s all couldn’t be possible without your post. Keep posting.
Excellent guideThanks a lot for this post !
Excellent guide. Ubuntu is the top for carrying out such operations. Long live Linux!
You guys are amazing! I have been looking for complete data recovery steps for my chronic hard drives and you just posted it.