How To Enable The Properties Bar In File Explorer In Windows 10
The File Explorer in Windows 10 is more or less the same as it was in Windows 8/8.1. The same can’t be said if you were to compare it to Windows Explorer in Windows 7. The interface has changed quite a bit if you compare the two and the changes are mostly for the better. Overall, it’s an improvement making several things, such as showing/hiding hidden files much easier. One change that you might not feel so great about though is the properties ribbon that is now gone. The properties bar appears at the bottom of Windows Explorer in Windows 7 and it gives you quick information about a selected file. You now only have the preview pane which doesn’t fill the gap. The good news is restoring the Properties bar is very simple. All you need is a free app called OldNewExplorer.
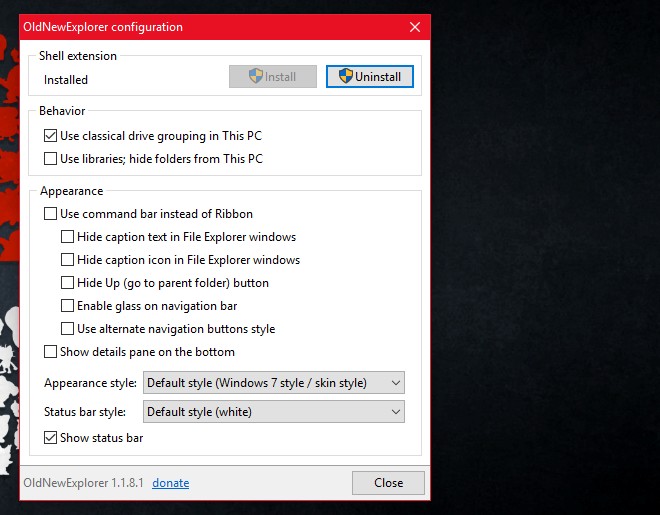
Install OldNewExplorer and enable the ‘Show details pane on the bottom’ option at the bottom of the ‘Appearance’ section. Click ‘Close’. If you have File Explorer open, close it and then open it again.

The properties bar will be restored and fully functional. Select a file and you will be able to see when it was last modified, its size, when it was created, etc.

OldNewExplorer works on a per-user basis. You can use the app to enable the properties bar on the user account you prefer and leave File Explorer for all other users untouched.
OldNewExplorer does a whole host of other stuff. Noteworthy is it’s ability to group your drives and any attached devices separately like they were in Windows 7/8. It can also remove the libraries listed under ‘This PC’ in the navigation bar in File Explorer.
If you don’t like the ribbon in File Explorer, OldNewExplorer can get rid of it too. It’s basically an app that can give you the Windows 7 File Explorer in Windows 10 on a per-user basis.

dramatically changed the appearance of explorer of my windows 10 pro. i like it. thanks for the link.