How To Add A Custom Screen Resolution In Windows 10
Windows lets you select your display’s resolution from a reasonably long list of resolution settings that you can pick out. Back in Windows 7 you had one recommended setting and one really low setting for your display and you could select other settings on the resolution slider in Control Panel. Windows 10 give you more options but if it isn’t listing the optimal resolution for a connected display, or it isn’t listing the one you want to use, here’s how you can add it.
Open the Settings app and go to the Display tab. Click Advanced Settings and scroll down to the very bottom of the advanced settings screen. Click ‘Display adapter properties’.

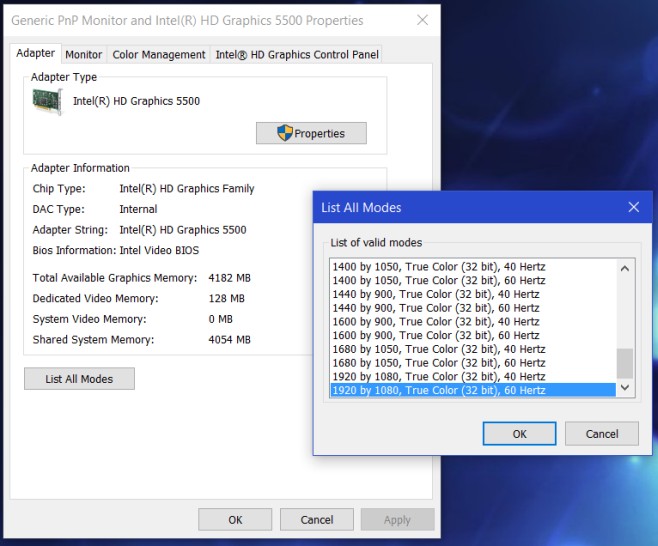
This will open the properties for the display adapter. In the Adapter tab, click the ‘List all modes’ button. This will open a new window listing every single resolution that your display can support. Select it here and click ‘Ok’ followed by ‘Apply’ on the properties window.

The resolution you’ve selected will now be applied and you will have the usual option to revert to the previous one if you don’t like it. If you’re on Windows 7, you won’t have the Settings app to go and will instead use the Control Panel app.
In the Control Panel app, go to Control Panel\Appearance and Personalization\Display\Screen Resolution and click Advanced Settings. This will open the Display Adapter’s settings. The rest of the process will remain unchanged; click the ‘List all modes’ button on the Adapter tab, select a resolution, and apply it.
It goes without saying that you can’t set a resolution that the adapter doesn’t support. It’s a hardware limitation that prevents this and not your operating system. You might find this particularly useful if you’ve connected more than one display and one of them isn’t displaying in the correct resolution.

Nope didn’t work.
This solution DOES work. You just have to go to your graphic driver’s program whether it’s AMD or Nvidia to create a custom resolution, and if it doesn’t show up normally under the window’s resolution display settings, then you go to the list all modes and you’ll see it there. And this article isn’t a misleading title, it says How to “add” not How to “make” a custom resolution.
Not for me. My screen has a 1680×1050 resolution and my GPU is a Mobility Radeon HD 4200. I’ve downloaded 3 versions of the driver and is not the last versión, that at least let me use a 16:10 more adecuate resolution (1280×800), but not the native one. Any sugestion?
This is impossible to fix ._.
stupid clickbait article
This is an awful article with misleading title, a bunch of spam on the page, and no useful information. I hope you rot in hell for wasting 5 minutes of my time.
mine neather
yeah that’s not my definition of custom…
The only solution is via regedit. change your ‘DefaultSettings.XResolution’ and ‘DefaultSettings.YResolution’
Until recent preview builds this still worked. Hopefully Microsoft pulls their collective out their arse and realize that PC loyalists want old features back not just stripped out Imac knockoff additives.
Except this doesn’t add a custom resolution. you’re simply selecting one thats already available.
well, it displays pretty much all monitor resolutions… why would you need any other..?
Because it doesn’t list ALL the monitor resolutions…