Exclusive: Make Your Own Screen Capturing Tool By Using 3 Free Programs
Sometimes one needs to be clever. A few months back we explained how you can create your own activity monitoring software, today we are going to teach you a way in which you can create a screen capturing software with output video in avi format.
The advantage of using this technique is that casual users will never notice a monitoring tool running in the background and also it is totally safe. We will be using the following 3 programs for this purpose:
- Spy Screen (<— For review click this link)
- Image Tuner (<— For review click this link)
- PhotoLapse (<— For review click this link)
For the sake of convenience I have packed all three tools in one simple zip archive and provided the download link at the bottom of this post. It is hosted on AddictiveTips so you can grab it anytime.
Step 1: Spy Screen
First install Spy Screen, open program, hit Extra Settings Open button to show complete settings. Now select any icon, it is better if you select system icon(to confuse users), give it a name, select the maximum number of screenshots to take, set password, and finally hit Start Spy button. It will ask for the destination where you would like to save the screenshots, makes sure to select the destination deep inside some program files folder(where most users don’t normally visit).
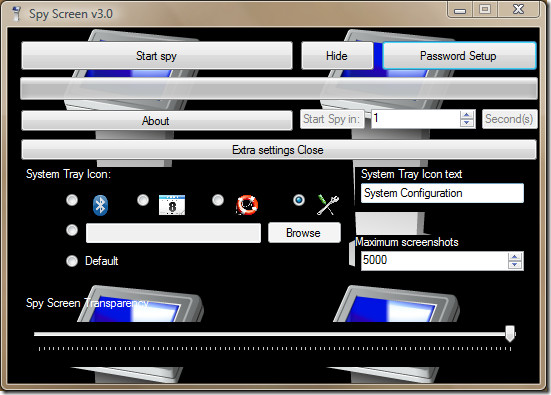
Note that this program will take screenshot after every 9 seconds. So why 9 seconds? Because it is optimal. A screenshot every 9 seconds means that in an hour it will take 400 screenshots which are enough. Now hit Hit Hide button to minimize it to the system tray.

Whenever some user will hit this icon, it will ask for password which means most users will ignore this icon. Now if someone asks you what it is for, you can tell them it is some important system configuration which is password protected. They will understand. 😉
Step 2: Image Tuner
Image Tuner was originally not included in this procedure, but because Spy Screen saves screenshots in high quality BMP format and Photolapse only accepts images of JPG format, we will need this tool for conversion task.
Run this tool, load all screenshots that were saved by Spy Screen in it, uncheck all boxes except Convert checkbox, choose JPEG format, select output destination, and hit Process Images button.
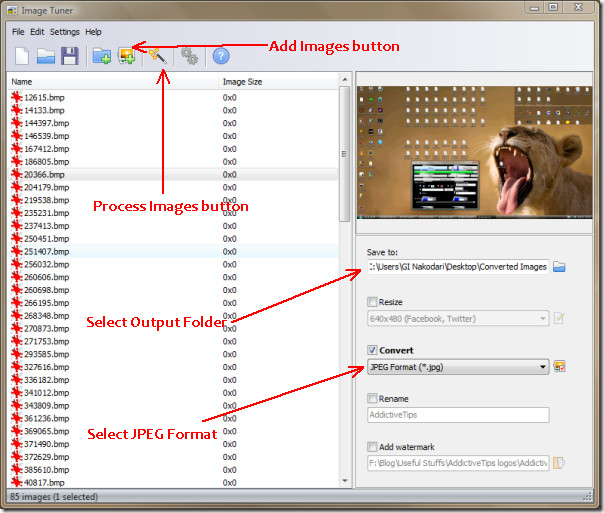
Now your BMP screenshots will be converted to JPEG format and will be saved in the output folder you specified.
Step 3: PhotoLapse
PhotoLapse is used to convert JPEG images into AVI movie. First select the folder that contains these screenshots and then hit Load files from current folder. Once all screenshots are loaded, hit Mark all button and make it 3 FPS(Frame per second). Hit Create Movie button and select the output video name & destination.
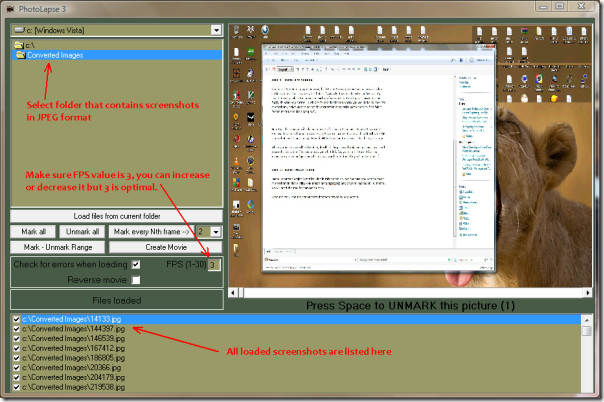
Now from the Video Compression tab, select ffdshow Video Codec.
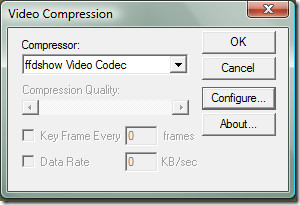
Now hit Configure and make sure the settings match as follows:
Encoder: Mpeg-4
FourCC: Xvid
Mode: One pass – average bitrate
Bitrate: 10000 (which is the highest)
I have highlighted these four important settings in the screenshot below.
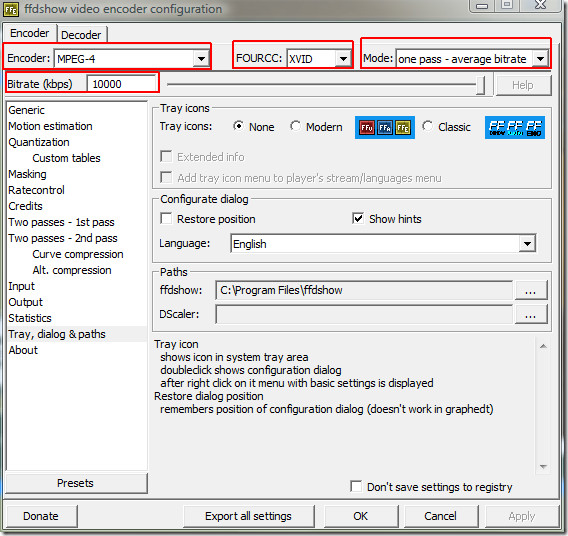
Hit OK and then hit OK again in Video Compression window. Now it will take some time to convert all images into AVI movie. Once done, open the video in your default media player and watch the video in full screen. Watching it in full screen is important if you want the best quality.
(https://www.addictivetips.com/app/uploads/2009/AddictiveTips Screen Capture Pack.zip) Download AddictiveTips Screen Capture Pack
Additional Notes from the Editor: Sometimes when you use multiple software together, they can solve a whole new problem. We at AddictiveTips are always trying to solve new problems and encourage others to do the same.
Enjoy!
