Create Custom Refresh Point In Windows 8 With Recimg Tool
Although Windows 8’s Refresh Your PC feature makes it easy to restore default Windows settings without deleting your personal files & folders and installed metro apps, it doesn’t allow creating a custom system refresh image. The Refresh Your PC feature basically creates a Windows Installer Image (WIM) to carry out the assigned tasks, i.e., restore default PC settings. Windows 8 comes with a small command line tool called Recimg, which helps you create a custom Windows 8 refresh point in Windows Installer Image (WIM) format. Using this image file, you can restore your PC to a different state, which may include all your personalized Windows settings, desktop applications with saved preferences and more. Instead of using the Windows default Refresh image, you can use the custom one to restore the specific saved state of the PC. The Recimg command requires nothing except the target location to create a current snapshot of the system.
The difference between Windows 8 Refresh Point and Windows Restore point is that the latter only captures system files and registry hives, and attempts to restore all the settings, without re-installing Windows, to an earlier point in time. The custom Refresh point created via Recimg command can be used to re-build your entire Windows 8 PC with saved desktop applications, Windows settings, and programs’ preferences. To create a custom refresh point, on Start Screen, enable All Apps (right-click in empty area, and then select All apps from bottom of the screen). Now, right-click Command Prompt tile, and select Run as administrator to launch CMD utility with administrative privileges.

Now, enter recimg command with following syntax.
recimg /createimage <target location>
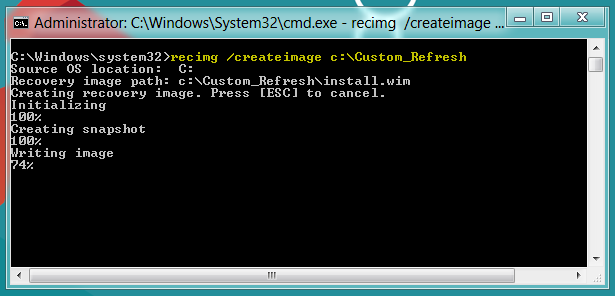
For example, if you want to create an image in C:/Custom_Refresh/ folder, enter this command.
recimg /createimage C:\Custom_Refresh

The /createimage switch is used to create a new custom Windows Refresh image and set it as the active recovery image. You can keep multiple Windows Refresh Images at a time, but in order to use the custom image, you have to set the required Refresh image as default/active. To set the custom refresh image as default Windows Refresh Image, use /setcurrent switch with recimg command. Just specify the directory where your custom Refresh image is located to make it default Windows 8 Refresh Image.
recimg /setcurrent <directory where custom install.wim image is located>
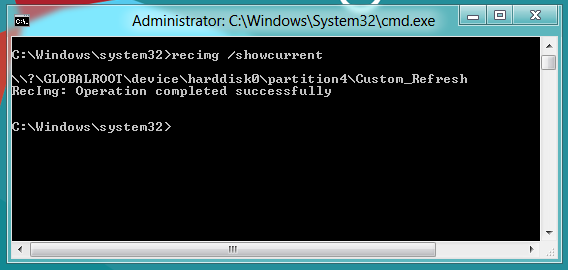
When you want to restore the custom refresh image, go to PC Settings and run the Refresh your PC utility (check out our guide on how to Refresh your PC). If you just want to check the location of current active Windows 8 Refresh Image, enter recimg command with /showcurrent switch to display the complete path of active Refresh Image location.

Another noteworthy aspect of Recimg command is that you can use /deregister switch for deregistering the current custom recovery image. It ensures that Windows 8 default Refresh Image recovery is used while refreshing the PC. It must be noted that the custom refresh image doesn’t include Metro applications. So, when you refresh the PC using the custom image, just log in with Microsoft account to restore metro apps with their settings.

I kept having issues with my Lenovo Helix and it having issues with some driver I am installing from either windows update or system update.
Having to go through and install windows 8.1 again every time is a major PITA since there are no more system restore points.
I finally have a clean build with everything working so I took a new snapshot using this tool
Nice step-by-step article.
Is it alright to use C: partition for creating and keeping the custom recovery image ?? If yes, then during refresh, will it not get wiped off as Windows 8 installs itself again?
After de-registering, or in general having never used recimg, is it possible to find out the factory/manufacturer´s recovery partition location and image source that Windows-8 and the Refresh uses by default ???
Thanks
Regards,
Rakesh
Press WIndows Key + X then choose disk management. From there you can see your OEM’s recovery partition. This can also be moved to a USB drive and deleted to clear up hard drive space (roughly 7.5GB).
I`ve got an error.
C:WINDOWSsystem32>recimg /createImage c:REFRESH
Source OS location: C:
Recovery image path: c:REFRESHCustomRefresh.wim
Creating recovery image. Press [ESC] to cancel.
Initializing
100%
Creating snapshot
26%
The recovery image cannot be written.
Error Code – 0x80070032
c:REFRESH folder exists.
remove existing folder, then retry… (run as admin)
I’ve tried a lot of times, with folder, without folder, with local admin account and with microsoft signed, few hard drives, clean windows – results the same.
Like it 🙂 especially when win 8 default apps are messed up again… don’t forget to make backups before you refresh.. (including “C:UsersAppData” ) Local and Roaming folder.
An ultra-useful hidden Windows 8 tool. Sadly, it produces an error on my PC and contacts Microsoft automatically to report.
PC is HP Pavilion 23, pre-installed Winows 8N.
Any others with same problem, and a solution perhaps?
Most obliged
If I have two devices with same hardware spec. (let’s called them device-A and device-B)
after device-A has installed all of the necessary drivers on pure Win8 OS, and make a refresh point image via recimg.
I am wondering if the created refresh point WIM image from device-A can be refresh to the device-B which only has pure OS on it(w/o drivers installed) ??
It is something like make a copy of whole ready system to another device.