Create Your Own Street View For Google Maps Using Photo Spheres
Google Maps is one of the most stellar projects undertaken in recent times. In addition to putting a map of the entire world at our disposal, Google has gone one step ahead with Street View, letting us view different areas of the world as if we were standing right there. While Google itself has taken the trouble of recording and uploading Street View for a whole lot of locations around the world, including full cities, there’s still a long way to go till the entire planet is captured in Street View, and that’s where you come in. Now you, the user, have the ability to capture photo spheres, stitch them together into Street Views, and share them with the entire world right on Google Maps. How? Let’s get straight to it!

- Use your Android phone’s camera to create a few photo spheres spanning the area that you want to capture in Street View. You can also use a DSLR for the purpose.
- Upload the photo spheres to your Google+ Photos. It will be a good idea to put them all together in a single album.
- Go to Google Maps Views and use the camera icon button with a + laid on top of it in the top toolbar to share those photo spheres on Views.
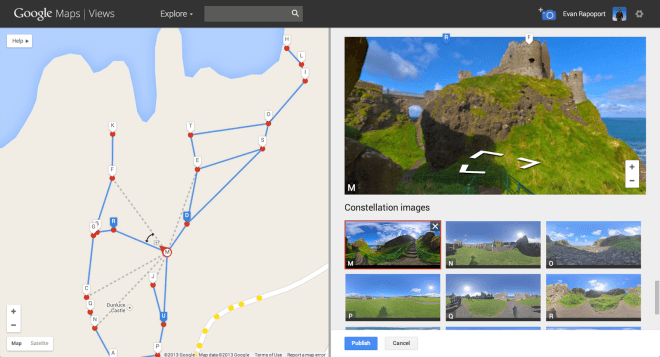
- Next, go to your profile on Views, where your images will appear as previews on the right, and as dots on a map on the left.
- Click Select images, followed by selecting all the photo spheres that you want to use for the purpose. To help you with the selection, photo spheres will be shown in blue on the map, with letters denoting their sequence order.
- After you have selected the desired photo spheres, click Connect images.
- Once connected, you can arrange any photosphere that’s not in the right place by dragging its dot to the right location.
- Similarly, if any photo sphere needs rotation to get aligned correctly, click it and a red marker will appear. Click and hold the pointer, and you’ll be able to rotate it in the right direction.
- Once you have ensured correct placement and alignment of your photo spheres, connect them together by clicking a marker to select it, followed by clicking the gray dotted line representing a connection. The line will turn blue from gray, indicating the connection was made.
- Similarly, you can connect a photo sphere to any nearby Street View (denoted by yellow dots on the map) by clicking the street view’s marker, hovering over any yellow dot, and click the gray dotted line that appears.
- You may also see a few connections between photo spheres created automatically for you, denoted by solid blue lines. You can remove any of them by simply clicking the line connecting them.
Do make sure to only connect photo spheres that don’t have obstacles between them that would prevent navigation from one to the other.
That’s pretty much it – after you have connected and published your photo spheres using this method, they will become available on Google Maps Street View for the whole world to enjoy. Here’s how a street view created like this would appear in Google Maps:
[via Google Maps Blog]

Just FYI that you can also do this right from your phone. Simply open the photosphere from the gallery, click the share icon, and send to the Google Maps application. Click Publish and you are done.
Yes, that works for uploading individual photo spheres to Maps. However, you will still need to use this method for stitching multiple photo spheres together to form a proper Street View.