TeamViewer App Screen Share Guide
How many times have you tried to explain the way something works on your computer to your friends or co-workers and haven’t been able to demonstrate it efficiently? Screen sharing is a productive method of sharing and demonstrating information in real time without any obstacles. TeamViewer app is one of the best, feature-rich options available for screen sharing. It’s free for personal use, and thanks to the friendly user interface of the software, it works like a charm.
As a remote access app, TeamViewer offers more than just screen sharing such as controlling a remote computer, transferring files, unattended access, and more. So, you don’t need multiple apps for remote monitoring, collaborations, or demonstrations. Considering more than 600,000 customers worldwide and 2.5 billion devices connected, TeamViewer is an incredibly popular and appreciated software around the world. In this article, we have gathered all the information you need to familiarize yourself with the app and easily set it up and use it on your computer.
Overview to TeamViewer App
TeamViewer app comes with different versions based on the customers’ needs. The full version specified as TeamViewer Full Client on the official website includes all the features such as online meetings, file transfer, desktop sharing, etc. However, if you only need TeamViewer to allow someone remotely access your device, there is a lighter version called TeamViewer QuickSupport that’ll provide you with exactly that.
On the other hand, TeamViewer Host is the best version if you need unattended access to a device. You can utilize this version to gain permanent access to a device, which is great for IT management and remote server maintenance. There is a specialized version of the software called TeamViewer Assist AR that was created to offer augmented reality (AR) technology capabilities. This version helps users provide visual guidance to solve problems and assists technicians with complicated installations and repairs. It’s only available for Android and iOS.
Many individual users and companies employ TeamViewer merely for online meetings and demonstrations. That’s why there is a separate version specifically for this kind of demand named TeamViewer Meeting. With this app, you can organize meetings, quickly communicate with other people, share your screen, and record the meetings.
Here is a summary of the different versions of TeamViewer:
- TeamViewer Full Client: This is for users who want all the main features.
- TeamViewer QuickSupport: For receiving remote support.
- TeamViewer Host: For Unattended access to devices.
- TeamViewer Assist AR: For access to augmented reality features.
- TeamViewer Meeting: For efficient online meetings.
Best Times to Use TeamViewer
There are many situations in which TeamViewer can help you solve an issue or improve your communication possibilities. Here are the best use cases for TeamViewer:
- Remote Work: With TeamViewer, you don’t have to be in your office to be able to continue your work. Even when you travel, TeamViewer makes it possible to connect to your work computer.
- Monitoring and Management: Maintenance and management no longer need a physical presence. Many users employ TeamViewer to monitor and manage systems remotely.
- Technical Support: Customer support teams often use TeamViewer to provide technical support and take control of remote devices to troubleshoot and solve their issues.
- Meetings and Demonstrations: TeamViewer makes it possible to organize meetings and demonstrations with advanced tools. It’s a great app for training and education through real-time interaction.
How to Screen Share Using the TeamViewer App
TeamViewer app is available on many devices and operating systems, including Windows, MacOS, Linux, ChromeOS, Raspberry Pi, Android, and iOS. The app works similarly on different devices, and the steps are quite alike, but we have prepared step-by-step guides for the popular operating systems nonetheless:
Windows
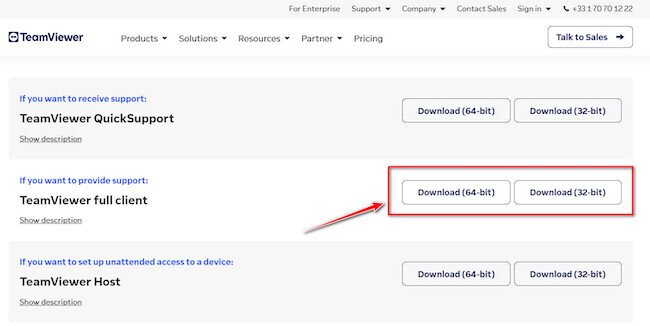
- Download the Windows version from the official website of TeamViewer. There are various versions of the software available. If you want the full version, download “TeamViewer full client.” Choose the 64-bit or 32-bit version based on the device.

- After the download, install the app on your Windows PC and open it. The partner who wants to share their screen also needs to download and install the app.
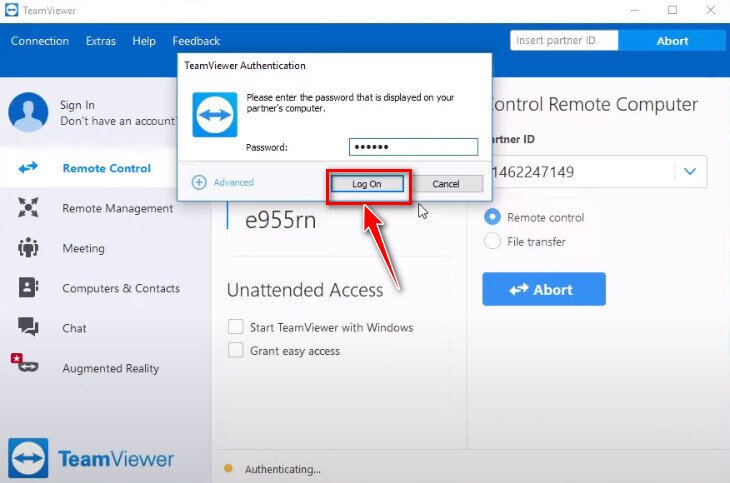
- Ask for your partner’s ID and password. Type your partner’s ID in the “Session Code” section and then click on the “Connect” button.

- A window will pop up asking you to enter the password. Type your partner’s password and then select “Log On.” Now, you can see and control your partner’s computer.

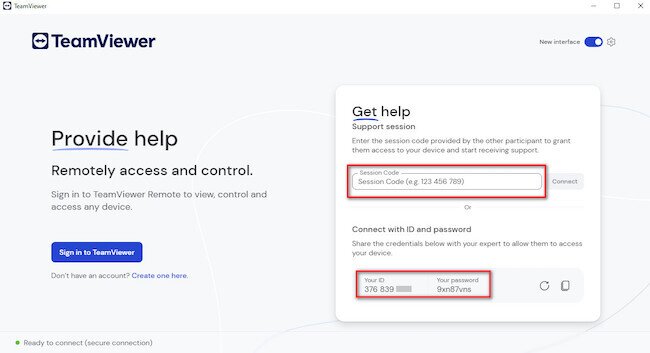
Note: If you want to share your own screen with your partner, on the main page of the app, you can see your ID and password. Similarly, copy the ID code and password and send it to the person you want to share your screen with. Then, the other person needs to enter the ID and password to gain access to your computer.
MacOS
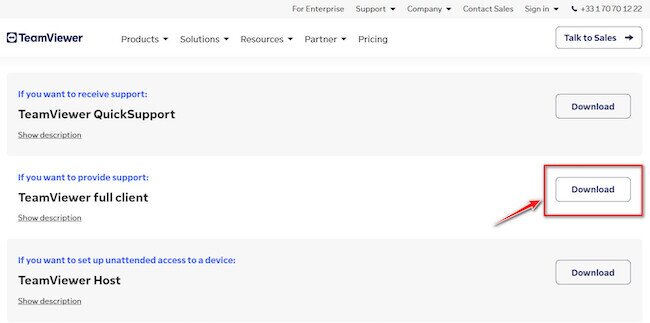
- Visit TeamViewer’s Mac page and click the “Download” button next to “TeamViewer full client.”

- Open the downloaded file and follow the installation process. Your partner should also download and install the app. TeamViewer supports cross-platform sharing, so you can share the screen of a Mac device with another device that uses a different operating system.
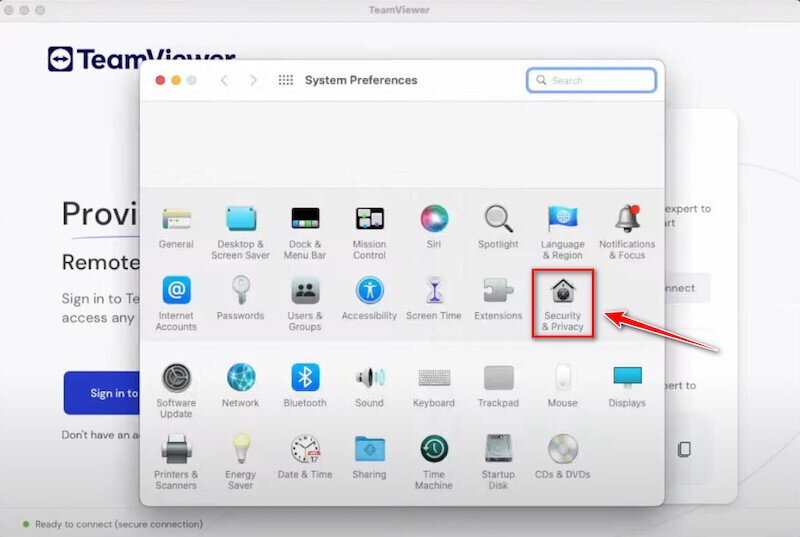
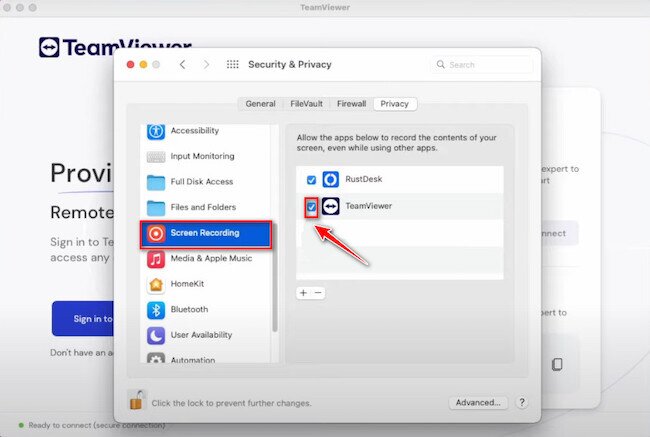
- If you want to share your screen on a Mac device, you need to give permission. so after the installation, go to the “System Preferences” of your Mac device and click on “Security & Privacy.”

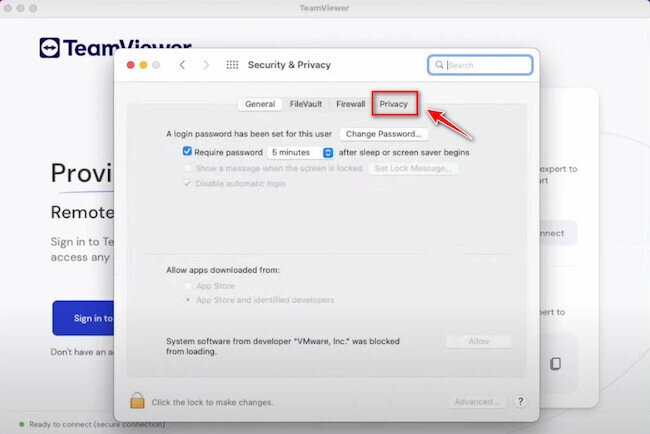
- On the opened page, go to the “Privacy” tab.

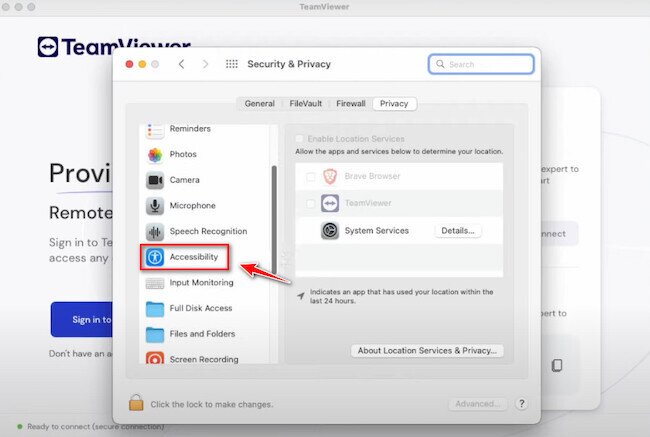
- On the left menu, scroll down and find “Accessibility” and click on it.

- Now, make sure the checkmark next to the “TeamViewer” is enabled.
- Again, on the left menu, find “Screen Recording” and select it. Mark sure the checkmark next to it is enabled.

- Similar to the Windows guide above, ask for your partner’s ID and password, and enter it in the appropriate sections. Alternatively, you can send your ID and password to your partner in order to share your own screen.