Use Ubuntu server as a Tailscale node
Have you ever wanted to route all of your Tailscale traffic through your Ubuntu server for privacy reasons? Wish you could access devices on an Ubuntu LAN through Tailscale? If so, this guide is for you. Follow along as we show you how to use your Ubuntu server as a Tailscale exit node.
What is a Tailscale exit node?
A Tailscale exit node serves as a place to route your network traffic. If you want to enhance your privacy, you can configure every device connected to your Tailscale mesh network to route all of your internet traffic through it, keeping everything private.
However, Tailscale exit nodes aren’t just a privacy thing. They can also help you access all devices on a LAN elsewhere, even if these devices aren’t connected to the Tailnet. Suffice it to say, that exit nodes are a great feature!
How to create a Tailscale account
Using the Tailscale service is free, however, you need to create an account. To create an account, head over to the official Tailscale website. Once there, find the “Get started free” button, and click on it.
After selecting the “Get started free” button, you’ll be asked to “sign up with your identity provider.” Choices are “Google,” “Microsoft,” “GitHub,” “Apple,” or OIDC. Once you’ve chosen, log into the service to get started with a Tailscale account. This process should be pretty quick.
How to install the Tailscale application on Ubuntu server
Now that you have a Tailscale account configured, you need to install the client on your Ubuntu server. To start, SSH into your Ubuntu server using your credentials. Then, use the curl command to download the Tailscale GPG key to Ubuntu.
Note: this guide focuses on setting up Tailscale on 22.04 LTS. If you are using a different release of Ubuntu, please check the “Download” page on Tailscale’s website.
curl -fsSL https://pkgs.tailscale.com/stable/ubuntu/jammy.noarmor.gpg | sudo tee /usr/share/keyrings/tailscale-archive-keyring.gpg >/dev/null
With the GPG key added to your Ubuntu system, you’ll need to add the Tailscale repo to your system. You can add the Tailscale repository to your system using the following curl command.
curl -fsSL https://pkgs.tailscale.com/stable/ubuntu/jammy.tailscale-keyring.list | sudo tee /etc/apt/sources.list.d/tailscale.list
Once you’ve added the Tailscale repository to your Ubuntu system, use the apt update command to refresh Ubuntu’s software cache.
sudo apt update
Now that everything is up to date, you can install the Tailscale application on your system by entering the following apt install command.
sudo apt install tailscale
When you enter the apt install command above, Ubuntu will configure and install the Tailscale client, and set up the tailscaled.service daemon. From here, you’ll need to run the tailscale up command to log in.
sudo tailscale up
Follow the URL in your SSH session to log your Ubuntu server into the Tailscale network via your account.
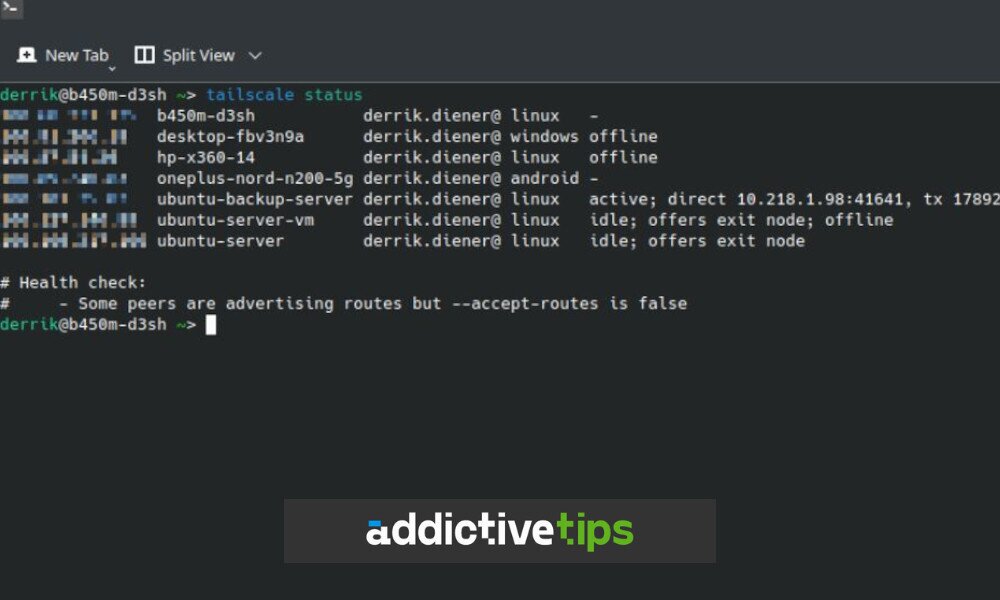
How to set up the Ubuntu server exit node
Now that Tailscale is logged in, you need to take Tailscale down so that you can bring it back up as an exit node. To take Tailscale offline, run the following tailscale down command.
sudo tailscale down
Now that Tailscale is down, your Ubuntu server will not be connected to the Tailscale network. You’ll now be able to bring it back online as a node using the following tailscale up command.
sudo tailscale up --advertise-exit-node
When you bring your Ubuntu server back online with the --advertise-exit-node flag, Tailscale will warn you that you do not have IP forwarding enabled and that your node will not work. You can quickly fix this with the following commands.
sudo sysctl -w net.ipv6.conf.all.forwarding=1
sudo sysctl -w net.ipv4.ip_forward=1
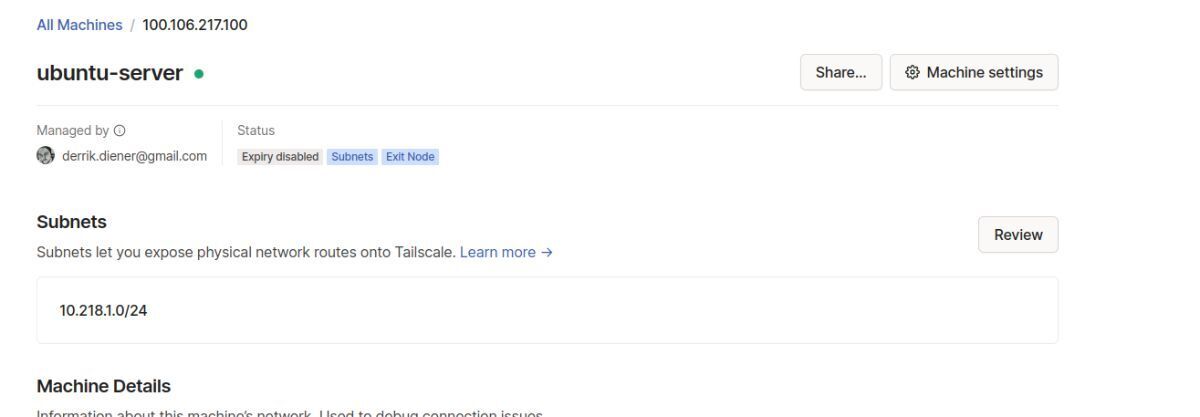
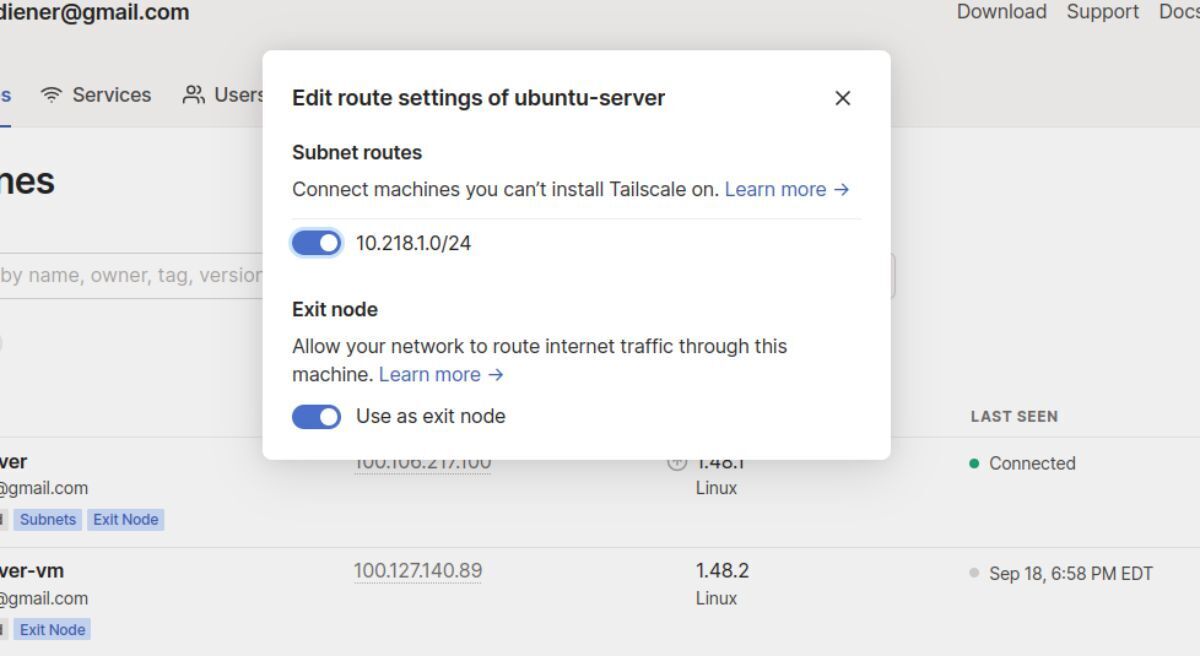
Once forwarding is enabled your Ubuntu server will be enabled as an exit node on your Tailnet. However, consider logging into the Tailscale admin interface to further configure your node settings.
How to connect devices to the exit node
To use your Ubuntu server’s Tailscale exit node, do the following. Please note that if you want LAN access, you need to enable it when selecting
Linux
To connect a Linux device to your Ubuntu server exit node, first, take your device down with sudo tailscale down. Then, bring it back up with the following tailscale up command.
sudo tailscale up --exit-node=TAILNET_IP_OF_UBUNTU_SERVER_EXIT_NODE
Windows
Right-click on the Tailscale client in your Windows system tray and select the Ubuntu server as an exit node.
Mac OS
Access the Tailscale tray icon app in the Mac OS global menu, and select your Ubuntu server as an exit node.
Mobile
Install the Tailscale app for Android or iOS. Then, connect to your Tailnet and select the Ubuntu server to use as your exit node.
