Scan for vulnerabilities on Linux with Nessus
Are you worried about the security of your Linux desktop or server? Then, check out the Nessus vulnerability scanner. With it, users can do deep vulnerability scans to keep machines and networks safe from threats. Here’s how to use Nessus to scan for vulnerabilities on Linux.
Installing Nessus on Linux
Before you can scan for vulnerabilities on your Linux PC with the Nessus app, you must install it. Installing it is done by downloading the latest package from the website rather than directly from repos included in your OS.
Officially, Nessus is supported by Ubuntu, Debian, OpenSUSE, and Fedora. There is also a community build of the app on the Arch Linux User Repository for Arch users. To install Nessus on your Linux system, launch a terminal.
Once the terminal window is open and ready to use, the installation process can begin. Using the installation instructions below that correspond with the Linux OS you use, set up Nessus.
Ubuntu
To install Nessus on Ubuntu, start by downloading the latest DEB package to your computer. You can download the DEB package quickly with the following wget download command.
wget https://www.tenable.com/downloads/api/v1/public/pages/nessus/downloads/16125/download?i_agree_to_tenable_license_agreement=true -O Nessus-10.1.2-ubuntu1110_amd64.deb
Once the package file is downloaded to your computer, install it using the apt install command below.
sudo apt install ./Nessus-10.1.2-ubuntu1110_amd64.deb
Debian
If you use Debian, you’ll be able to install Nessus on your system by downloading the latest DEB package release. To get your hands on this package, run the following wget download command.
wget https://www.tenable.com/downloads/api/v1/public/pages/nessus/downloads/16125/download?i_agree_to_tenable_license_agreement=true -O Nessus-10.1.2-ubuntu1110_amd64.deb
After downloading the file to your Debian system, you can install it on your computer using the apt-get install command. Setting up the package with apt-get rather than dpkg will allow Debian to collect all dependencies for the package and set up all systemd services.
sudo apt-get install ./Nessus-10.1.2-ubuntu1110_amd64.deb
Arch Linux
If you want to install the Nessus vulnerability scanner on your Arch Linux PC, you will need to install the software from the AUR. Start by setting up “git” and “base-devel” packages using the pacman -S command.
sudo pacman -S git base-devel
With the two packages set up, enter the commands below in succession to get the Trizen AUR helper working. This tool will make the installation of Nessus much easier on your Arch Linux system.
git clone https://aur.archlinux.org/trizen.git
cd trizen/
makepkg -sri
With the Trizen app installed, you can set up the latest version of the Nessus application using the trizen -S command.
trizen -S nessus
Fedora
To get the Nessus app set up on your Fedora Linux system, start by downloading the RPM package to your computer using the wget download command.
wget https://www.tenable.com/downloads/api/v1/public/pages/nessus/downloads/16118/download?i_agree_to_tenable_license_agreement=true -O Nessus-10.1.2-fc20.x86_64.rpm
With the file downloaded to your Fedora system, you can install Nessus on your Linux PC using the dnf install command.
sudo dnf install Nessus-10.1.2-fc20.x86_64.rpm
OpenSUSE
To install the Nessus application on your OpenSUSE Linux system, you must first download it. Download the RPM package using the wget command below.
wget https://www.tenable.com/downloads/api/v1/public/pages/nessus/downloads/16122/download?i_agree_to_tenable_license_agreement=true -O Nessus-10.1.2-suse15.x86_64.rpm
With the file downloaded to your Linux PC, install the Nessus app on your OpenSUSE system using the zypper install command.
sudo zypper install Nessus-10.1.2-suse15.x86_64.rpm
Scan for vulnerabilities on Linux with Nessus
To scan your network with Nessus, start opening a new browser tab. Then, navigate to the following URL.
https://localhost:8834
Note: if you’ve installed Nessus on a remote machine on your network, replace “localhost” with the computer’s local IP.
Once you’ve loaded the URL, you may see your browser claim there is a security issue. Allow the exception to continue to Nessus. Then, follow the UI to set up your Nessus account.
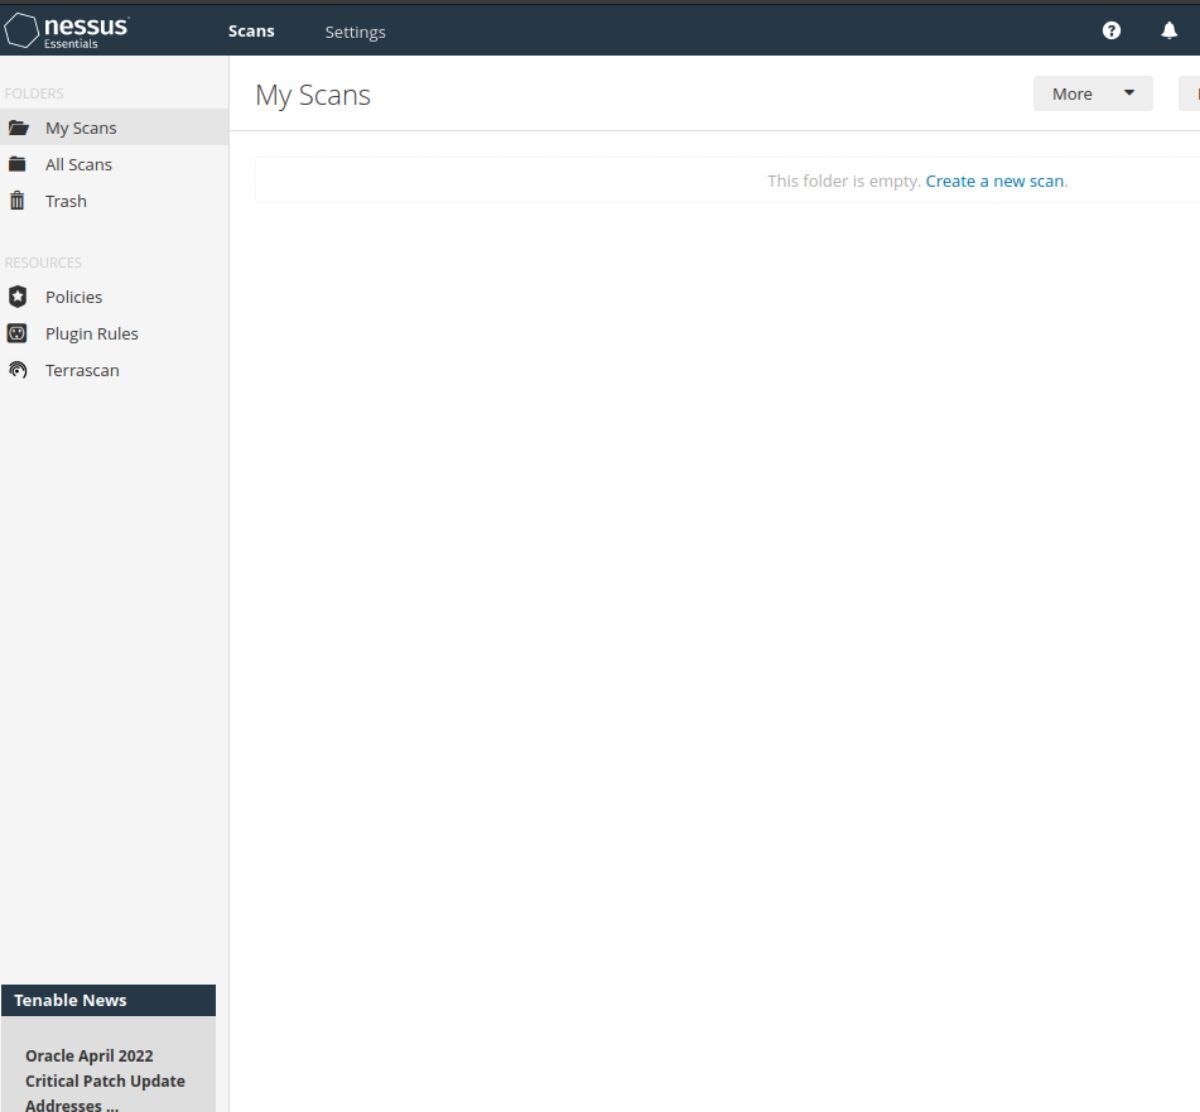
When the Nessus app is loaded up, find the “my scans” area, and click on it with the mouse. Then, click on the “Create a new scan” button.
After selecting the “Create a new scan” button, a pop-up window will appear. Select the “Host Discovery” option. Then, find the “Targets” box, and enter an IP address range.
For example, if your router runs at 192.168.1.1, you can scan every connected device with “192.168.1.0/24”. Or, if your router runs at 10.218.1.1, try “10.218.1.0/24.”
Note: not all router IP addresses are the same. Refer to the manual to determine what local IP it uses and its IP range.
Once you’ve entered your scan’s IP range, click on the play button to start the scan process. Scanning shouldn’t take too long to complete.
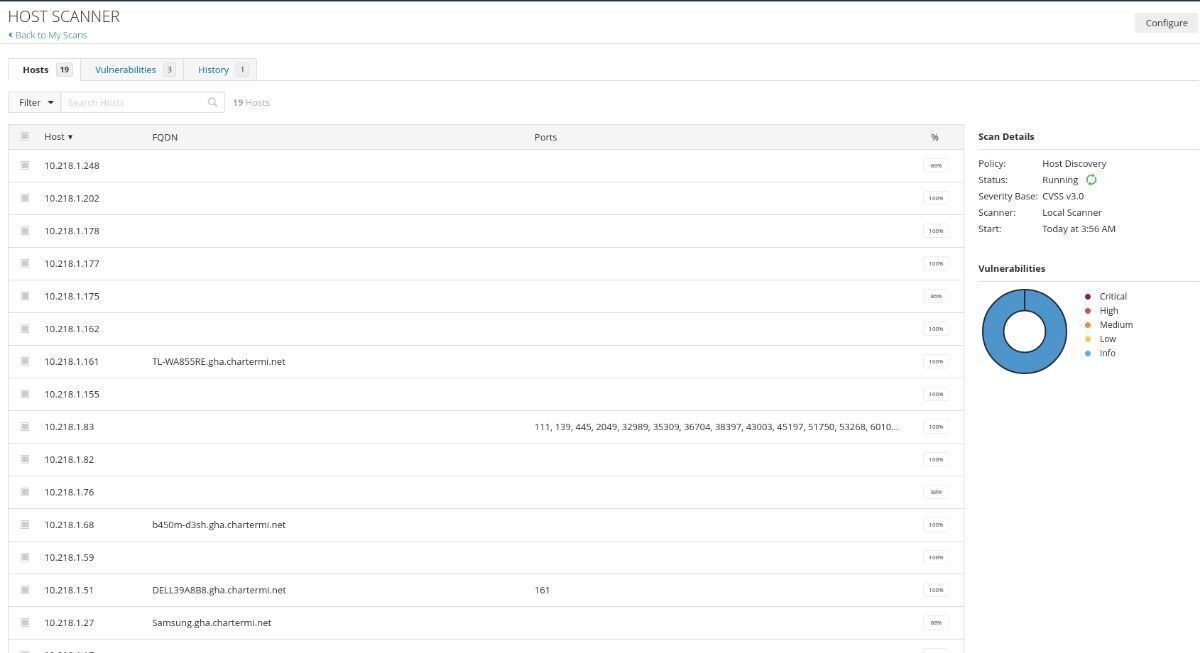
After the discovery scan is finished, you’ll see a readout of every computer connected to the network and what ports are open. Take any IP from the discovery scan, copy it to your clipboard, and return to “My scans.”
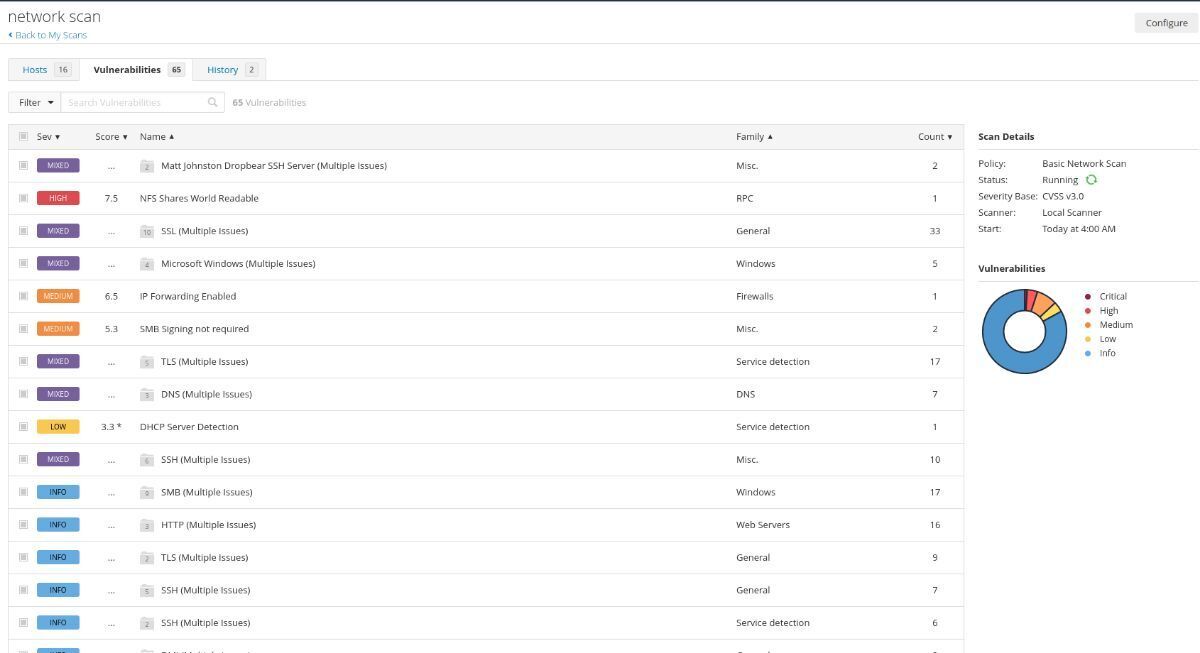
In the “My Scans” area, click on the “New Scan” button. Then, select a scan operation. For example, to check for malware, select “Malware Scan.” For a basic network scan, select “Basic Network Scan,” etc.
Select it with the mouse when you’ve decided what scan to do. Then, input your device IP, and click on the “Save” button. Lastly, click on “My Scans” and click the play button to start your scan.
The scan process will take some time to complete. When the process is complete, select it in “My Scans,” followed by the “Vulnerabilities” scan to view vulnerabilities Nessus detected.
