Install Windows Server in VirtualBox on Linux
Generally, most people deploy Windows Server on a physical server. However, if you primarily use Linux and need access to a Windows Server, you can virtualize it. In this guide, we’ll show you how to install Windows Server in VirtualBox on Linux.
Please note that this guide assumes your Linux machine has a GUI interface to use tools like VirtualBox. If you wish to run this on a production server, you’ll need to use the VirtualBox cli tool Vboxmanage.
How to download Windows Server
You must download Windows Server from the Microsoft Server Evaluation Center. Follow this link. Then, once at the evaluation center, you can select either the ISO download or the VHD download.
In this guide, we’ll be instructing you to download the ISO version of Windows Server. The reason? The VHD release from Microsoft, while useful, doesn’t allow users to customize the OS or install it. It simply deploys as a ready-to-use VM. You’ll want to customize your installation if you plan to run Windows Server on VirtualBox.
How to install VirtualBox on Linux
VirtualBox is developed by Oracle. However, it isn’t installed by default on any Linux operating system. As a result, if you wish to use it to virtualize Windows Server on your Linux system, you need to first install it.
Installing VirtualBox on Linux is pretty straightforward. To start the installation process, open up a terminal window. You can open up a terminal window by pressing Ctrl + Alt + T on the keyboard. Or, search for “Terminal” in the app menu and launch it that way. With the terminal app open, follow the installation instructions below to get VirtualBox working on your Linux OS of choice.
Ubuntu installation instructions
To install VirtualBox on your Ubuntu Linux system, you will not need to download any special packages. Instead, use the apt install command below and install the “virtualbox” package from the official Ubuntu software sources.
sudo apt install virtualbox
Debian installation instructions
On Debian, if you wish to install VirtualBox (especially on newer distributions like 11 and 12), you need to download the latest version directly from Oracle. To download, use the following wget command.
wget https://download.virtualbox.org/virtualbox/7.0.8/VirtualBox-7.0.8-156879-Linux_amd64.run
After you’ve downloaded the latest VirtualBox binary to your computer, you’ll need to update the permissions of the file. using chmod update the permissions.
chmod +x VirtualBox-7.0.8-156879-Linux_amd64.run
With the permissions up to date, ensure you have Linux Kernel headers installed on your Debian system. You’ll need these as VirtualBox needs to build kernel modules.
sudo apt install linux-headers-$(uname -r)
You can then install the VirtualBox run package on your Debian system by executing the run file with the command below.
su

./VirtualBox-7.0.8-156879-Linux_amd64.run
Arch Linux installation instructions
On Arch Linux, getting the VirtualBox app working is done with the pacman -S command. Enter the command below to get the app working.
sudo pacman -S virtualbox
Fedora installation instructions
To use VirtualBox on Fedora, you must first enable the RPMFusion software repositories. You can enable both repositories by entering the commands below in a terminal on your system.
sudo dnf install https://mirrors.rpmfusion.org/free/fedora/rpmfusion-free-release-$(rpm -E %fedora).noarch.rpm

sudo dnf install https://mirrors.rpmfusion.org/nonfree/fedora/rpmfusion-nonfree-release-$(rpm -E %fedora).noarch.rpm
Once the repos are installed on your Fedora system, you can install VirtualBox with the following command.
sudo dnf install VirtualBox
OpenSUSE installation instructions
To install VirtualBox on OpenSUSE, you’ll need to enter the following zypper in command.
sudo zypper in virtualbox
How to create the Windows Server VM in VirtualBox
To create the Windows Server VM in VirtualBox, start by clicking on the “New” button in the VirtualBox GUI app on the Linux desktop. Then, find the “Name” box, and enter “Windows Server.”
After entering the name, find “ISO Image,” and browse for the Windows Server ISO file you downloaded previously. Then, once the ISO is selected, VirtualBox should auto-select Windows Server. Click “Next” to continue.
Note: ensure you select “Skip Unattended Installation,” as Windows Server sometimes doesn’t work with this feature.
On the next page, choose the base memory you’d like to use with Windows Server. You’ll also need to choose the amount of CPUs to use with the VM. Once you’ve made your choices, click the “Next” button to continue.
After choosing RAM and CPU options, VirtualBox will ask you to create a virtual hard disk for the VM. By default, it’ll choose 50 GB. Leave it at 50 GB, or, create a larger one using the UI. When done, click the “Next” button to move to the next page.
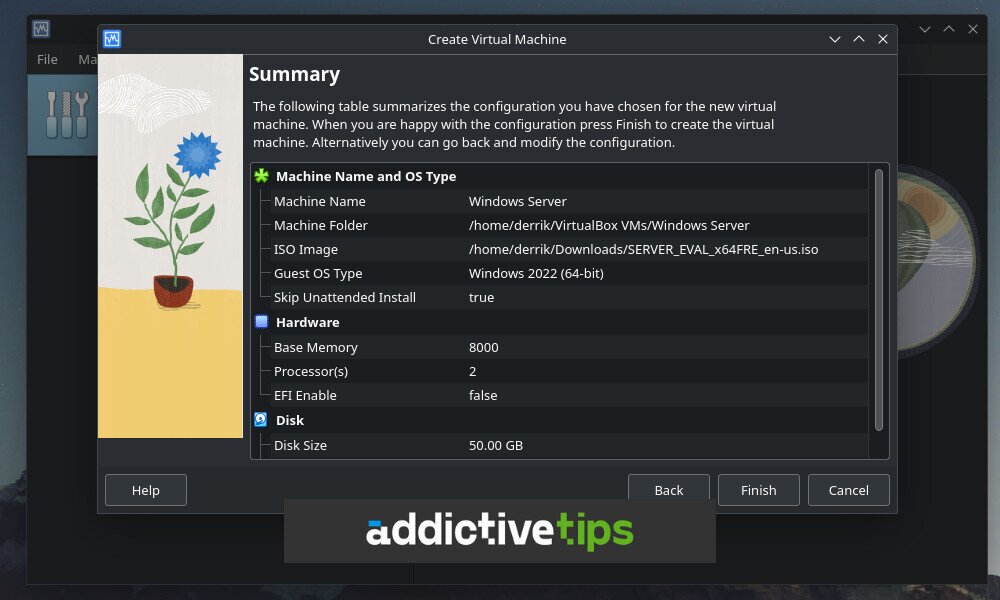
On the last page, VirtualBox will show you a summary of the VM. Select the “Finish” button to finish setting up your VM. You can then start it up and install Windows Server the way you traditionally would.
