How to set up Nextcloud on NixOS
If you use NixOS for a home server operating system and want to deploy Nextcloud but don’t know how we can help! Follow along with this guide to learn how you can get Nextcloud working on your NixOS system.
How to Create a Nextcloud NIX Module
If you want to deploy Nextcloud on your NixOS server, you’ll need to edit your configuration.nix to include Nextcloud configurations. However, adding a lot of information to a single file can make editing it annoying. An easier way to add Nextcloud to your configuration.nix file is to create a nextcloud-server.nix module and import it.
To start, open up a terminal session on your NixOS server via SSH. Once logged in, use the touch command to create nextcloud-server.nix in the /etc/nixos/ folder.
sudo touch /etc/nixos/nextcloud-server.nix
Once you’ve created this module, open up the configuration.nix file and add it to the “imports” section. Your imports should look similar to the example code below.
sudo nano -w /etc/nixos/configuration.nix
Ensure your “imports” section looks similar to:
{ config, pkgs, ... }:

{
  imports =
    [
      ./hardware-configuration.nix
      ./nextcloud-server.nix
      # Other imports...
    ];
  # Other configurations...
}
Once you’ve edited configuration.nix to include nextcloud-server.nix, save your edits in Nano with Ctrl + O. You can then close the configuration.nix file with Ctrl + X.
When you’ve closed the configuration.nix file, open up the nextcloud-server.nix file in Nano for editing.
sudo nano -w /etc/nixos/nextcloud-server.nix
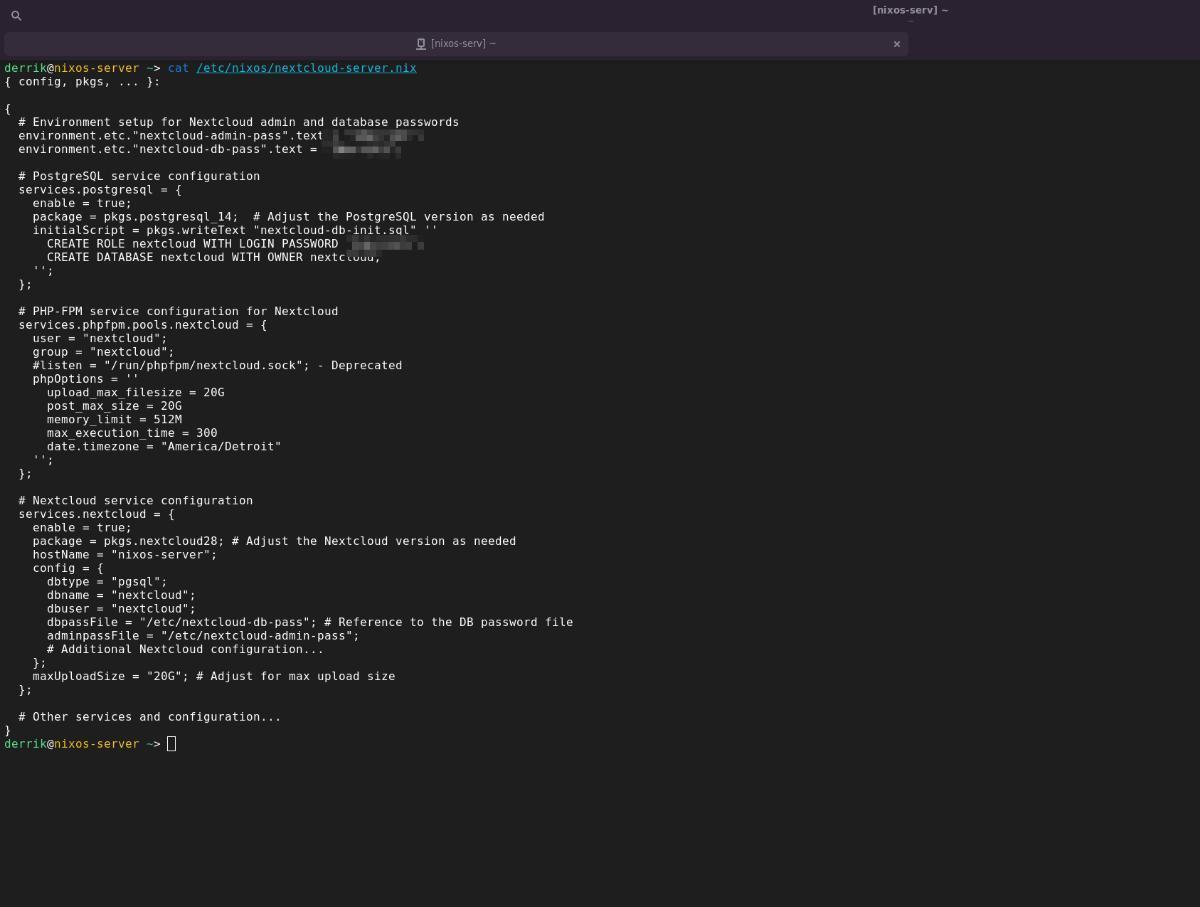
Then, paste the following code into the file:
{ config, pkgs, ... }:

{
  # Environment setup for Nextcloud admin and database passwords
  environment.etc."nextcloud-admin-pass".text = "SECURE_PASSWORD_HERE";
  environment.etc."nextcloud-db-pass".text = "SECURE_PASSWORD_HERE";

  # PostgreSQL service configuration
  services.postgresql = {
    enable = true;
    package = pkgs.postgresql_14;  # Adjust the PostgreSQL version as needed
    initialScript = pkgs.writeText "nextcloud-db-init.sql" ''
      CREATE ROLE nextcloud WITH LOGIN PASSWORD 'SECURE_PASSWORD_HERE';
      CREATE DATABASE nextcloud WITH OWNER nextcloud;
    '';
  };

  # PHP-FPM service configuration for Nextcloud
  services.phpfpm.pools.nextcloud = {
    user = "nextcloud";
    group = "nextcloud";
    phpOptions = ''
      upload_max_filesize = 1G
      post_max_size = 1G
      memory_limit = 512M
      max_execution_time = 300
      date.timezone = "America/Detroit"
    '';
  };

  # Nextcloud service configuration
  services.nextcloud = {
    enable = true;
    package = pkgs.nextcloud28; # Adjust the Nextcloud version as needed
    hostName = "nixos-server";
    config = {
      dbtype = "pgsql";
      dbname = "nextcloud";
      dbuser = "nextcloud";
      dbpassFile = "/etc/nextcloud-db-pass"; # Reference to the DB password file
      adminpassFile = "/etc/nextcloud-admin-pass";
      # Additional Nextcloud configuration...
    };
    maxUploadSize = "1G"; # Adjust for max upload size
  };

  # Other services and configuration...
}
This is the configuration for a basic Nextcloud server running PostgreSQL on NixOS. In addition, this configuration has PHP-FPM settings so that you can control the upload size for the server.
Modifying the Nextcloud NIX Module
You’ll need to customize the Nextcloud NIX module to suit your needs. Start by finding:
  # Environment setup for Nextcloud admin and database passwords
  environment.etc."nextcloud-admin-pass".text = "SECURE_PASSWORD_HERE";
  environment.etc."nextcloud-db-pass".text = "SECURE_PASSWORD_HERE";
And change “SECURE_PASSWORD_HERE” to a secure password. You’ll need to do this two times. Once you’ve changed “SECURE_PASSWORD_HERE” to a strong password, you must set a third one.
CREATE ROLE nextcloud WITH LOGIN PASSWORD 'SECURE_PASSWORD_HERE';
Change “SECURE_PASSWORD_HERE” to a secure password. This password is for the “nextcloud” user in the PostgreSQL database, so ensure it is a strong password. Then, find date.timezone = "America/Detroit" and change “America/Detroit” to your preferred timezone (optional).
Once you’ve set your timezone and passwords, find hostName = "nixos-server"; and change “nixos-server” to your preferred hostname. This hostname is the URL in which you can access Nextcloud on your LAN.
When all changes have been made in the nextcloud-server.nix module, press Ctrl + O to save. You can then close the editor with Ctrl + X on the keyboard.
How to Deploy Nextcloud on Your NixOS Server
All the hard work for setting up Nextcloud on your NixOS server is done. Now you just need to rebuild the operating system so that it can include the Nextcloud configuration. To rebuild your server, you’ll need to use the nixos-rebuild command.
sudo nixos-rebuild boot
Running the nixos-rebuild boot command will build Nextcloud into your NixOS home server and make this new build of NixOS the default boot option, but it won’t switch to it until you reboot. Keep in mind, that rebuilds take a while to complete.
Once your NixOS system is built, reboot your NixOS server. When you log back in, you’ll have Nextcloud deployed.
How to Set Up Nextcloud on Your NixOS Server
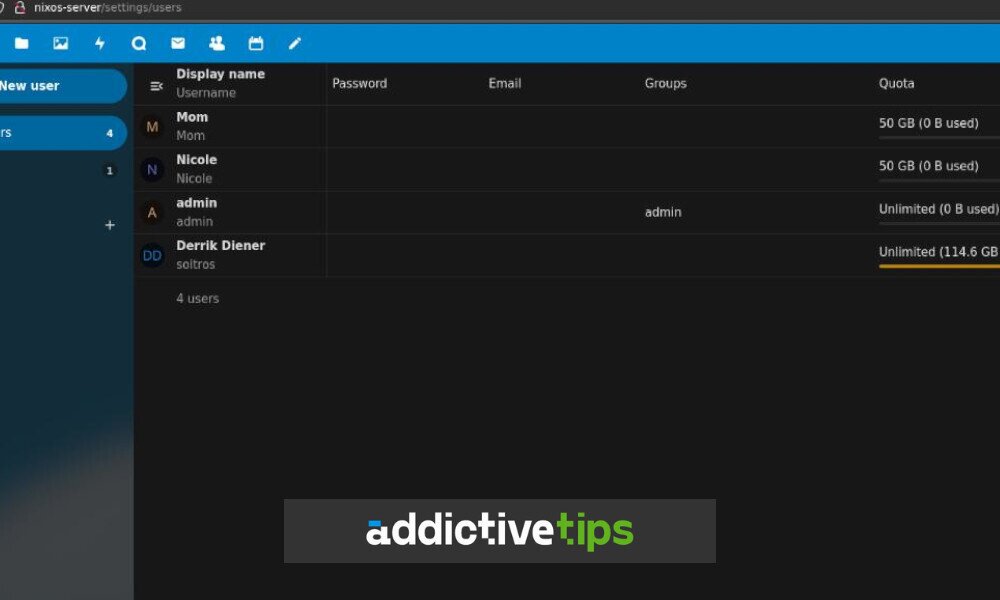
You need to create users and configure your Nextcloud server on your NixOS server once it is deployed. To do this, open up a web browser on a computer on the same LAN as your NixOS server and follow the creation instructions.
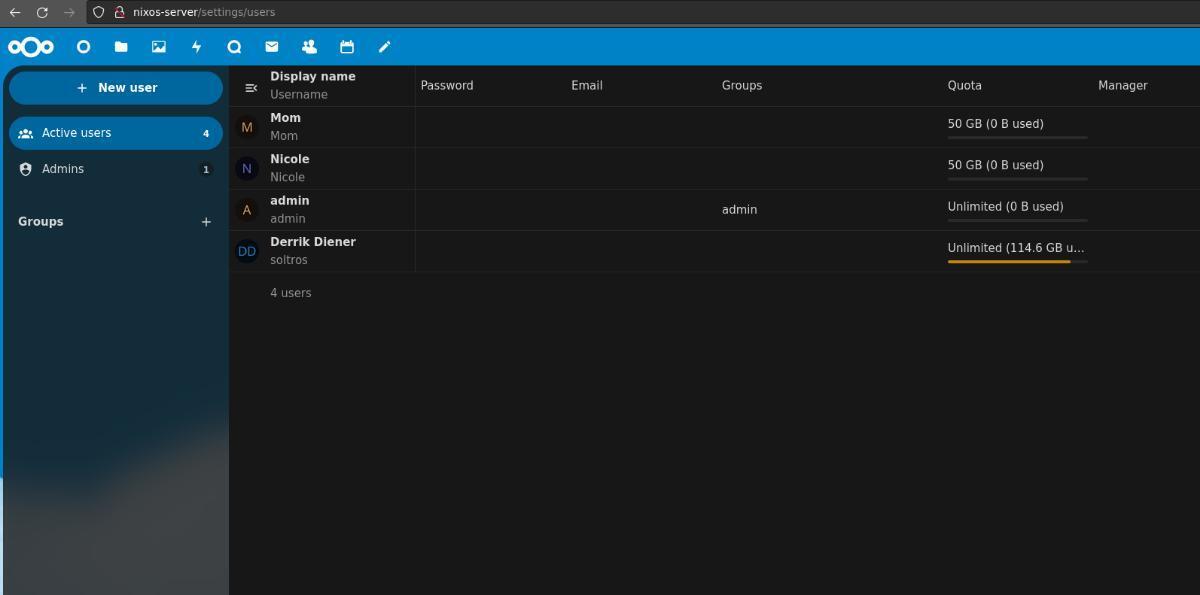
When you’ve gone through the initial setup, you’ll be free to create users that can access your Nextcloud instance via the web UI.
