How To Create A Bootable Live Ubuntu 9.04 USB Drive
Ubuntu 9.04 is the latest in line of Ubuntu Linux operating system, which is faster and has a more improved user experience. I have only 3 partitions on my hard disk, one for Windows Vista, one for Windows 7 beta, and one for my local files. I am used to 3 partitions maximum, since it looks less cluttered this way. Instead of creating a fourth partition, why not try installing it on a USB drive? Obviously, doing a proper install is better than doing a installation on USB, but since I don’t use Ubuntu much creating a fourth partition doesn’t make sense either.
For those having problems with bootable live CD, they can try creating a bootable live USB.
UNetbootin is a free portable tool for both Windows and Linux that lets you create bootable live USB drives for a variety of Linux distributions. It also lets you do a quick ‘frugal install’, but we will only cover the procedures for creating a bootable live Ubuntu USB in this post.
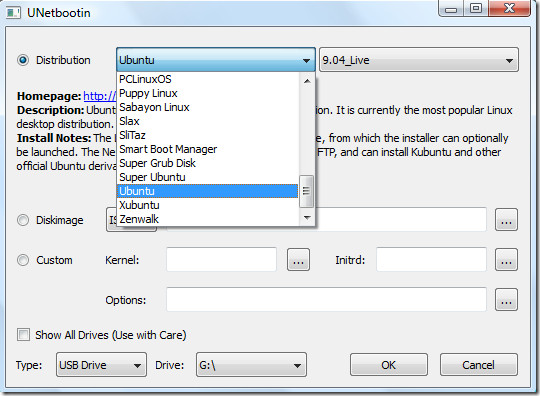
Once you run this tool, you get two choices. Either you can select to download a Linux distribution from the list or you can locate the disk image of the Linux distribution you downloaded. If you have not downloaded Ubuntu yet, select Ubuntu from the list of Linux distributions and then select the latest version 9.04_live from the list.

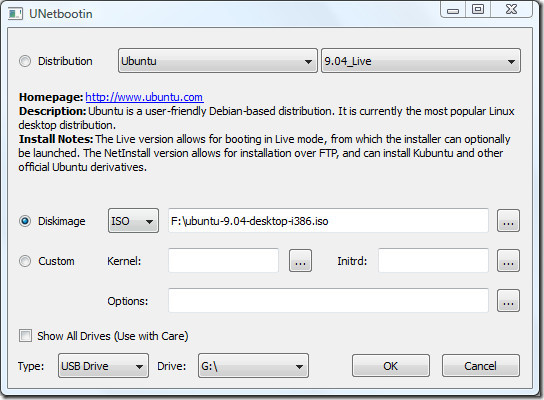
In my case, I already downloaded Ubuntu 9.04 Desktop Edition Image file(.iso file) from the website, so the later option would be best for me.

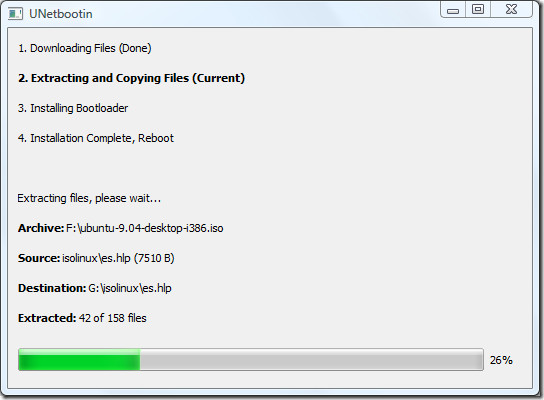
In the next step, select the Type of installation, in our case it is USB Drive. Once done, click OK and it will begin extracting and copying the files to the USB Drive.
Note: You should have a USB Drive with a minimum 1GB of free memory.

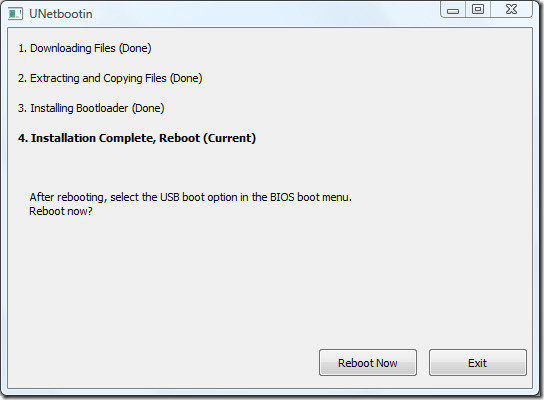
Once the installation is complete, it will ask you to restart the computer. Click Reboot Now to restart your system.

Now while your system is starting up press the appropriate button(usually F1, F2, F12, ESC, Backspace, or Escape) to bring up Bios Boot Menu. Now change the startup order to boot USB by default, usually you will have to press F6 to move the selected USB device on top. Once done, save changes and restart the system. Now you will have Ubuntu running from USB drive.
Note: If you get ‘BOOTMGR is missing’ error, then this fix will help.
Enjoy!

Hello I am jay, thanks for sharing Great information, Funny Usernames Reddit
We have at best technozu blog if you want to more information about technology please visit us.
in the list of the versions of ubuntu it does not show 9.04
This is LAME. The fix that you listed for ‘BOOTMGR is missing’ has NOTHING to do with this issue! We are trying to BOOT from the USB stick, not ‘repair Vista.’
In ‘olden days’ [LOL] there was a procedure where you UNHIDE and UNPROTECT (-h -s) the system ‘boot files’ and so forth, on a Windows Vista or Windows 7 installation, and then copy those to the USB stick, so it would be bootable.
There are HUGE problems with FAT-32 vs. NTFS and booting of USB sticks; AND even HUGER (ha, ‘more HUGE’) problems with 4GB and over vs. 4GB and under (in USB stick size).
AND even huge problems with certain ‘models’ of usb stick. Those that have the ‘built-in’ ReadyBoost enabled may have problems acting as normal boot devices.
I have a $10 4GB Ativa USB stick that works PERFECTLY, when formatted as FAT-32, BUT it is NOT big enough to hold the Windows Server 2008 Dell Install DVD – which is under 4GB but, for some reason, will NOT fit on a 4GB USB. So, currently I am trying 8GB USB sticks, but I noticed that they have the ‘ReadyBoost’ feature enabled, by default, and when formatted as FAT-32, I am not yet able to boot from the device, ‘no boot device found,’ BUT I’m not perfectly certain that I did the “diskpart” steps correctly (active, format, assign); SO, I tried then to use NTFS as the format for my 8GB USB, but ‘BOOTMGR is missing’ is the error I get.
So, there you have it.
Here’s what I did:
1. diskpart
2. select disk 1
3. clean
4. create partition primary
5. select partition 1
6. active
7. format fs=NTFS quick
8. assign
9. exit
But, I did a “drag-n-drop” copy and NOT an “xcopy” – so, now I’m wondering if that also had/has anything to do with it? YES, I have ‘show all hidden, system, etc.’ turned on.
Also, remember in ‘days of old,’ you would do a “Format /s” – so that you make a “system bootable” disk. So… Any ideas ??????? Thanks in advance!
after rebooting system the bootmgr file is missing.
what should i have to do now???
FAT32 doesn’t fix the problem
yes, it doesn’t resolve the bootmgr is missing issue.
I’m running unetbootin from Windows 7 home premium 64bit
I have the same problem. BOOTMGR is missing – I have Vista starter, when booting from that USB stick where I installed UBUNTU. that page about fixing – it need vista DVD – I dont have it right now… command line commands are not workin with that guide… please help!
In my opinion the ‘BOOTMGR is missing’ fix mentioned in this blog has nothing to do with the problem.
The fix is for correcting the error on the hard disk, but the problem we’re having when we try to create a bootable ubontu usb stick is caused by the formatting of the usb stick.
At least that’s my experience. First I tried to use an usb stick with NTFS formatting. Then I got the BOOTMGR is missing error. I tried to change different options and rebooted again and again – nothing changed.
Finally I tried to reformatted to FAT32 and started all over and this time i worked perfect.
So solution is to make sure your usb stick is NOT NTFS format.
Yes that worked for me too, tried Debian 6 64bit on my 8GB NTFS drive but it gave me same error. I used diskpart, cleaned the partition, created a primary partition afresh and quick formatted fat32. It worked fine. Surprisingly neither the developer of unetbootin nor do other forums provide any reasonable help.
Yours is the first post that I came across with the correct solution.
Thanks!
Hi,I get BOOTMGR is missing. But ONLY when the Ubuntu live USB is inserted, as soon as i remove it it's fine? Do I still need to follow your BOOTMGR fix?J
Hi,I get BOOTMGR is missing. But ONLY when the Ubuntu live USB is inserted, as soon as i remove it it's fine? Do I still need to follow your BOOTMGR fix?J
Hi,I get BOOTMGR is missing. But ONLY when the Ubuntu live USB is inserted, as soon as i remove it it's fine? Do I still need to follow your BOOTMGR fix?J
I'm in the process on downloading 9. older computers like PIII may not have the usb boot optin in their bios. So far Ubuntu 6 and 8 don't want to load a dell optiplex P4
Hi,
I went through quite a bit of pain and trying various tools such as unetbootin and pendrivelinux etc to come up witha a 16Gb Bootable USB that I could use to reboot my work laptop. The inbuilt tool in Ubuntu limited me to 1GB, the other limited me to 4Gb which wasn’t enough for what I wanted. Eventually I realised I was just being silly and there was an easy way. If you’re confident enough in your PC’s BIOS (and if you don’t know what I’m saying here, I suggest you get some help or leave well alone) but inactivate your hard drive, put in your USB, and just do a normal install from a live CD. The USB will be the only hard drive that the install sees. It’s an easy method that gives you all the usual support & options. There’s lots of guides on the net to show you how to do a normal install. Once you’re done, just go back to the BIOS & reactivate your hard drive.
Instead of doing this, you can also make USB drive load before the Hard drive. In this way the USB bootable disk will load first and you will be able to install the OS of your choice. 😉
True but then it isn’t portable. I wanted to create a persistant, portable, bootable USB that I could use on any PC and I didn’t want to have to have the usb fitted on the first pc when I used that, which is what happens if you don’t disconnect the hard drive temporarily.
Johnny P
Actually, I kept playing and found a better way. Download and install the Alternate Install Disk – get it from the usual Ubuntu download sites – just look lower in the page. While the install method is a bit clunkier to work through, doing it this way gives you 2 huge advantages – you don’t need the BIOS Change I mentioned above & you can have the USB encrypted. Just use the LVM & encrypted option (Option 4) when you get to it on the partitioning options and put in a decent passphrase.
Doing this gives you a USB Ubuntu installation that is:
Portable (You can use it on any PC that can boot from USB – i.e. pretty much any modern PC)
Persistent (It keeps any changes you’ve made to your applications & documents)
Secure (Use a decent passphrase & the average thief won’t be able to see your documents, bank account details, etc)
&
Uses the entire USB – I object to paying for something and then not being able to use it.
I downloaded the tool and have tried to use it several times to make an Ubuntu 9.04 as well as Linux Mint both letting it download the iso itself and then from downloaded iso files and every time when I go to boot the machine it says “Could not find kernal image: linux”
Anyone have an idea why this is happening every time? I’m using an Attache 16GB Flash drive.
Thanks – this seems like a great idea… just wish it would work for me! 🙂
Use a pirated Windows XP installation. Ditch this Linux shit. It will take another 5 years before any Linux distro comes anywhere close to Windows.
dude… seriously… this is a how to create a ubuntu usb.. NOT LET’S ARGUE ABOUT WEITHER WINDOWS IS BETTER THAN LINUX!
SAY SOMETHING INTELLEGENT OR GTFO!
I tried all kinds of user and password, up to now no success! Interesting exercise but no use whatsoever if I can’t get past that window.
Any suggestions?
I followed…. but when I reboot it only shows the letter ‘J’.
Do you know why?
No idea. 🙂
Having said that, I chose 8.10 and it started to download it, so why can’t it let me download 9.04 without me having to download it independantly first and then point unetbootin at it?
If it does not let you download the 9.04 version of Ubuntu, I would recommend that you manually download it. It’s the same thing.
Ignore my last comment. It seems I have to download an ISO first. I’m sure I created a bootable USB 8.10 previously without having to download anything – just using the install of the OS I was already using.
I don’t get 9.04 as an option, even though I’m using 9.04. It only goes up to 8.10
hi,
what’s initial username and password ?
Are you able to login after rebooting ?
You can try using the following:
Username: User
Password: User
Let me know if this helps!