How to clear Ubuntu cache and increase swap size
Ubuntu server is a well-oiled machine. Unfortunately, it can get bogged down with cache. This guide will cover how you can clean cache and free up swap on your Ubuntu system through the use of command line inputs.
Clearing the Ubuntu page cache
Page cache contains many things, like buffered I/O (input/output) and other important OS data. If you’re running an Ubuntu server and your system’s page cache rapidly fills up, it may be good to flush it.
Luckily, flushing Ubuntu’s page cache is incredibly simple:
You’ll need first to open up a terminal window.
Then, log into Ubuntu as root.
Note: if you don’t have the root account enabled on your Ubuntu system, you can log into root using the sudo -s command rather than su.
su -
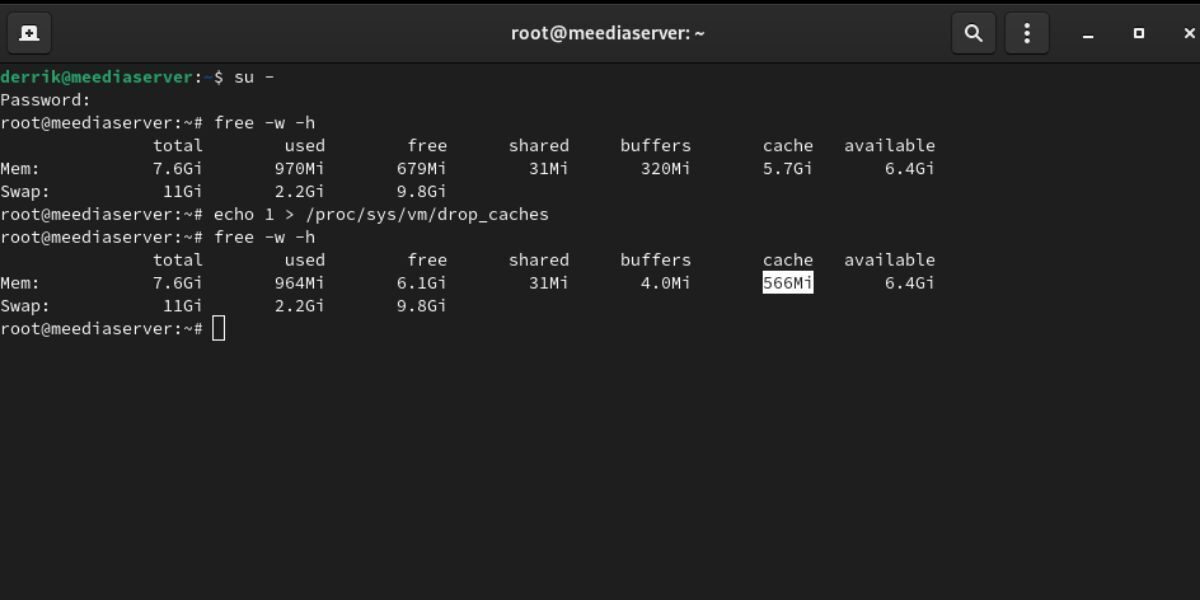
After logging into the terminal shell in Ubuntu with the root account, execute the echo 1 command on the /proc/sys/vm/drop_caches file to free up the page cache on the system.
echo 1 > /proc/sys/vm/drop_caches
Once you’ve cleared the page cache, you can run the free -w -h command and check the “cache” column to view how much page cache you’ve freed up.
free -w -h
Clearing Ubuntu dentries and inodes
Dentries are data structures that represent a directory, and inodes are data structures that represent files. Both can be used to store cache, which exists to save time so that inodes/dentries don’t need to be read/written from storage repeatedly.
While having dentries and inode caches are important on Ubuntu, it can fill up and become cumbersome. Thankfully, like the page cache, it’s possible to clear out the dentries and inodes cache.
Start by opening up a terminal window and log into the root account using the su command (or sudo -s if you have root disabled).
su -
Once you’ve logged into the root account, clear the dentries and inodes caches by using the echo command on the /proc/sys/vm/drop_caches file.
echo 2 > /proc/sys/vm/drop_caches
Freeing Swap space on Linux
Swap space is handy, especially if you’re running a server that uses a lot of RAM but doesn’t have a lot of physical system memory. However, if you find yourself using a lot of swap, you might notice that it often runs out.
If you want to clear out the swap space, you can turn it on and off. To turn off the swap in Ubuntu:
Start by opening up a terminal window
Then, log into the root account using su (or sudo -s if you have root disabled on Ubuntu).
su -
After logging in, you can run the swapoff command to turn off the swap. It’ll also clear out any programs using the swap space (essentially flushing it clean).
swapoff -a
Once the swap is shut off, everything is cleared from it. You can now turn your swap space back on with the swapon command.
swapon -a
Clearing other caches on Ubuntu
While clearing the various caches, and swap space are helpful, you can also clear other things using Bleachbit cleaner over the command line.
To start the cleaning process:
Open a terminal window.
Once it’s open, use the sudo apt install command to install the “bleachbit” package.
sudo apt install bleachbit
After entering the command above, Ubuntu will ask you to enter your password. Using the keyboard, write in your password. Then, press Y to confirm the installation.
Once the Bleachbit tool is installed, run the bleachbit –list command to view a list of cleaners available for use on your system.
bleachbit --list
Look through the list of available cleaners to run. Then, run the bleachbit –preview command to see what the Bleachbit command-line tool will clear from the system. For example, to preview the “system.tmp” cleaner, run:
sudo bleachbit --preview system.tmp
After examining the cleaner and seeing what it will clear out of Ubuntu, you can run the bleachbit –clean command.
sudo bleachbit --clean cleaner-name.name
Conclusion
There are several ways you can create more space in Ubuntu. The above methods are just some of the tactics to clean out your system and make things run smoother. Feel


