How to fix Ubuntu not detecting Windows 10 partition during install
Many Ubuntu Linux users choose to dual-boot the Linux-based operating system with Microsoft Windows 10, either by selecting it during the installation when setting up Ubuntu or after the fact, by loading it up with Grub.
Most of the time, Ubuntu can detect and set up Microsoft Windows 10 automatically, with no fuss at all. However, in some rare cases, the Ubuntu Linux operating system can’t find Windows 10 and cause problems for those trying to set up a dual-boot.
If you’re trying to set up Ubuntu Linux and Windows 10 on the same system, and you can’t figure out why Ubuntu won’t detect it, we can help. Here’s to how to fix Ubuntu not detecting Windows 10!
Fix Ubuntu not detecting Windows 10 during installation
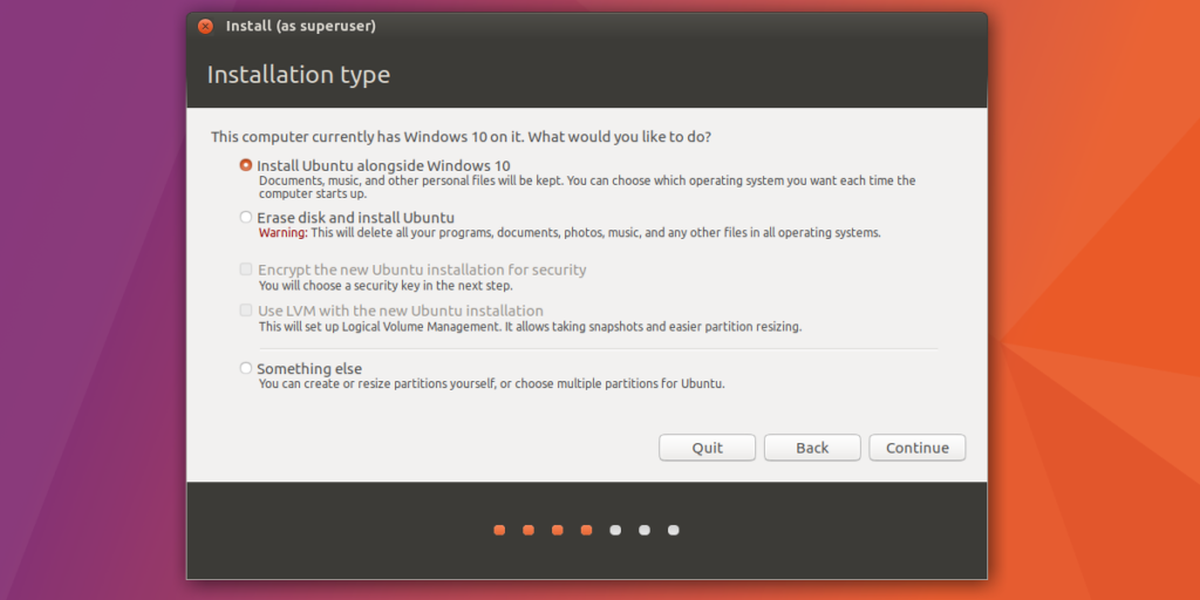
The Ubuntu installation tool scans for alternative operating systems during the installation. Usually, a separate hard drive running Windows 10, or a Windows 10 partition is automatically detected with Os-Prober, a sophisticated operating system scanning tool. If Windows 10 isn’t recognized, it likely means that Windows 10 wasn’t shut down correctly and needs some quick maintenance before the Ubuntu installer will be able to see it.
Close the Ubuntu Linux installation tool and reboot into your Windows 10 PC. From there, follow the step-by-step instructions to clean your Windows 10 installation.
Step 1: Upon logging into Windows 10, make your way to the “My Computer” section and locate the main “C:\” hard drive.
Step 2: Right-click on the “C:\” hard drive with the mouse, locate the “Properties” option and select it to open up the C:\ drive’s settings area.
Step 3: In the settings area, find “Tools” and select the “Check” button under “Error checking.”
Step 4: Selecting “Check” will tell Windows 10 to automatically scan the C:\ drive for errors, and fix them if they’re present.
Step 5: Open up the Windows 10 Command-prompt window in the app menu. Then, once the “Command Prompt” app shows up in the menu, right-click on it and select “Run as administrator.”
Step 6: When the User Account Control prompt opens up on the screen, saying, “Do you want to allow this app to make changes to your device,” select “Yes.” Choosing “Yes” will give you access to a command prompt window with system-level access.
With the command line open, run the chkdsk command below. Keep in mind that this should only be run if the “Error checking” scan in step 4 found no errors at all.
chkdsk C: /F
Step 7: After running the chkdsk command, a prompt will appear in the command-line, letting you know you need to reboot to run the command. Select “Y” to restart.
Step 8: Let the chkdsk command run. When it finishes running, boot into Windows 10.
Once you’ve loaded Windows 10 back up, click “Shutdown” to turn it off safely. Then, plug in the Ubuntu USB stick, and boot to it to re-try installing Ubuntu. The installation app should now detect Windows 10 in the installation process.

Fix Ubuntu not detecting Windows 10 after Ubuntu is installed
Not every user that intends to dual-boot Windows 10 and Ubuntu plans to install the operating systems on the same hard drive. Many Linux users have two hard drives: one for Linux and one for Windows 10.
If you’ve installed Ubuntu onto your PC, the Ubuntu installer should detect the Windows 10 hard drive automatically. If it doesn’t, here’s how to fix it.
Step 1: Boot into Ubuntu Linux on your PC. Once booted, open up a terminal window by pressing Ctrl + Alt + T or Ctrl + Shift + T on the keyboard.
Step 2: Use the lsblk command to detect what your Windows PC’s drive label is, as well as the partition names. In this example, it will be “/dev/sdb”, and the partitions we’ll work with are “/dev/sdb1”, “/dev/sdb2”, “/dev/sdb3”, and “/dev/sdb4”.
Step 3: Run the fsck tool on each of the partitions on the Windows 10 drive to clean out any dirty bits on the drive. Be sure to replace each instance of “/dev/sdb” with your actual Windows 10 partition names.
sudo fsck -y /dev/sdb1
sudo fsck -y /dev/sdb2

sudo fsck -y /dev/sdb3

sudo fsck -y /dev/sdb4
Step 4: Install the Os-prober package to Ubuntu Linux using the Apt command below.
sudo apt install os-prober
Step 5: In the terminal, using the update-grub command, force Ubuntu to manually update your bootloader.
sudo update-grub
Step 6: Watch the terminal prompt, and make sure that Ubuntu detects Windows 10. You’ll know Os-prober works if you see it in the output. If the update-grub command doesn’t recognize your Windows 10 hard drive, the fsck command may not be enough. Consider booting into the Windows 10 drive with your BIOS, run chkdsk, and then re-run the update-grub command.
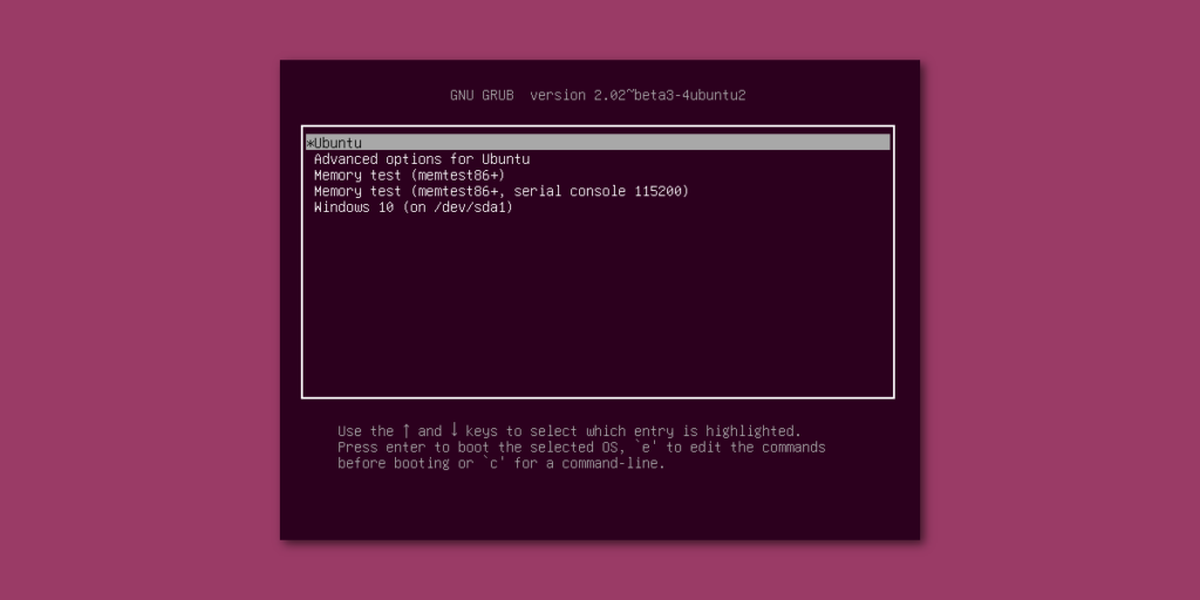
Step 7: Reboot your Ubuntu installation. During the boot process, take a look at the Grub bootloader. If the process is successful, Ubuntu will have detected Windows 10 and added it as a boot option!


I confirm, this worked for me: that’s why win10 booted in UEFI, I started the ubuntu installer (22 LTS) through USB in UEFI mode and the procedure recognize the windows system presence.
Thanks a lot
I’ve installed ubuntu alongside many times without problems. But this time windows is not recognized. I followed your steps 1 thru 7 and get the same thing. Any other suggestions? Here is my environment.
Summary
Operating System
Windows 10 Pro 64-bit
CPU
Intel Core i7 2600 @ 3.40GHz 97 °F
Sandy Bridge 32nm Technology
RAM
16.0GB Dual-Channel DDR3 @ 665MHz (9-9-9-24)
Motherboard
Hewlett-Packard 1494 (SOCKET 0)
Graphics
S271HL (1920×1080@60Hz)
1023MB NVIDIA Quadro K600 (NVIDIA) 119 °F
Storage
476GB SPCC Solid State Disk (SATA (SSD)) 105 °F
1863GB Hitachi HUA722020ALA331 (SATA ) 92 °F
4657GB Seagate Expansion Desk SCSI Disk Device (USB (SATA) ) 96 °F
3726GB Seagate Backup+ Hub BK SCSI Disk Device (USB (SATA) ) 101 °F
232GB Generic External USB Device (USB (SATA) (SSD)) 105 °F
Optical Drives
hp CDDVDW TS-H653T
Audio
Realtek High Definition Audio
Operating System
Windows 10 Pro 64-bit
Computer type: Mini Tower
Installation Date: 10/29/2020 8:39:01 PM
Windows Security Center
User Account Control (UAC) Enabled
Notify level 0 – Never Notify
Windows Update
AutoUpdate Not configured
Windows Defender
Thank you,
Joe
If running a chkdsk, doesn’t work you may need to install Windows over again. I’m not quite sure why it isn’t detected.
In my case there was no problem with the system disk, it was something that unfortunately few support pages refer – if your computer starts in BIOS mode and the system disk is MBR, you must start the Ubuntu installation in BIOS mode and not UEFI.
Thanks for a succinct and easy to use tutorial. I have installed Ubuntu Studio on an M2 SSD after installing Win10 on a laptop SSD and lost my Win10. This resolved the issue though when scanning my hard drive it came up with the term “bad magic” on the entire drive (sda) and one of the partitions (sda1) but then found the EFI bootloader on sda2. Thanks again!
No problem! I’m glad you were able to get your system working again, James!
This is my 6th installation of a dual booted PC… Windows/Ubuntu. So I’m not completely new at this. However I’ve never had one fail to recognize the Windows side until 10. I suspect it might be due to something happening in the upgrade from 7. In the grub menu I see an extra line/partition at the end referencing Windows 7. If I scroll down and select it nothing happens and I can still boot up and select Windows 10.
At the fsck step it is unclear what to do. Just saying to run it and use it to clean out any dirty bits was actually a little frustrating to read and follow. There is a long list generated that makes it more complicated than just “use it”. I keep going down these rabbit holes of troubleshooting because I have to re-Google something to figure out what somebody means by something.
Perhaps just a tiny bit more clarity for the non techs out here next time.
While installation method didn’t work.Didn’t try the other one.