How to downgrade Ubuntu to a previous version
Every six months, Ubuntu Linux has a new release available for download. These releases appear in April and October. Usually, Ubuntu releases go off with almost no issue. However, occasionally, problems occur in the form of unforeseen bugs and other errors in software code.
If you’ve ever run into these errors while running a new release of Ubuntu, there’s something you can do: downgrade to a previous version. In this guide, we’ll show you how to do just that.
Downgrading Ubuntu Linux to an older version can only be done by re-installing an earlier release of the operating system, so no apps, or personal data can be saved, unfortunately. Before continuing with this tutorial, be sure to back up your data by using an external hard drive.
Download older release of Ubuntu Linux
Ubuntu.com usually has two download options available to the public. The first download option is always the Long Term Support release (18.04 LTS as of writing,) and the latest standard release (19.04 as of writing). In this guide, we’ll be going over how to downgrade Ubuntu 19.04 to Ubuntu 18.04 LTS. That said, the instructions in this guide apply to every release of Ubuntu Linux. It is possible to downgrade any Ubuntu release to a previous version by getting the older version from the archive here.
To start the downgrading process from Ubuntu 19.04 to Ubuntu 18.04 LTS, head to Ubuntu.com, and click the “Download” button on the menu to reveal the different download options available. Then, grab the ISO image for Ubuntu 18.04 LTS and download it to your PC.
Once the Ubuntu 18.04 LTS ISO image is done downloading to your Linux PC, move on to the next section of the guide to learn how to create a bootable USB stick.
Create a bootable USB
To start the downgrading process, burn Ubuntu 18.04 LTS ISO on to a USB stick with an ISO imaging app. There are several ways to do this on Linux, but the easiest way is with the Etcher imaging tool.
To get your hands on the latest release of Etcher, head over to the app’s website, and download it for Linux. Then, once the Etcher download is complete, open up the Linux file manager, and click on “Downloads.”
Inside of the “Downloads” folder, find the Etcher ZIP archive file, and right-click on it with the mouse to reveal the right-click menu. Then, find the “extract” option and select it to unzip the Etcher AppImage file.
Once the Etcher AppImage file is fully extracted, double-click on it to run the program, and plug in your USB stick. From there, click the “Select image” button, and browse for the Ubuntu 18.04 LTS ISO file on your computer.
After adding the Ubuntu ISO to Etcher, select your USB flash drive in the “Select Drive” section. Then, click the “Flash!” button to start the imaging process.
Assuming the Etcher imaging process is successful, you’ll have Ubuntu 18.04 LTS ready to go on your USB stick. At this point, reboot your Ubuntu 19.04 PC into BIOS mode and configure it to boot from the USB flash drive.
Downgrad Ubuntu
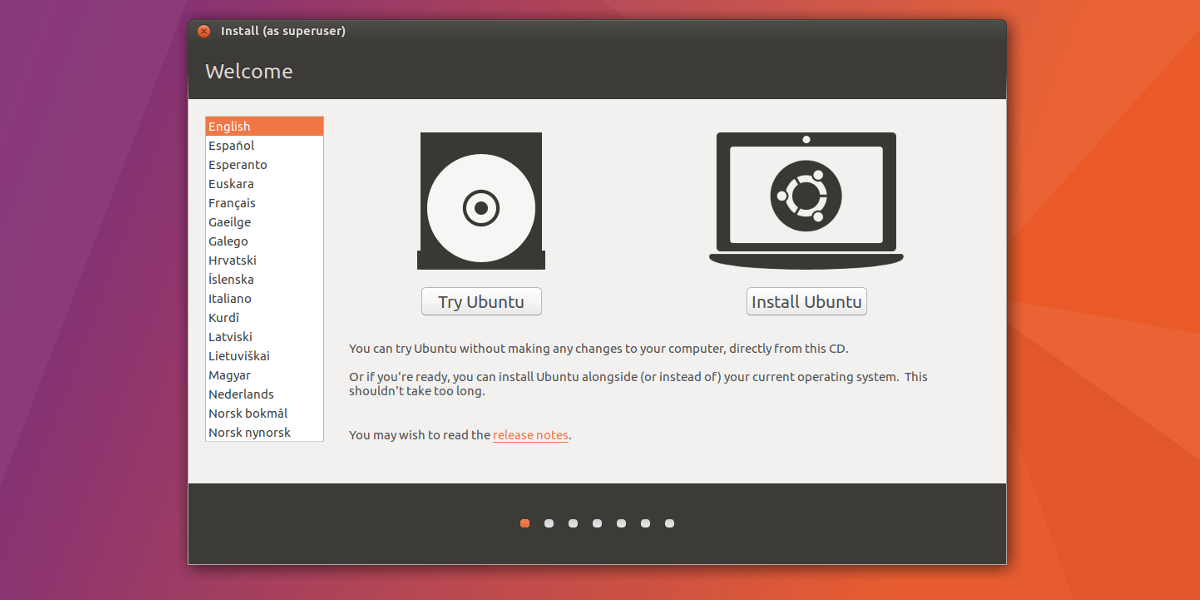
As the Ubuntu 18.04 LTS USB stick boots up on your Ubuntu 19.04 PC, you’ll see a welcome screen. This welcome screen has two options: “Try Ubuntu,” and “Install Ubuntu.” Choose the “Install Ubuntu” button.

Upon choosing “Install Ubuntu,” you’ll see the “Keyboard layout” window. In this window, select the keyboard layout you prefer, and click the “Continue” button.
Following the “Keyboard layout” page is the “Updates and other software” section. Use this page to select what type of installation you prefer (Normal or Minimal,) if you’d like to download updates while installing Ubuntu, and whether or not to install third-party software and drivers. Click “Continue” once you’ve chosen what to add to your Ubuntu installation.
After “Updates and other software” is the “Installation type” page. On this page, you can see several different installation types. As this guide focuses on downgrading a newer release of Ubuntu (19.04) to an older release (18.04 LTS), you must select the “Erase Ubuntu 19.04 and reinstall” option. Then, after selecting this option, click “Continue” to move to the next page.
Note: the “Erase Ubuntu 19.04 and reinstall” will replace your 19.04 installation and partitions with an older 18.04 LTS installation, but all of your documents, apps, and other files will be gone.
Once you’ve made it past the “Installation type” section, follow the installer and choose your location (for time zone purposes,) create your username and set your password.
When the installation is complete, a message will appear on the screen. This message will let you know that the setup process is complete and that you should reboot your computer. Do so. Upon logging back in after rebooting, you’ll have successfully downgraded to an older release of Ubuntu.

Hi
Thank you. This article was most helpful. 🙂
how is this any different than installing a fresh, older-version ubuntu. LOL
“Note: the “Erase Ubuntu 19.04 and reinstall” will replace your 19.04 installation and partitions with an older 18.04 LTS installation, but all of your documents, apps, and other files will be gone.”
Is this true? This sentence literally means that 19.04 will be replaced with 18.04. Then all your documents, apps, and other files will be erased as well as 19.04 from the disk.
Will this option erase all my files?
This is a clean installation, not the downgrade. Don’t do articles just to create page views.
I want to download Linux os
You are a proper “IDIOT” you know! This is not downgrading… very stupid article, how about it be titled “Installing Ubuntu 18.*”?!