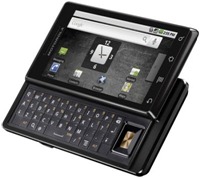
Install Android 2.2 Froyo based CyanogenMod 6 on Motorola Milestone

What you’ll need :
- A rooted Motorola Milestone running Éclair 2.1 (A comprehensive Step by Step Guide is found on How to Root Motorola Milestone on Android 2.1 )
- Latest Cyanogen ROM (Grab the version you want for Milestone).
- Optionally, Google Apps: Download Link (Grab the appropriate version for the ROM you downloaded).
- Open Recovery 1.46 : Download Link
Pre-Flash Setup :
- Extract Open Recovery 1.46 zip file.
- Copy “OpenRecovery” Folder and “Update.Zip” to SD Card. [ Leave the .sbf file. this is the same as vulnerable_recovery used earlier. Just replace the old update.zip]
- Copy the already downloaded Custom ROM & Latest Google Apps in SD Card\OpenRecovery\updates
- Unzip Disable recovery check by OTA and copy contents to SD Card\OpenRecovery\Scripts
Flash :
- Power off your phone.
- Power it back on While pressing the ‘X’ button on the Keyboard. Hold ‘X’ until you see a Triangle with an Exclamation mark on it, and then let go of ‘X’.
- Press & Hold the Volume up button and press the camera button. You’ll be taken to Android System Recovery <2e>.
- Using D-Pad as cursor & golden button in the middle as ‘Enter’ , Perform a ‘Wipe Data/Factory Reset’ & ‘Wipe Cache Partition’
- Once done , apply Sdcard :update.zip.
- You will be taken to Motorola Milestone Open Recovery Version 1.46 ( In case of “E:signature verification failed” error, use (https://android.doshaska.net/sites/android.doshaska.net/files/Disable_recovery_check_by_OTA.zip) Disable_recovery_check_by_OTA.zip & procedure here to resolve.)
- In the menu, go to “Nandroid” > “Backup All”. This will place a backup of your current ROM in a folder called “Nandroid” on your SD Card. Move it to a safe location later.
- Perform a wipe data/factory reset followed by wipe wipe cache partition and wipe Dalvik cache.
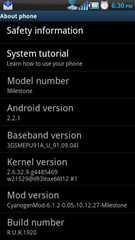
![CM6 Milestone About CM6 Milestone About]()
- Goto Apply Update, scroll to ‘update———milestone-signed.zip’ & apply. [The dashes are numbers.]
- Scroll to ‘gapps——signed.zip’ and Apply. [The dashes are numbers.]
- Go back to Main Menu and reboot system.
- The first boot will take sometime, let it.
CyanogenMod 6 is now installed on your phone.
CyanogenMod 6 is loaded by overclocked kernel modules that offer you very stable overclock speedsteps of 900MHz, 700MHz, 500MHz & 250MHz. An overclocking application like SetCPU can be used to customize the clocks to your personal needs , define overclock governors & battery levels to get the most out of your phone.


Finally Rooted and installed 2.3.7 on my milestone. Thanks a lot. You guys are superb
I am new to all of this and need help I need help understanding what you mean by all of this I would love to unlock this milestone that I have had for 6 months, what does it mean to root, and what is setcpu and how do I get or do it, please xplain all this to me so I can over clock mine and tap it’s full potential, you can reach me at onerealfreek@yahoo.com, ty
how do i install android 2.3 on motorola milestone XT720??
how do i install android 2.3 on my motorola milestone XT720??
As well for me. Did it ever finish loading for you 2?
how long should it take to load, after the install? mine showed the cyanogen screen for a while and now it just keeps reflashing it on the screen. The rocket goes around a few times then stops. then the screen flashes up again and the process starts again. is it screwed?
Yea! the same thing happens to me too!
themeter1 and Vivek , Please flash your phone again , this time please make sure you HARD RESET and wipe dalvik cache and cache partition before the ROM flash and then the same after the upgrade.
I had the same issue which was resolved by this.
THANK YOU!! i followed your instructions (including vulnerable recovery) to the letter and now i have a fully functional milestone on froyo overclocked to cyanogen’s stock 1+ghz (downscaled to 800mhz now).
cheers!!
Hello, I did the update and followed the steps as you said.
I am running froyo now.
But the phone cannot find my network operator.
My phone could detect 4 different network. Which now only finds 2. and the other two were the ones that I DO USE.
What may be wrong?
How can I fix it???
Thanks
I think the phone got locked after all the wiping.. because both of the carriers i mentioned work on the same frecuency (850), and i use the 900 band and the 1900.
Can I retrieve those settings from the nandroid backup??
Or what can I do?
Im seriously confused because im unable to track down the old update.zip (from rooting) on my sdcard yet I cant install the new one
I’ve figured it out but now I have no service after my initial reboot is this normal?
All credit to the Cyanogen Team 🙂
Please Visit us again when CyanogenMod 7 is officially released for the Milestone, currently its undergoing development.
worked like a charm, very good rom
Worked like a charm! Thank you very much for such a useful tutorial.
Keep it coming 🙂
Anyone know…..Does this work for Canadian Milestone (orig.Telus) working on Roger’s / Fido HSPA+ frequencies?
thanks
Cyanogenmod Rocked me….. woohooo…. nice update… fuck Moto… My frst android wud have been a showcase item if this mod wudnt have been installed on it.
thanks a lot to all mods and devs….
cheers mate
Hi,
I have a problem when “Press & Hold the Volume up button and press the camera button. You’ll be taken to Android System Recovery .”
When I press it there is nothing happens, Is there something wrong with my Milestone,
Please advice me, What should I do,.
Thanks’
Hi Dru,
Try this:
Open up your hardware keyboard.
Reboot your Device from Android.
Hold the ‘x’ key as soon as the screen goes black and keep holding it till you are taken to a screen with a triangle and exclamation mark logo.
Now let go of the X button.
Press the Volume Up button and keep it pressed and press the camera button with the other hand.
I am sure there is nothing wrong with your Milestone, it took me a couple of tries as well. 🙂
Hi,
I think a critical part of the tutorial is missing, which leads up to the error “E:signature verification failed”. If you look at the following line under preflash setup instructions: Copy “OpenRecovery” Folder and “Update.Zip” to SD Card. [ Leave the .sbf file. this is the same as vulnerable_recovery used earlier. Just replace the old update.zip]
I do not see what you mean by [ Leave the .sbf file. this is the same as vulnerable_recovery used earlier. Just replace the old update.zip] unless there is another tutorial where the vulnerable_recovery was used.
yes, theres is a hole in the almost great instructions of this tutorial. I’ve read this other tut from here http://androidfromscratch.blogspot.com/2010/12/motorola-milestone-and-how-to-upgrade.html and I’ve deduced that just before the “Flash:” section the vulnerable file (.sbf) included in the openrecovery must be flashed in the phone using RSD Lite (download address provided there), this apparently doesn’t worked for me but following the instructions from http://android.doshaska.net/rootable “If you applied an OTA update before [was my case at 2.1-update1], there is a script run at every system boot that checks and re-flashes the recovery when its checksum doesn’t match. In such case, you have to avoid booting to android after the vulnerable recovery flash. ” I flashed again the vulnerable recovery and this time, when RDS lite was rebooting my phone [not finishing the process] I pressed x then camera + volumen up and entered in the recovery mode, then (now you can follow the tut) wiped, tried “apply update”… and voilá I was in Open Recovery… Now I’m playing with the cyanogen mod…
I succesfully passed from 2.1-update1 official firmware to nadlabak’s cyanogen mod following this step additionally to the tutorial.
BTW, it’s a good idea to follow ALL the backup directives from the androidfromscratch url I’ve provided, in my case market in Cyanogen didn’t download all the applications I had previously and I had to download all of them one by one… at least I’ve did the Titanium backup so I could restore all the data of them
This worked for me.
Before “Flash” section of this tutorial (for links see what RG wrote above)
– download RSD Lite
– flash phone with .sbf file from OpenRecovery_v1_46_SHOLS.rar
– once RDS starts flashing keep holding CAMERA button until triangle with exclamation mark appears (x button did not work for me)
– once the triangle with exclamation mark screen is on press camera and volume up (actualy i had to press it several times before blue manu appeared)
From here continue the tutorial
Good luck!
Thanks RG, followed the instructions on http://androidfromscratch.blogspot.com/2010/12/motorola-milestone-and-how-to-upgrade.html and it worked perfectly, even overclocked my phone to 1.2GHZ. Upgraded to Froyo and will install cyanogen after, have to add that I had a couple of problems which I put up on the website and how I dealt with them :
This is a useful tip when using rdslite, if using windows vista or windows 7, make sure to rename the sbf file to abc.sbf for rdslite to recognize it, default name is too long (you might get a greyed out start rds button otherwise).Go to program folder for RDSLite and give SDL administrator permission rights when executed, place sbf file in public folder (has to do with rights management on windows 7/Vista, you will get a failed to update error otherwise)
Hi Jack,
We’re sorry for a portion of the update to be missing, it was actually linked to a wrong page automatically, we have linked it to the correct page now, so the ‘Pre-Flash Setup’ will make sense now. We’re sorry for the inconvenience caused.
hi, thanks for this post, i have a question, this is the tutorial for the motorola milestone and not the droid, the milestone is the same that sells in latin american (i’m from colombia) the model number is A853?
Hello milerx,
This tutorial addresses only the Motorola Milestone, model A853, but not the Droid. While the Droid is essentially the same, its CDMA whereas the milestone is GSM. Due to this basic hardware difference, the ROM’s posted for Milestone are different from those for Droid. Please visit us in a day, we’ll be covering a Froyo based ROM for droid as well.
Thank you for visiting us.
Hello Fahad,
Thank you for the tutorial, I’ve successfully updated my Milestone to Android 2.2and I can move my apps to SD which was I needed most.
But I’ve a problem, I don’t see some of widgets I installed. Like beautiful widgets.
When I long press on screen and choose widgets Some of the widgets I’ve installed doesn’t appear on the widget list. Do you know any way to fix this problem?
Hi Ferhat,
Sorry for the late reply, this happens because all of your widget apps are now being installed onto your SD card because of your new settings. Android OS needs the widgets or any applications that use widgets to be placed on the phone’s internal memory. This is not true for ALL widgets thought. However it can be easily resolved.
Goto Settings > CyanogenMod settings > Check Allow Application Moving.
Goto Settings > Manage Applications
Find the Widget that is not working and Tap on it.
Press ‘Move to Phone’ and Reboot.
The widget would now be available.
Ummmm, did I miss a step? Where do I find the “Disable recovery check by OTA” zip file?
Nevermind…I figured it out. I just had to read a little further down. 🙂