How To Insert Automatic Event Logs Using Excel VBA Timestamp
Timestamps are a great resource to identify when an event occurred. Microsoft Excel gives you the option to add timestamps in dd: mm: yyyy hh: mm: ss format. Mostly you need to use keyboard shortcuts or execute Excel functions to add the timestamps, which is a manual and error-prone task.
Excel Visual Basic code editor comes to your rescue by enabling you to automate the entire task using the VBA timestamp scripts. You can also add complex conditions to further automate the task without relying on the data entry operator or collaborator. Read on to learn a few simple tricks to use VBA to add timestamps in Excel.
1. How to add VBA Timestamp: QAT Macro
The following VBA code lets you run the event log function whenever you want with a single click from the Excel quick access toolbar or QAT. It’s similar to running an Excel VBA macro, so you need to save the existing worksheet using a Macro-enabled file extension after applying the VBA code:
- Right-click on the worksheet tab and click on View Code from the context menu.
- Copy-paste this VBA code into the code editor and then click on Save.
Sub vba_timeStamp()

Dim ts As Date
With Selection
.Value = Date + Time
End With

End Sub
- Save the workbook as a Macro-enabled file.
- Now, click the File tab and choose Options from the File menu.
- Click on Quick Access Toolbar (QAT) and then scroll the list to find View Macros.
- Add View Macros to the QAT and close the Options menu by clicking Ok.
- Now, run the Macro from the QAT when you need to add a timestamp by executing the VBA code.
To fully automate the timestamp creation task, you can use the below-mentioned VBA scripts.
2. How to add VBA Timestamp: When Worksheet Changes
The following VBA code will add a timestamp in the cells of column B when it detects changes in the corresponding cells of column A:
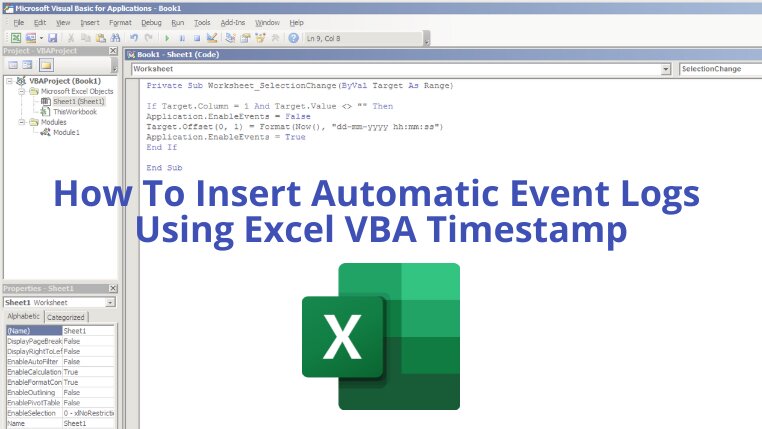
Private Sub Worksheet_SelectionChange(ByVal Target As Range)

If Target.Column = 1 And Target.Value <> "" Then
Application.EnableEvents = False
Target.Offset(0, 1) = Format(Now(), "dd-mm-yyyy hh:mm:ss")
Application.EnableEvents = True
End If

End Sub
Follow the steps mentioned in the first method to open the VBA code editor. Now, double-click on Sheet1(Sheet1) under the VBAProject (Book1) menu to activate worksheet changes tracking.
The code editor should show Worksheet in the left-side drop-down and SelectionChange in the right-side drop-down. You can now copy-paste the above VBA code. Once done, don’t forget to save the file as a Macro-enabled Excel workbook.
Whenever you run this Macro, Excel will automatically add a timestamp in column B if you write something in column A. You can also add the Macro to QAT by following the steps mentioned in the previous method for adding the VBA script.
Final Words
Now that you know how to use the Excel VBA code editor with the aforementioned VBA timestamp codes, you can get started modifying your Excel workbook to insert timestamps automatically when you want.
However, any changes that you make in your Excel worksheet by executing a VBA code won’t go away if you press the undo hotkey. Hence, make backup copies before applying these simple VBA scripts. Excel VBA can also perform other cool functions, for example, you can use VBA to insert rows in Microsoft Excel.
