Step Up Your Screen Recording on Mac Game With These Expert Tips
If you’re looking for a screen recording Mac guide, you’ve come to the right place. Mac has its own internal built-in features for screen recording, but there are pros and cons to doing it this way. We cover all the different methods, including the best third-party recording tools, so that you have all the best options to choose from when recording your videos. Let’s jump in.
Before You Start Recording: Why a VPN Matters for Your Mac
Check… check… 1… 2…
Right before you hit that record button, take a moment to ponder your online safety and security. The reality is that whether you are using native programs or third-party apps, a VPN can help to encrypt the data, meaning that your recordings cannot be snooped on when you share them.
Using a reliable provider like our Editor’s favorite, NordVPN, can even help you to access geo-restricted content for your recordings, bypass bandwidth throttling, and avoid the tracking of your personal information.
Editor's Pick April 2025
How To Master Screen Recording on Mac With Built-In Tools
We’ll start with the native recording tools found on Mac devices. Here are the ones to know.
Using the Screenshot Application
This method requires macOS Mojave version 10.14 or later, so keep that in mind, before you jump in. Here’s how it works:
- Open the Screenshot application by pushing Shift + Command + 5 at the same time

- From there, an onscreen toolbar will appear.
- There are controls that will allow you to take a screenshot or recording of your screen. These include just capturing a still of your screen, recording the entire screen, or just recording part of your screen. This last option lets you choose which portion to record by adjusting and dragging borders.
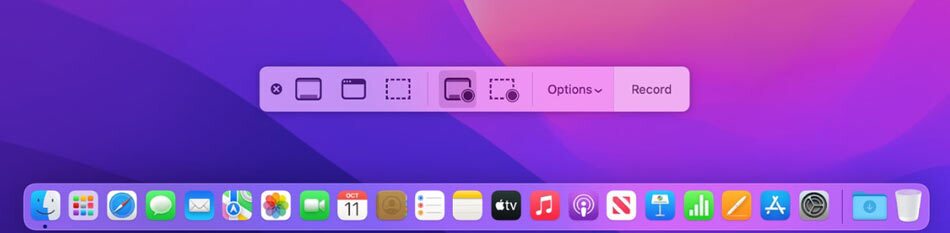
- You can select Options within the toolbar if you want to adjust the settings of the recordings. Here’s what to know:
-
- The microphone lets you record audio or your own voice along with the screen recording.
- The recording timer allows you to choose the number of seconds before recording officially starts, giving you a few extra seconds to clear away any unwanted tabs that are cluttering your screen.
- The Show Mouse Clicks option creates a black circle around your cursor when you click for better visibility.
- You also have the option to save your recording to various locations on your computer. The default save is to your desktop, but you can adjust this to suit your personal preference.
- When you’re ready to start recording, select Record. When you’re finished, just tap the Stop button, or you can press Command + Control + Esc.
Once it all is said and done, there will be a thumbnail of the finished recording in the corner of the screen. Simply select it if you want to make any further edits. You can also edit the saved version at any time. There are several helpful keyboard shortcuts to know when using the Screenshot app, and while they are more for actual screenshots versus entire recordings, they are useful to know:
- To take a screenshot of the entire screen, press Shift + Command + 3.
- To just take a screenshot of part of the screen, press Shift + Command + 4. This will turn your mouse pointer into a crosshair that you can drag to select the area you want to capture. When you let go of your mouse/trackpad button, it will automatically take a picture. Press the escape key to cancel your selection. This is especially handy if you have a split screen open and only want to capture part of it.
- Pressing Shift + Command + 4 + Space bar lets you take a screenshot of a menu or window.
Using QuickTime Player
Another useful screen recording Mac method is through QuickTime Player. This is another application that is native to Mac, making it easy to find and use. Here’s how:
- Go to your Applications folder.
- Open QuickTime.
- Using the menu bar, select File.
- Choose New Screen Recording. You can also press Control + Command + N.
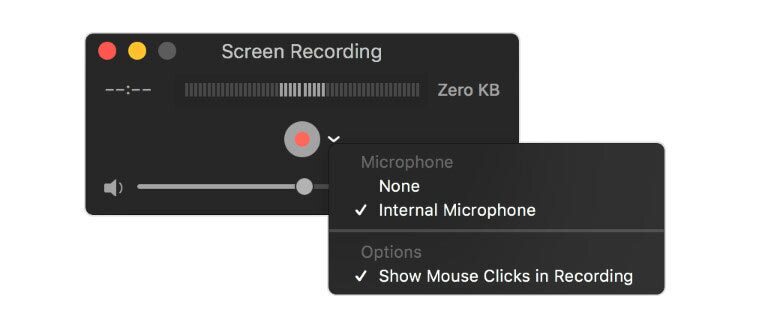
- A Screen Recording window should open. You can select the arrow beside the record button to adjust the settings. Some options include:
-
- Microphone allows you to record your voice or audio alongside the screen recording. There is even a volume adjuster to help fine-tune your audio.
- Show Mouse Clicks in Recording creates a black circle around the pointer when clicking.
- When ready to record, click the red circle Record button. From there, you can drag your pointer to select the area you want recorded, or you can just click anywhere to record the whole screen.
- When you’re finished recording, select the Stop button, or you can also hold Command + Control + Esc.
- When recording is done, the QuickTime Player app will automatically open your recording so that you can share, play, or edit it.
Helpful Recording Tips to Know
- Your saved recording will default to Screen Recording [date] at [time].mov. You can change this title when you edit your video.
- Some applications may not allow you to record their windows. Therefore, if you try to screen record, and it doesn’t work, try another app to see if that solves the problem.
- Your screen recordings can be opened with iMovie, QuickTime Player, or other video editing applications.
- To cancel the action of recording, just push the Esc button before you start the recording.
Top Third-party Tools for Mac Screen Recording

There are numerous third-party tools for screen recording that are compatible with Mac. Here are some of the most well-respected, versatile options currently on the market. All of these are available to purchase either on the Mac App Store, or through the software developer directly.
Because there are so many different tools and products, learning how to use them will vary depending on which one you choose. Fortunately, they all have great learning resources and support, so users will be able to pick up how to use them pretty quickly. Here’s a quick comparison table before we dive into each one:
| Software | Snagit | Camtasia | ScreenFlow | OBS Studio |
| Best For | Advanced tools and multiple platforms | All the bells and whistles | Beginners | Free option |
TechSmith Snagit

This screen recording tool is available for both Mac and Windows and has many happy user ratings. You can capture and record your screen, add context and visuals, and record audio as well. There are plenty of advanced features, such as scrolling capture, as well as the ability to share across multiple platforms or applications with ease.
Pros:
- Wide compatibility
- Extremely customizable
- 15-day free trial
Cons:
- No free tiers
- Not as many video editing tools as some platforms
Camtasia

Also by TechSmith, Camtasia is one of the favorites for users who need to make a lot of screen recordings. It has some of the most advanced and numerous editing and recording tools on the market, and while it is expensive, you can get a lot for your money, such as subtitling, advanced audio and text animation. If you have the budget, you won’t need to look any further for a great screen recorder.
Pros:
- Screen capture recording and video editing tools all in one
- AI assistive tools, such as background removal and AI voice generation
- Free trial
Cons:
- More expensive than many third-party screen recorders
- You can only use it on two computers
ScreenFlow
ScreenFlow is not only catered for Mac users, it is also catered for beginners who want a ton of great editing and recording tools without the headache of learning complex instructions. They even have online training for users who need a little extra help as well as a free knowledge base.
Besides learning resources, they have some of the best quality audio and video on the market, along with streamlined media management and lots of publishing options.
Pros:
- Made specifically for Mac devices
- iOS recording for iPhones and iPads
- Stock media of over 500,000 images
- Easy to learn user interface
Cons:
- Somewhat expensive
- Only available on Mac, so users who need multiple platforms are out of luck
OBS Studio (Open Broadcaster Software) is an open-source software for live streaming and video recording. There is a reason why it is a favorite among Twitch streamers. It’s free, it’s reliable, and it works.
If you have a lot of business recording needs or high demands that require all the bells and whistles, this may not be for you. But if your screen recording needs are more simplistic or you have the tech skills to really make the most out of OBS Studio’s functions, this is not only a great software choice, it’s a free one, too.
Pros:
- Free to use
- Available on Mac, Windows, and Linux
- Hotkeys for customizations
Cons:
- Limited features compared to pay-to-use providers
- Can be a bit tricky to learn
Frequently Asked Questions
Why does my Mac screen recording have no sound?
A common reason for this is not selecting an audio source. This is usually found under the Options or another similar function. Other possible culprits:
- Make sure the microphone is selected as the audio input device.
- Make sure the app has permissions to use your microphone.
- Make sure the speaker or microphone volumes aren’t too low to be captured on the recording.
- Make sure your app is up-to-date.
How do you screen record on MacBook Air?
You can screen record natively on any Mac product, as long as it is running on macOS Mojave version 10.14 (or later), or has compatibility with the third-party app you may be using. You can use QuickTime Player, the Screenshot application, or any other software that works with your Mac. The steps should be similar to what we have outlined above.
What’s the best way to screen record with internal audio on Mac but avoid external noise?
If you only want internal audio for your screen recording and don’t want any external or ambient noise, be sure that you choose “None” as your microphone source so that you don’t accidentally record the audio from your surroundings, alongside your screen. Moreover, many third-party apps excel at features to emphasize audio and microphone controls. If you are having difficulties with the apps native to Mac, consider looking into third-party options, especially if they are free or have a free trial.
What’s the best free third-party screen recorder for Mac?
OBS Studio is the most well-respected open-source screen recorder that is compatible with Mac. There are other free recorders out there, but many require your finished video to have a watermark with their logo, or they simply aren’t available for Mac. This will likely change as the options expand, but for now, OBS Studio is pretty difficult to beat for free screen recording on Mac.