How To Install OS X Mountain Lion On A PC [Hackintosh Guide]
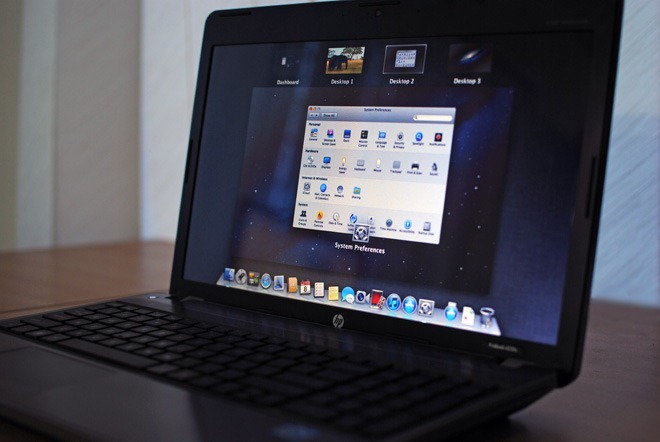
Macs and PCs have competed with each other for a long time and a fairly large number of users run both OS X and Windows side by side. If you’d like to see what using a Mac feels like (and maybe you’re thoroughly impressed with the images coming out of NASA’s control room featuring multiple Macs), but aren’t in the mood of buying a real one, a Hackintosh is just the thing for you to try. Although a somewhat difficult feat, it is possible to run the latest version of OS X i.e. Mountain Lion on your PC given you have the right hardware devices. In the event that your hardware isn’t compatible, you will, very likely, have to go shopping for new ones. With the proper hardware, creating your very own Hackintosh is simple. This guide details the process for running Mac OS X Mountain Lion on a regular PC. Tests were carried out on an HP ProBook 4530s. No changes to the hardware were made. You will need a USB drive drive that has 8GB storage space and a friend who owns a Mac.
Know Your Hardware
Apple is very particular about the hardware that its OS can run on and not every PC will be compatible. Before you can check for compatibility, you need to first know the name and model of the different hardware components that are installed in your PC. There are two ways of finding out the information; you can grab a screwdriver, open your PC’s case and literally take a look inside. Model numbers should be readable on the components. You can remove and insert items like the graphics card, and other chips easily. Unlike Macs, nothing is soldered onto the Motherboard in PCs however, it is likely you might lose a few screws in this process. The other and much easier way would be to use Speccy, an advanced system information tool that can tell you what’s running under the hood.
Hardware Compatibility
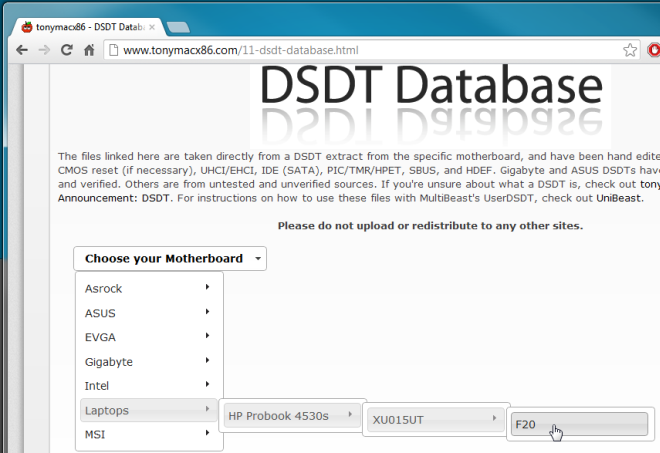
Once you know what hardware is running on your PC, you have to check for compatibility. Your main concern here will be the system motherboard. The drivers you need to run all components once Mountain Lion is up and running will depend on your motherboard. You will need to create an account on tonymax86 to get drivers. Once you’re logged in, head over to Resources>DSDT. From the Choose your Motherboard dropdown menu, see if your Motherboard is listed. If it is, you will be able to download its DSDT file. Select the relevant entry based on model number and brand, and download it.
Once you’ve downloaded the DSDT for your PC’s motherboard (this will be a single file), set the file aside for later use. You will need to copy it to your Hackintosh once you’ve booted into Mountain Lion. There isn’t a large range of motherboards supported for laptops, but a reasonable number of Intel Motherboards and ASUS ones are supported. If your motherboard isn’t listed, you get the short end of the stick and getting a new motherboard or buying and assembling a new PC are your only options.
While you’re here, and assuming your motherboard was supported, head over to Resources>Downloads and download Unibeast for Mountain Lion and Multibeast. Unibeast is the boot loader that you will need to install Mac OS X Mountain Lion and then boot the Mac OS X on your PC, while Multibeast is a comprehensive cutomization utility for hackintosh, which gives you the liberty to choose the drivers, critical ktexts, EasyBeast (permanent Mac OS X bootloader) and more.
Getting Mountain Lion Installer
This part can be slightly tricky; what you need is a friend or co-worker who already owns a Mac and is running Mountain Lion. It would help if said friend or coworker likes to share and has a reasonable amount of faith in your technology tinkering skills. What you need from your friend is the Mountain Lion installer. The installer is the file that’s downloaded when Mountain Lion is purchased from the Mac App Store. It’s best to ask a friend to make a copy of this file before they install and upgrade their OS or it will have to be downloaded again. Make sure the file name is not changed when copying the file from one location to the other.
Preparing Your USB Drive For Unibeast
Next you need to prepare your USB drive. Plug it into a Mac and go to Applications>Utilities and launch Disk Utility. You will see your USB drive on the left, select it (make sure you have not selected the Mac HD). There are five tabs on the left; select the Partition tab. From the Partition Layout dropdown menu select 1 Partition, and from the Format dropdown, select Mac OS Extended (Journaled). This is essential for booting into OS X.
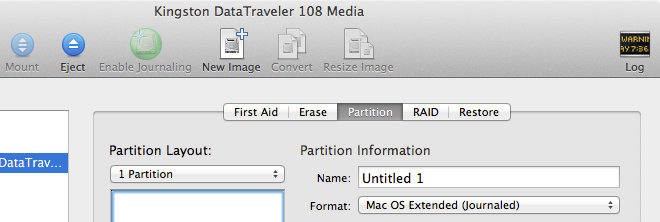
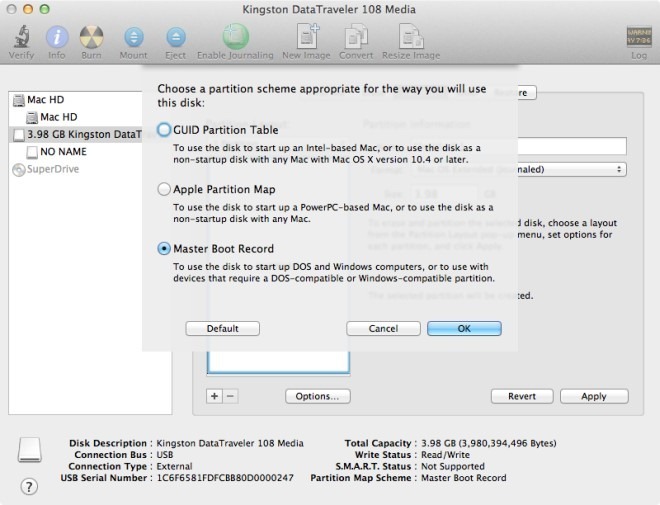
Next, click the Options button at the bottom of the Partition Layout column and in the panel that slides open select Master Boot Record. This is necessary to create a bootable USB for PCs. Before you click OK, make sure that Format is set Mac OS Extended (Journaled). Now, give your USB drive an appropriate name and hit Apply to format your drive.
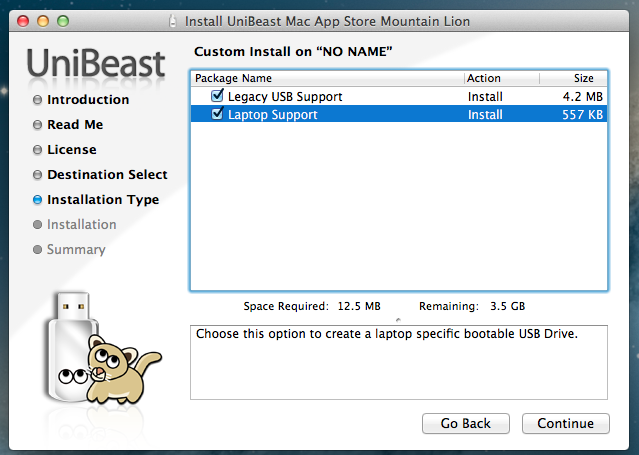
Next, copy the Mac OS X Mountain installer to the Applications folder, and then launch Unibeast (you downloaded this earlier from tonymacx86). UniBeast will pretty much take care of the whole process. During installation, you will get two options in Installation Type; Legacy USB Support and Laptop Support. Check Laptop Support if you’re installing on a Laptop and Legacy Support if you have an Intel processor and the model number is three digits long, (Speccy should help you here if you aren’t sure about the exact model number).
Do not panic if it takes too long to create bootable USB drive with Mac OS X Mountain Lion installer. Once installation is complete, your work with the Mac is done and you can head back to your soon-to-be-a-Hackintosh PC.
Configuring Your PC
Turn your PC on and enter into the BIOS by hitting DEL, F2, F10 or other system reserved key; the button that allows you to open the BIOS varies from system to system but is conveniently displayed for a fraction of a second when you turn your PC on. Here, you have to make two changes; you need to set the first boot priority to USB Device and set your Drive Controller to AHCI mode. Normally, they are set to IDE, but OS X does not support it. Save these changes, plug in the USB you created and reboot your system.
Booting Mac OS X Mountain Lion On Your PC
When you turn your PC on, it will boot from the USB and your screen should show all bootable drives (hard drive partitions) and bootable USB drive (containing the Mac OS X installer). Select the Mountain Lion installer bootable drive to begin the installation process.
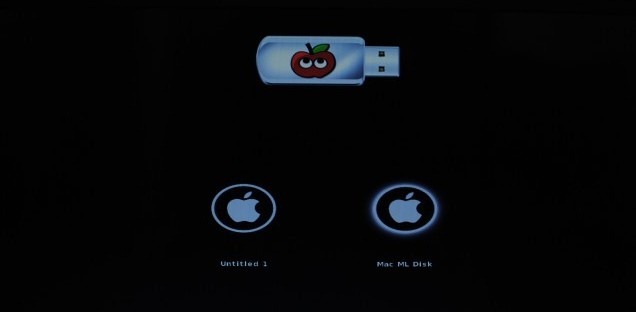
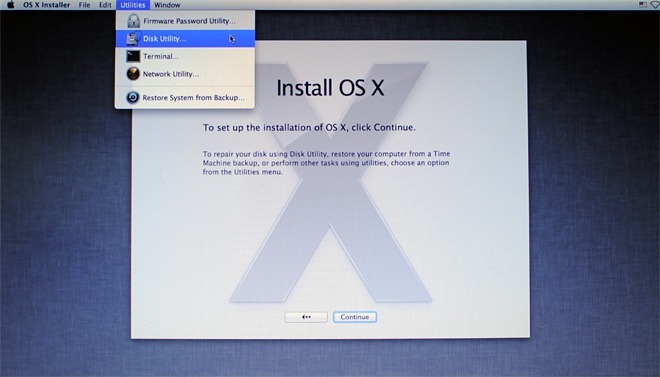
Select the installer to begin the installation and the following screen will appear. Do not hit continue since your hard disk isn’t ready to install OS X yet. Instead, go to Utilities from the menu bar and select Disk Utility.
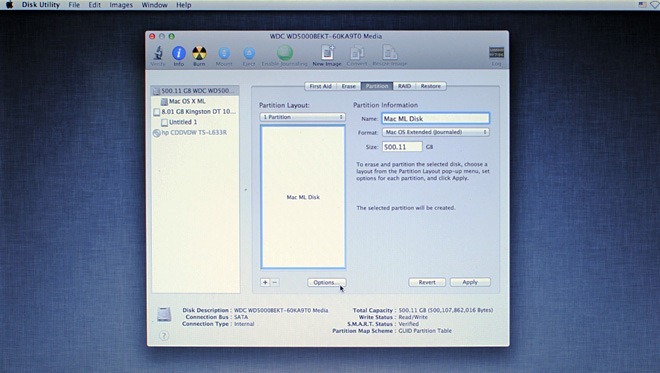
This is the same Disk Utility you used on the Mac when preparing the USB drive. Select your PC hard disk and go to the Partition tab. Here, select 1 Partition from Partition Layout, set Format to Mac OS Extended (Journaled), and then hit Options to select GUID Partition Table in the panel that slides open. Once done, hit Apply to prepare your hard disk for Mac OS X Mountain Lion.
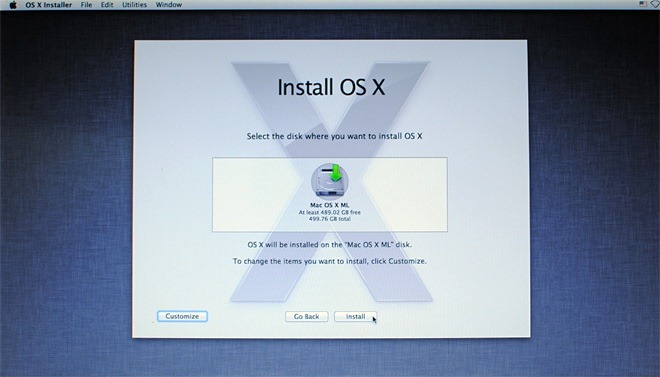
Once done, you will return to the Mountain Lion Installer and the newly formatted hard disk will appear as an available disk to install the OS. Select it and click Install. Installation can take up to 30 minutes and there is little you will have to do during the process. Once installation is complete, set up your Mac (language, Apple ID etc).
You should now see the signature galaxy background, the Dock and the Menu Bar. You’ve successfully installed Mountain Lion.
The OS won’t be fully functional just yet; you need drivers. Remember the DSDT file and the Multibeast utility mentioned earlier? This is where they come in. Place the DSDT file on your desktop (in Mountain Lion) and run Multibeast. During the Installation Type step, you will get a large number of options to check. These will list the hardware components like the Wi-Fi card, Graphics card etc. At the top, you will see an option User DSDT Install that you should check. This will enable your system to boot directly from the hard drive. Carefully select which additional drivers you want to install and proceed with the installation. Once this installation is complete, your Hackintosh is complete and ready for use. Enjoy!

Hi, I don’t know anyone with a Mac that I can try to get the OS X, but I have installed OS X in my pc with Virtual Box, anyone knows if I can do the Mac steps using the Virtual Box? Thanks in advance!
jkdfhjksfgjdkjkfjskfklejdksjfrkj
MYHACK IS BEAST
thank you
you are very welcome dear..
There are easier ways using VMware… This process is too rigorous…
This process is too rigorous… right, but this tutorial is not dedicated for noobs, you need to know how to use linux console for debugging if problems appear.
There are easier ways using VMware… right too, but do you think that Mac will be efficient ? I don’t. This is like virtualizing your own Windows/Linux on a Windows/Linux to use it. This is not productive !
Nice write up. Thanks AT!
Is there any way to use a SD card instead of USB drive?
Have you ever tried to install an OS with a SD Card ?
8 gb sd card also work (laptop has sd card slot)
I have tried sd cards and I Have had no luck. This may be due to BIOS or you laptop not supporting from and SD card. I also tried to do a windows 7 installation from and SD card but it wouldn’t allow me to boot. I believe this is because Microsoft disabled all drivers before the system actually booted. This may be the same for Mac. Although I would give it a try because I do not know if your Bios Allows it or Not. Try Using MyHack also to create your bootable OS X sd card installer. Hope this helped….
PS.. USB are cheap these days
Also try using an external sd card reader
🙂
Tip : do a backup image with Time Machine when your installation is finished and clean (no bug, all drivers working …) to avoid a complet re-installation of the system when Mac get Kernel Panic or doesn’t want to boot.
Always perform a backup before updating with Mac combo upgrade (10.8.x).
There are some features that you won’t be able to have like multi gesture on touchpad, Mac sound at boot … and more.
If you don’t have a friend with a Mac, perfom these step :
System requirement
– A DVD of Snow Leopard, ask a mac user friend, or buy/download it.
– iBoot CD … downloadable on TonyMacx86 download section
– A DVD Player (sorry Ultrabook)
Set right settings on BIOS like said in article.
Put iBoot CD in DVD tray, boot. You should get same screen in ‘Booting MacOSXML on your PC’
Wait a little (when CD speed slow down) and change it with SL DVD. Press R (i don’t really remember the key – check help) to Refresh and see the DVD of OSX SL.
Boot with verbose mode (arrow down then verbose).
Wait the second screen and perform exact same steps. If you get a Kernel Panic (no response), check text description and Google it.
MacOSX SL is now install. Just install internet driver (ethernet, wifi), we will do the rest after.
Perform a backup with Time Machine, download last OSXSL combo update (10.6.8) to get Mac App Store.
Buy OSXML then upgrade your machine by double-clicking on OSXML icon. Tip : save image disk on a support to avoid re-download (~ 4Go).
You also can create a USB installation key.
Create a good keyboard layout with Yukulele to match with your own keyboard if needed
Sorry for bad english.
Dear Jean-Philippe! I write to you, since you are a professional in the Mac OS. I ask you to help, if you can. I was an owner of MacBook Pro. It happens so that I remained only with the not Mac PC. But I made backup of my disk with clonezilla. I need to get access to my working Mac OS system, but I don’t know how to do this with not Mac PC. Is it possible to virtualize such system from a clone of the disk or to make Hackintosh? If it is possible, how it can be done? I hope that you will have time answer to me and you know how to solve my problem.