8 Useful iPhoto Tips You Probably Don’t Know About [Mac OS X]
iPhoto is the iTunes equivalent for managing photos, and comes pre-installed on Mac OS X Lion 10.7. The app is meant to make it easier to transfer and organize photos between your iPhone and Mac, your camera and, generally, all your images. However, iPhoto isn’t just a photo organizer; it is feature rich and can be used to do a lot more. The application’s key feature remains, of course, its library, which, like that of iTunes, is excellent. For beginners to even average users, iPhoto does take some time getting used to, and there are quite a few common problems that beginners face. This post addresses all those issues for iPhoto ‘11, version 9.2.1. To check which version you have, go to About iPhoto in the iPhoto menu.
Opening Your iPhoto Library in Finder
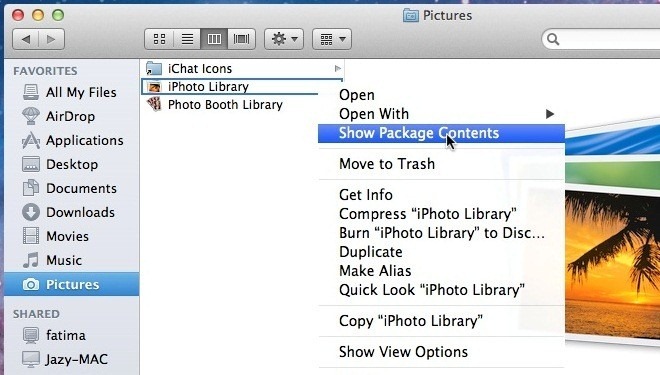
Before we tell you how to open your iPhoto library in Finder, know this: tampering with this library or removing or adding photos to it via the Finder is never a good idea. You might need to open it to troubleshoot something, but that, too, if you’re particularly skilled. The reason for this is the fact that, while your iTunes library has songs sorted by albums etc, your photos have much more information, and they can’t be downloaded again if you accidently misplace or delete them (you’ve been warned!). To open the iPhoto library in Finder, go to the pictures folder, and you will see iPhoto library there. Right-click it, and from the context menu, select View Package Contents to enter the very forbidden iPhoto library. The Masters folder is where all original photos are located. They are sorted into sub-folders by day, month and year.
Stop iPhoto From Launching When Camera Is Connected
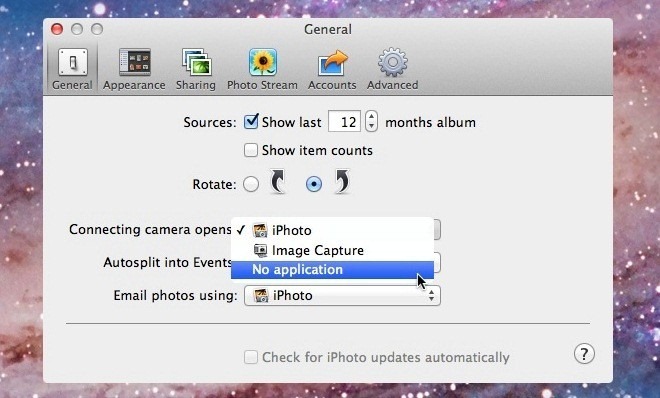
iPhoto doesn’t just magically pop up when you connect your iPhone; it’s also meant to support importing and organizing photos from your camera. However, since your camera doesn’t restrict reading/writing photos like iPhone, you might want to use it more freely. The only trouble is that iPhoto opens each time you connect your camera. To disable this, go to iPhoto’s preferences, and from the Connecting camera opens dropdown, select No application (or any other application that you would like to set as default for your camera).
Copy Pictures From iPhoto To Another Folder
Since you never ever, in a million years, want to mess with your iPhoto library, but would like to access an original picture from iPhoto nevertheless, you can copy them to your desktop or anywhere else by selecting the ones you want and dragging & dropping them onto any folder.

Deleting & Permanently Removing Photos in iPhoto
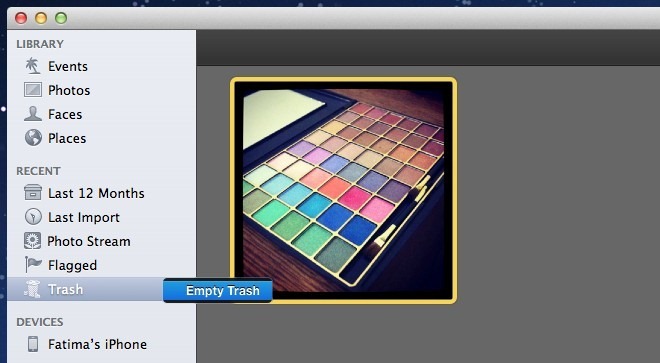
If you’re just starting out with iPhoto, one of the first things you will notice is that iPhoto has its very own trash. Photos that you delete from iPhoto go to this trash, and unless it is emptied, they continue to reside on your hard disk. Emptying the system trash also has no effect on this. To empty iPhoto trash, all you need to do is Control+Click the Trash icon in the iPhoto sidebar, or use the Empty Trash button in the top right corner, and all images will be permanently removed. Like the system Trash, you can’t selectively remove these images.
A small bug in iPhoto sometimes makes it difficult to empty the trash, which normally occurs when there are too many images to delete. To work around this, you need to delete fewer images at once. Let’s say you’re trying to delete 300 images at once, and iPhoto isn’t playing nice. Select the first 100 and drag & drop them onto Albums in the sidebar. Repeat for the next 100, and then assign the keyword ‘Trash’ to each one. Delete the remaining 100. Search for photos associated with the keyword ‘Trash’ (there should be 200 of them), send half to the trash and empty your trash again. Follow suit until all the images have all been deleted. Ideally, you wont have this problem unless you’re trying to delete over 10,000 photos. Moving the photos to an album is necessary, as you can’t assign keywords to photos in Trash. Remember to search for the photos via the keyword you assigned, and then to delete them. If you delete them from the album, they will only be deleted from the album and not from your library.
Move Library To A Different Location Or External Drive
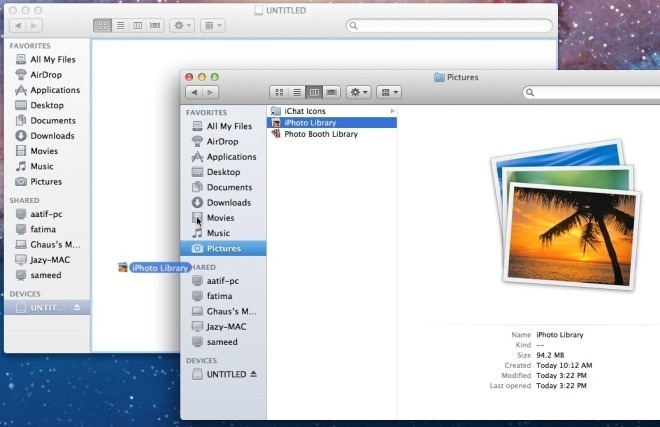
Relocating the iPhoto library was somewhat of a tedious process in iPhoto ‘6 or ‘8, but it is simple drag & drop in iPhoto ‘11. While accessing the library is something like handling a live bomb, moving it to another folder or to an external drive is simple. Make sure you close iPhoto first, then go to the Pictures folder and drag iPhoto Library to whichever folder you want, even on an external drive. Launch the iPhoto library from its new location and iPhoto will automatically register the change.
Create Multiple iPhoto Libraries
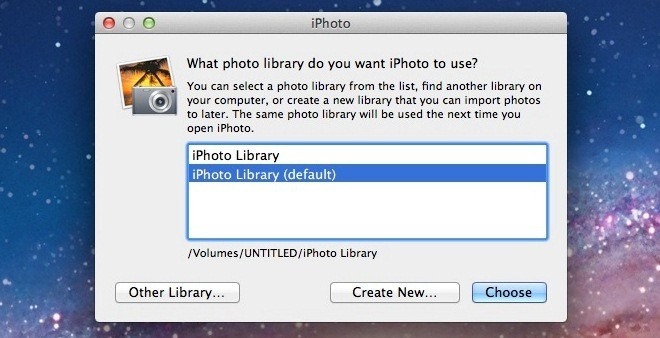
You can be as organized as you want, but there is still a chance of home photos getting mixed up with work photos and images. If you use the same Mac at both work and home, you might want to create separate iPhoto libraries to ensure the two worlds never collide and cause you avoidable embarrassment. To create multiple iPhoto libraries, quit the app if it is running, and hold down the Option key when you start it again. Click Create New and name your library anything that would help recognize it easily. To load a different library, follow suit when starting iPhoto, but instead of creating a new library, pick which one to load from the ones listed.
Set An Image As Desktop Background
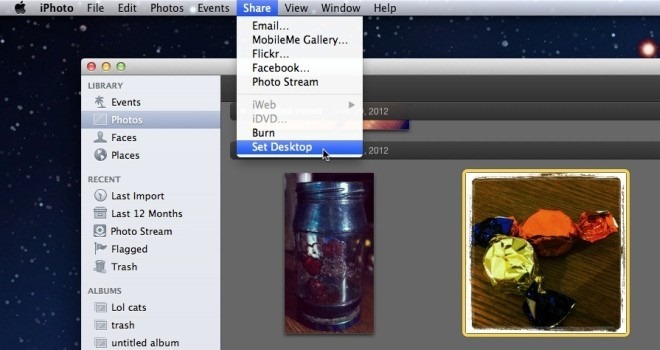
Assuming you have a really amazing photo that you’ve imported to iPhoto and you would like to use it as your desktop wallpaper. A quick visit to Desktop & Screensaver in preferences will tell you that you can’t access photos in the iPhoto library. To set an image from your iPhoto library as your desktop wallpaper, select it and go to Share>Set Desktop.
Compress & Resize An Image
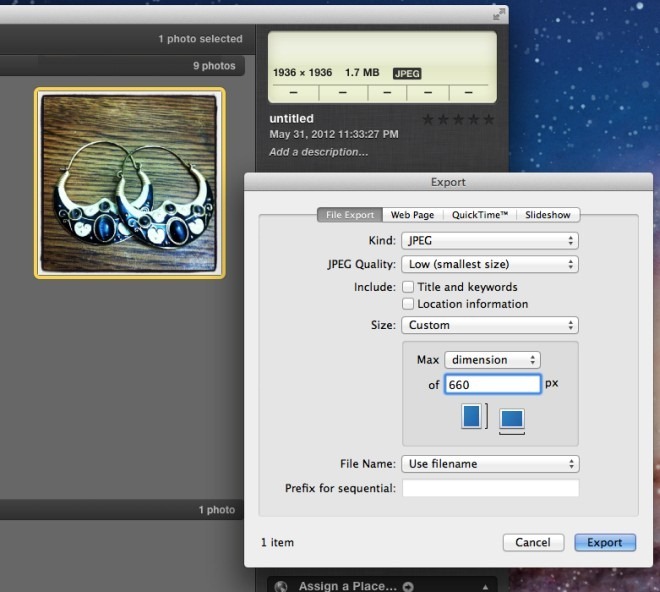
You can’t resize the actual RAW images in iPhoto library and replace them with the compressed version. However, you can export any image, compress and resize it. Select an image to compress and resize. If you hit Command+I, you will get a brief overview of the image’s properties. Go to File > Export, save the image in JPEG format and select a compression level from the JPEG Quality dropdown. From the Size dropdown, select custom and define either the width or height of the image and click Export. The image will be compressed and resized. You can later import the image to iPhoto and delete the larger one if you like, but make sure you won’t ever need the original before you delete it.
Getting used to iPhoto does take a little time, as does learning its flow, but it is excellent as far as a photo organizer goes. If you take a lot of photos, either with your iPhone or camera, this is one app you want to learn. Are there any annoyances you experienced when setting up or getting used to iPhoto? Let us know in the comments and share how you worked through them. And if you have a duplicate photo problem, try DuplicateCleanerForiPhoto to find and remove them.

This was an excellent article, however, I would like to remove about 2000 photos on my hard drive and put them onto an external hard drive, then delete the originals from my hard drive to free up space. What is a safe way to do this. One other issue I would like to address. I noticed that when I drag a photo from iPhoto into external hard drive the image goes from a 17 MB and in the external drive it is a 14 MB. Can I transfer jpegs at original size?
my iphoto (’11 version) always quit unexpectedly when I connected to the internet. Any solution?
I find *messing* with the iPhoto library very liberating – given how much a control freak it is.
Here’s what you do: On the sidebar of the Finder, bookmark the ‘Masters’ folder (from inside your iPhoto Library). Access images at will – I usually move out bunch of photos at a time and eventually end up with an empty photo library when I’m done “processing” it.
🙂
As to dealing with the empty folders – or worse, numerous subfolders with one or two files that get created (why does that happen – um, now I remember, that’s what I was trying to find out when I ended up here and got distracted with my need to share what I already know … but I digress):
I go into the folder hierarchy under “Masters//// using Terminal (i.e. command prompt), and run a simple but less than trivial shell script/command:
mv `find . -type f | xargs` .
Problem solved. All the photos from the sub-folders get moved into the current folder (make sure you’re in the folder when you run this).
Then I go back into my Finder window to the same folder, double-check to see that the sub-folders are all empty, multiple-select them, and delete.
Now just move all those files any which way you like (I use Finder’s ‘New Folder with Selection’ option to create a folder for related photos, and then move them into my Pictures folder – make sure you do what you really intend to: actually moving vs. merely bookmarking if you drag it to the sidebar.
Like I said, liberating.
I photo’s accidently went into Trash, cannot find the site in trash only indvidual photo’s must I move each one separate out of trash is there an easier way?
After exporting and resizing an image, you mentioned above I can then import back into iPhoto and delete the larger version. How can I do this? Thanks
Excellent advice on how to delete Trash from iPhoto. Very simple and easy. Thank you!
If a picture is stored in the iPhoto library is it safe to delete it from photo stream without losing it? Does photostream use my computers memory?
When I go to my finder I have a ton of pictures that show up in the downloads section. They are the same pictures that I have in my iphoto library. Will deleting them from the finder download section delete them from my iPhoto?
Thanks for this information. Let’s say one wants to edit a photo from the library through the Preview options. Would it be necessary to copy the image from the library (so as not to alter the original) and then save it to a new location?
you should never access images from the iPhoto library for editing. Always make a copy and edit that copy. Messing with the iPhoto library can create problems and even result in some pictures being lost.
Thanks for this information. Let’s say one wants to edit a photo from the library through the Preview options. Would it be necessary to copy the image from the library (so as not to alter the original) and then save it to a new location?