How To Remove Trusted Devices From Your iPhone
You can use your Apple ID on multiple devices. Apple introduced two-factor authentication for Apple IDs back in 2013. With two-factor authentication enabled, you can identify trusted devices for your Apple ID. These trusted devices do not require a verification code if you have two-factor authentication set up. You can view all trusted devices by signing into your Apple ID on the desktop. Come iOS 10.3 you will have a new, revamped, Settings app that lets you set up two-factor authentication and remove trusted devices from your iPhone. Here’s how.
We assume at this point that you’ve signed into and properly set up iCloud on your devices. We also assume you’ve set up two-factor authentication and have at least one trusted device.
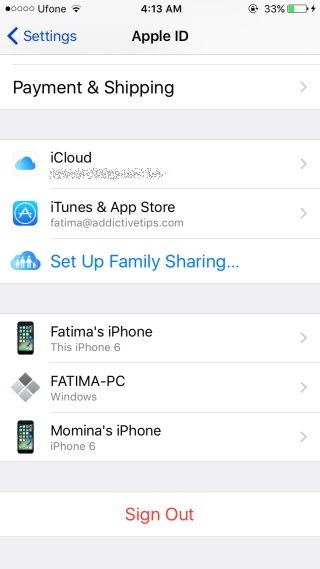
Open the Settings app. Tap your profile image at the very top and scroll down past the iCloud and iTunes & App Store section. If your device(s) don’t show up immediately, give it a few seconds.
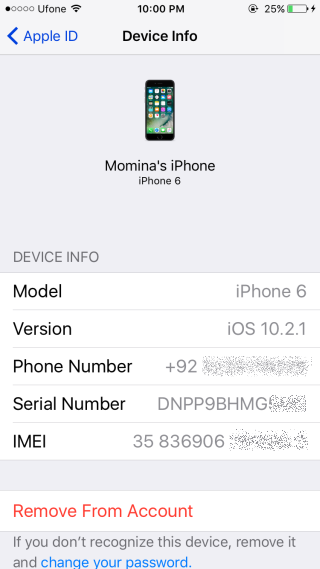
Tap the device you want to remove. You have to answer your security questions in order to remove a device. Once you’ve done that, you will be taken to the Device Info screen for the device you selected.
Scroll to the bottom and tap ‘Remove from Account’.


Here’s what this does; if you had an iPad set as a trusted device, you didn’t need to verify your sign-in via the two- factor code when you mad a purchase on it. Any time you needed to sign into the device, you wouldn’t have to go through the two-factor verification process because the device was a trusted one.
After removing the device, you will need to enter a verification code to sign into it.
Two-factor authentication isn’t a new feature and neither are trusted devices. They’ve been around for three years now. iOS 10.3 just gives you the ability to remove trusted devices from your iPhone. iOS 10.3 is currently in beta. Users on the stable channel will have to wait a few months to get this update.
