How To Create And Add Button In Firefox Navigation Toolbar [Guide]
Today, we are bringing a Firefox guide that anyone can follow to create a custom button in navigation toolbar. Along with visible buttons in navigation toolbar, there is a list of other buttons having different functionalities provided in Firefox which can be added anywhere on toolbar and can be customized according to your needs. Since the button’s position and behavior can be changed without requiring any extra knowledge, one can easily build a new extension that behaves as directed, sits in defined position, while being highly customizable. This post covers how to create a simple extension – a toolbar button that will provide a simple functionality.
To begin, first you need to find out extensions folder (one which is residing in Firefox Profiles folder). Windows 7 and Windows Vista users will find this folder here;
C:\Users\<<user name>>\AppData\Roaming\Mozilla\Firefox\Profiles\<<profile name>>\extensions
However, if you’re using Windows XP, type %AppData% in Windows Run console and hit Enter.
Now open Firefox folder and then Profiles –> <Profile name> -> extensions folder
Once the extensions folder is opened, create a new folder by the name of custom-toolbar-button@example.com init.
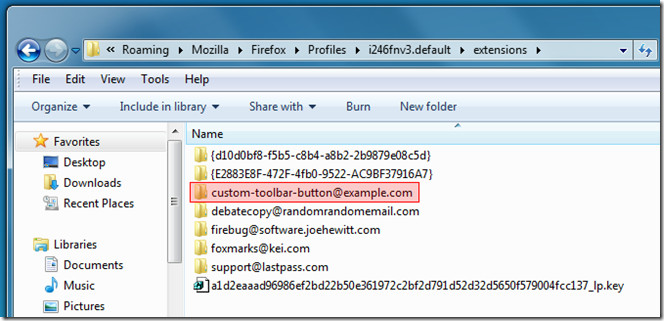
Open the newly created folder, and create a new directory namely chrome, along with two files – chrome.manifest and install.rdf. Now we will be editing these files in text editor, we reckon you to use any editor with UTF-8 support, like – Windows build-in Notepad.
First, open chrome.manifest file and insert following lines of code init. The code provided below is also functional for Thunderbird mail, compose, and address book windows, and for Sunbird. However, if you need to use button only in Firefox, lines of code for Thunderbird and Sunbird can be excluded.
content custombutton chrome/
  style chrome://global/content/customizeToolbar.xul chrome://custombutton/content/button.css

# Firefox
  overlay    chrome://browser/content/browser.xul chrome://custombutton/content/button.xul

# Thunderbird mail
  overlay    chrome://messenger/content/messenger.xul chrome://custombutton/content/button.xul

# Thunderbird compose
  overlay    chrome://messenger/content/messengercompose/messengercompose.xul chrome://custombutton/content/button.xul

# Thunderbird address book
  overlay    chrome://messenger/content/addressbook/addressbook.xul chrome://custombutton/content/button.xul

# Sunbird
  overlay    chrome://calendar/content/calendar.xul chrome://custombutton/content/button.xul
Once code is inserted in the file, close it down after saving the changes. Now edit install.rdf file, you need to insert following lines of code in it. You can change the button general description, text can be added in 6, 7, and 8th lines of the code (must be enclosed in double-quotation marks), you can enter button’s name, descriptive text, and creator name.
<?xml version="1.0"?>

<RDF xmlns="https://www.w3.org/1999/02/22-rdf-syntax-ns#"
     xmlns:em="https://www.mozilla.org/2004/em-rdf#">

  <Description about="urn:mozilla:install-manifest"

    em:name="AT"
    em:description="AddictiveTips"
    em:creator="Usman"

    em:id="custom-toolbar-button@example.com"
      em:version="1.0"

    em:homepageURL="https://developer.mozilla.org/en/docs/Custom_Toolbar_Button"

    em:iconURL="chrome://custombutton/content/icon.jpg" >

    <em:targetApplication><!-- Firefox -->
        <Description

        em:id="{ec8030f7-c20a-464f-9b0e-13a3a9e97384}"

        em:minVersion="1.4"

        em:maxVersion="99" />

    </em:targetApplication>

    <em:targetApplication><!-- Thunderbird -->
        <Description

        em:id="{3550f703-e582-4d05-9a08-453d09bdfdc6}"

        em:minVersion="1.4"

        em:maxVersion="99" />

    </em:targetApplication>

    <em:targetApplication><!-- Sunbird -->
        <Description

        em:id="{718e30fb-e89b-41dd-9da7-e25a45638b28}"

        em:minVersion="0.2.9"

        em:maxVersion="99" />

    </em:targetApplication>

    <em:file>
        <Description

        about="urn:mozilla:extension:custombutton"

        em:package="content/custombutton/" />

    </em:file>

  </Description>

</RDF>
Once you’ve changed the description, save the changes and close the file. Remember the newly created folder (chrome), where we will create 3 files and insert 2 images. First create 3 files having following names;
- button.css
- button.xul
- button.js
Now we will apply styling to the button, there isn’t anything complex here, we will just apply some basic styling over the button design (define image dimensions and hover effect on the button). If you are familiar with designing a CSS file (Cascading Style Sheet), changing values & effects will be a cinch, however, if you are hearing its name for the very first time, just insert the following style lines of code in button.css file, once done, save changes and close it.
#custom-button-1,
  #wrapper-custom-button-1

  {list-style-image: url("chrome://custombutton/content/button-1.jpg");}

/* common style for all custom buttons */
  .custombutton                    {-moz-image-region: rect( 0px 24px 24px  0px);}

.custombutton:hover       {-moz-image-region: rect(24px 24px 48px  0px);}

[iconsize="small"] .custombutton
    {-moz-image-region: rect( 0px 40px 16px 24px);}

[iconsize="small"] .custombutton:hover
    {-moz-image-region: rect(24px 40px 40px 24px);}
Now open the button.xul file in a text editor and insert following lines of code. Remember that we are providing code for Thunderbird & Sunbird as well, if you’ve been following this guide only for Firefox, you can exclude lines related to Thunderbird & Sunbird.
<?xml version="1.0" encoding="UTF-8"?>
  <?xml-stylesheet type="text/css"

  href="chrome://custombutton/content/button.css"?>

<!DOCTYPE overlay >
  <overlay id="custombutton-overlay"

  xmlns="https://www.mozilla.org/keymaster/gatekeeper/there.is.only.xul">

<script type="application/javascript"
    src="chrome://custombutton/content/button.js"/>

<!-- Firefox -->
  <toolbarpalette id="BrowserToolbarPalette">

  <toolbarbutton id="custom-button-1"/>

  </toolbarpalette>

<!-- Thunderbird mail -->
  <toolbarpalette id="MailToolbarPalette">

  <toolbarbutton id="custom-button-1"/>

  </toolbarpalette>

<!-- Thunderbird compose -->
  <toolbarpalette id="MsgComposeToolbarPalette">

  <toolbarbutton id="custom-button-1"/>

  </toolbarpalette>

<!-- Thunderbird address book -->
  <toolbarpalette id="AddressBookToolbarPalette">

  <toolbarbutton id="custom-button-1"/>

  </toolbarpalette>

<!-- Sunbird -->
  <toolbarpalette id="calendarToolbarPalette">

  <toolbarbutton id="custom-button-1"/>

  </toolbarpalette>

<!-- button details -->
  <toolbarbutton id="custom-button-1"

  label="Custom"

  tooltiptext="My custom toolbar button"

  oncommand="CustomButton[1]()"

  class="toolbarbutton-1 chromeclass-toolbar-additional custombutton"

  />

</overlay>
Now you need to insert two image files having names button-1.jpg and Icon.jpg with dimensions 40×48 and 48×48 respectively to get the best results. However, you can create images of any size not exceeding 48px width and length wise. Below you can see the button images we are using – button-1.jpg image is for toolbar button with respective sizes (big & small) and hover effect can be seen beneath the both default images’ sizes. Icon.jpg image refers to main extension icon image (the one you will see in Firefox extension gallery)
button-1.jpg

Icon.jpg

Once created, move to the 5th file – button.js. This JavaScript file carries a lot of importance, as it will define the main functionality of the button. You can add a sample script that prompts a message to test the functionality or go for advance script to do whatever you want. Also there are many scripts contrived especially to fullfill one’s requirements, you can also check out some simple but useful scripts here. Since this guide is for elementary-level users, we will creating a simple bookmark item that will open the specified website. Open the button.js file and insert following lines of code to create a bookmark button (to show on Firefox toolbar).
CustomButton = {

1: function () {

const url = "https://www.addictivetips.com/"

document
    .getElementById("content")

  .webNavigation

  .loadURI(url, 0, null, null, null)

  },

}
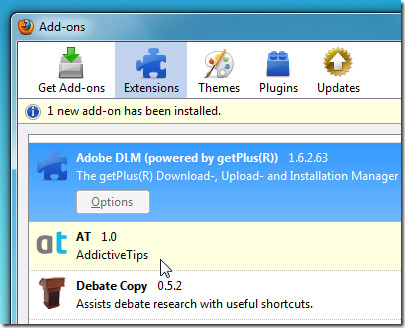
Now you’re good to go, we reckon you to check the code you’ve inserted in the mentioned files and verify the image dimensions again. To install the newly created extension, close all the running instances of Firefox and then launch it. If everything went well, you’d probably be seeing new add-on installation prompt, indicating that extension has been successfully installed.
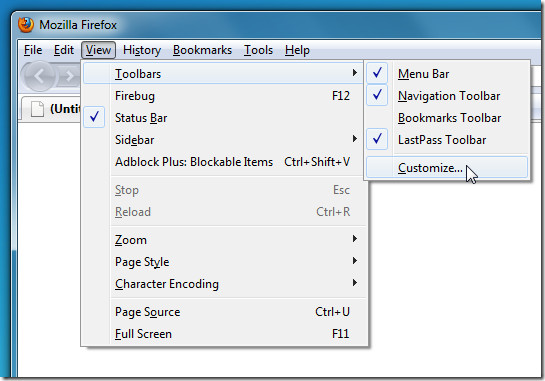
To make newly created button appear in the navigation toolbar, from View menu, under Toolbars sub-menu, click Customize.
Customize Toolbar dialog will show up, from where you have to drag the newly created button over the navigation toolbar. Once inserted, you can also change its position by dragging it anywhere you like.
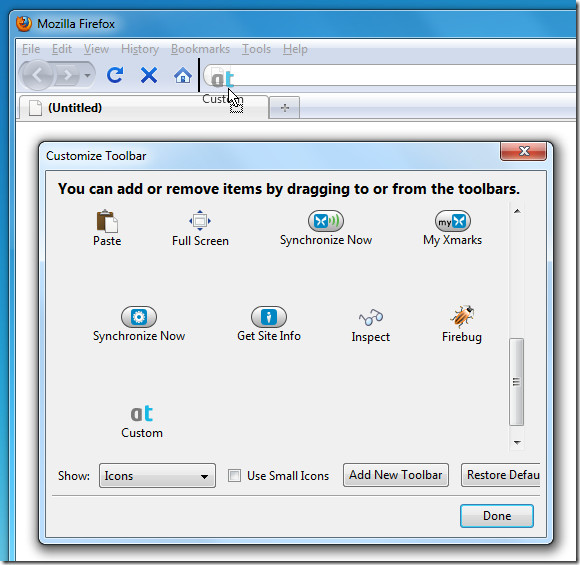
Now just click the button to verify the functionality inserted in JavaScript file.
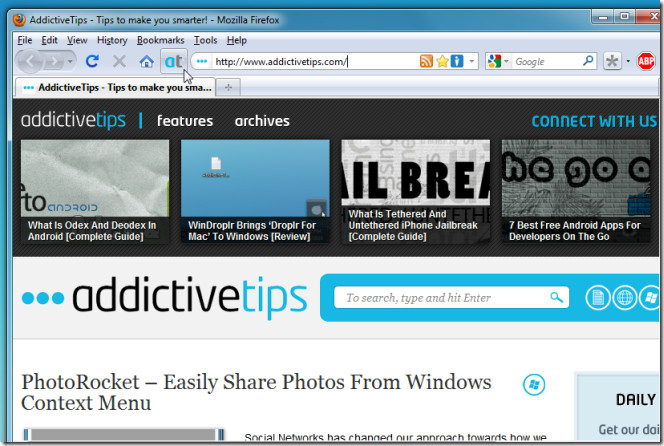
The resultant button’s functionality is user-defined, so it is up to your skills that how much you can calibrate its functions. Novice users can create shortcuts, link applications, design bookmarks while users in limbo between average & expert level can certainly make more use of it and add required functionality in main JavaScript file.

Is this supposed to still valid? Tried it in Firefox 50 and it did not work.
Hey thanx for the wonderful guide.
I’m using Linux and firefox 9.0.1 and managed to make it work with my own image.
I have a couple of question if its easy for you to reply.
1. If I want to add 3 more buttons do I need to go through the same process again creating 3 folders etc, or there is a smarter and quicker way to add some more code in the existing files and still have the same result?
2. Is it easy to make the middle button work? For example click the middle button on mouse and have a new tab open.
Many thanks again.
I’m trying to get the current window URL and add a parameter at the end (enable to login to Oracle portal or edit mode). But when I use e.g. var currURL = window.location.href;, the result is always pointing to this: chrome://browser/content/browser.xul and not the actual path in the URL field. It’s not taking the value in the URL field but taking something else. Anyone, has an idea?
I just followed this tutorial in 5.0.1, and it worked perfectly! Thank you!
I’m sorry to say your tutorial completely failed to work. Maybe because I’m using FF5, I guess things have changed a bit. This is dead easy with Opera.
You need to move button.css, button.js, button.xul, button-1.png and Icon.png in a folder called “chrome”.
Can you tell me how to add 3 custom buttons on navigation bar automatically as soon as the extension is installed just like Delicious bookmark extension ?
Thanking in advance
Something is wrong with this extension firefox can´t even find it.I did what you wrote 20 times and it still won´t work.
me too have the same problem
I tested it but when i restart Firefox, custom extension is actived but the custom button is not appeared in customize Toolbar dialog.
Where is the mistake ? because i copied exactly the same code that you and i take YOUR icon et button to test.
Hello
Thanks for this tips.
I tested it but when i restart Firefox, custom extension is actived but the custom button is not appeared in customize Toolbar dialog.
Where is the mistake ? because i copied exactly the same code that you and i take YOUR icon et button to test.
Thanks for your help
hey have a look at this
http://img175.imageshack.us/img175/4200/dsfsdfo.jpg
it is bookmark.
I hate all toolbars except navigation toolbar, which is actually needed. Adding more toolbars reduces the screen real estate and annoys the hell out of me. We wrote a guide on how to create a button, the functionality of the button would depend on what users want it to be like.
hey I agree with u
Can u post the link of the guide you have mentioned ?
Thanking in advance