Learn the Basics of Building a Chicken Farm in Minecraft
For Minecraft players, continuously tending crops and animals is a highly tiring task for which they need to invest their time in harvest and breeding. Chicken is the perfect animal of all as it doesn’t require any additional food to harvest. These are also a great food source and the best passive mob. You can make various recipes with them and trade them with others.
Creating an automatic chicken farm is the best way to farm this animal with the least labor. Let’s learn the basic points about the chicken farm in Minecraft, such as how to build a farm or which elements you will need for the farm.
Things Needed for an Automatic Chicken Farm in Minecraft
- Some carpets
- Stone
- Glass
- 1 dispenser
- 1 chest
- 2 Redstone repeater
- 1 Redstone comparator
- Some Redstone
- 1 bucket of lava
- 4 hoppers
- Some eggs
How to Build a Chicken Farm in Minecraft
- To begin with, you’ll need a few chicken eggs. You have to build a chicken coop and lure chickens with seeds to capture them.
- For the coop, locate a small but clean area where you need to put a chest. Surrounding the chest, add 2 stone blocks on both sides and put 5 stone blocks at the back. Remember to leave some space behind the chest, preferably 2 blocks.
- Place a hopper on the empty area behind the chest. As you put it down, the items of the hopper will move to the chest. No matter how much space is left now, you should cover it with stone.
- Put a Dispenser behind the hopper. Also, cover the chest with a glass block.
- Now, put a stone slab over the hopper. Also, you need to put 3 blocks on each side to surround the sides.
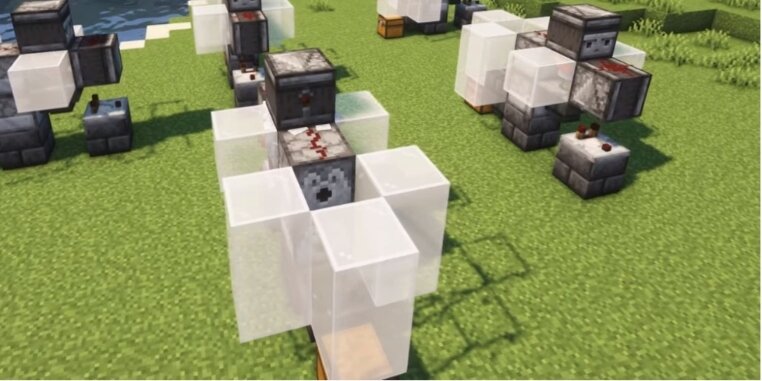
- At this point, you should sequentially place a Redstone comparator and a Redstone repeater behind the dispenser. Now, move to the backside and place another Redstone repeater on the right side of the comparator. You can use Redstone dust to cover the remaining area.
- Once done, you must put a glass block over the chest and add a hopper above the dispenser. Add two additional hoppers behind the one which is connected to the dispenser.
- Use stone to cover the area which is exposed right now. Then, you have to put 3 carpets over the hoppers. Again, add a layer of stone blocks. Now, behind the glass block, add lava.
- Cover the remaining part, except a hole. You have to throw some chicken eggs here unless some chicken hatchings take place on the farm.
At this point, your Minecraft chicken farm is complete. It’ll automatically produce chicken and feathers. By this time, the chickens you made using eggs should be big enough and able to lay eggs by themselves. After some minutes, you will notice small chickens roaming around over the slab.
Conclusion
Creating an automatic chicken farm in Minecraft is not only incredibly cheap but also an absolute necessity in the survival mode game. A chicken farm can provide the players with chicken meat, eggs, and feathers. Now that you know the basics of a Minecraft chicken farm, you can go ahead and make one yourself!
