How to install Session on Chrome OS
Session is a unique, privacy-focused messaging tool available for Linux, MacOS, Windows, and mobile platforms. It operates in a decentralized manner, powered by user-hosted servers. Best of all, as Session works on the Linux platform, you’ll also be able to run Session on your Chromebook and other devices that run Chrome OS. Follow these steps to get the Session app up and running on your Chromebook.
How to Enable Linux on Your Chromebook
First, enable Linux compatibility to use Session Messenger on Chrome OS. Begin by locating and selecting the clock on the Chrome OS dashboard, then click the gear icon to enter the Chrome OS settings.
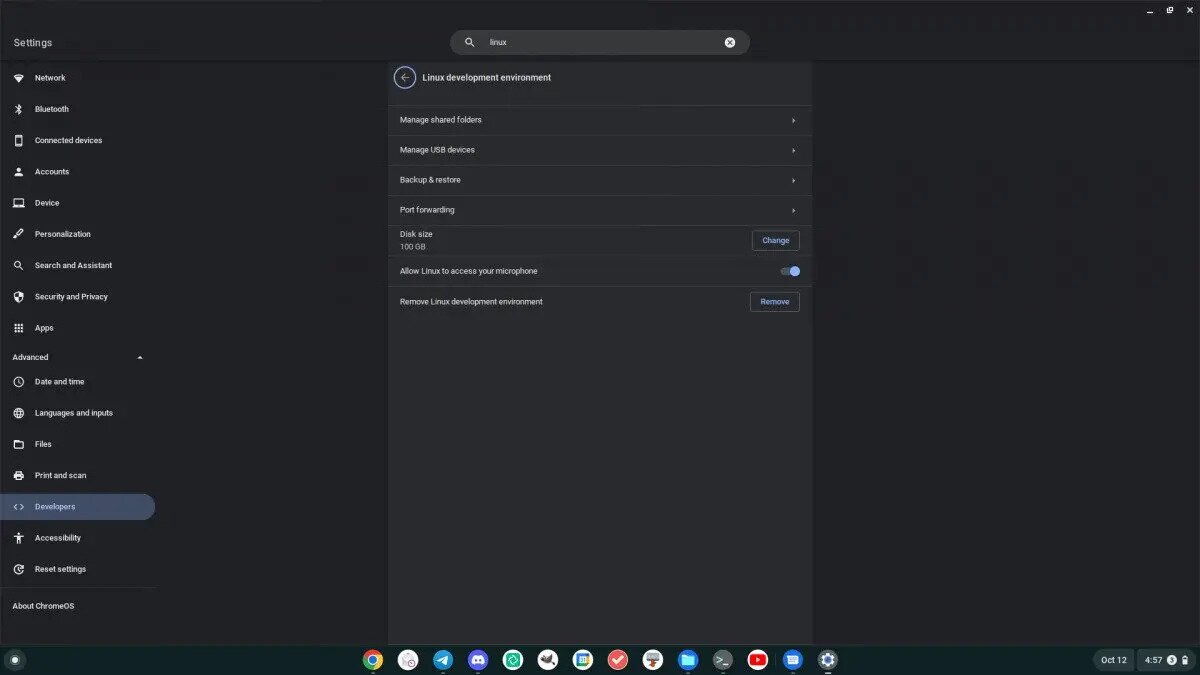
In the settings interface, scroll down to the “Advanced” section and click on it to reveal more options. Look for “Developers” in this section and select it.
In the “Developers” section, find the “Linux development environment” and click the “Turn on” button.
Clicking “Turn on” in the “Linux development environment” initiates the download of Debian Linux into a Chromebook container, complete with a terminal app. This process usually completes quickly.
When the download finishes, the Chrome OS terminal app will automatically open. Search for “Penguin” in the terminal and select it to access the command line. Then, run the apt update and apt upgrade commands to update the Debian container.
sudo apt update
sudo apt upgrade -y
Once updated, your Chromebook will be ready to run Linux applications like Session Messenger.
How to Install Session Messenger – Flatpak
Flatpak offers the recommended method to install Session on Chrome OS. Flatpaks consistently receive updates, and using them is straightforward.
Open the Chrome OS terminal app from the Chrome OS app menu. Inside the terminal, select “Penguin” to access the command line.
Use the apt install command to install the “flatpak” package, which manages Flatpak package runtimes and repositories.
sudo apt install flatpak
After installing “flatpak,” enable the Flathub app store, allowing your Chromebook to install a wide range of Flatpak apps. Use the command below to enable Flathub.
flatpak --user remote-add --if-not-exists flathub https://dl.flathub.org/repo/flathub.flatpakrepo
With Flathub enabled, you can now install Session. Use the following command:
flatpak install flathub network.loki.Session
After running the above command, the Session messenger will be set up on your Chrome OS system and available in the “Linux apps” folder in the Chrome OS app menu.
How to Install Session Messenger – DEB
Alternatively, install Session on your Chromebook using the DEB package. Open the Chrome OS terminal app and select “Penguin” to access the terminal interface.
Inside the terminal, use the wget command to download the Session DEB package to your Chromebook’s home directory.
wget https://github.com/oxen-io/session-desktop/releases/download/v1.11.5/session-desktop-linux-amd64-1.11.5.deb
After downloading the DEB package, install it using the following apt install command.
sudo apt install ./session-desktop-linux-amd64-1.11.5.deb
Once installed, you can find Session in the “Linux apps” folder in the Chrome OS app menu.
How to Use Session on Chrome OS
Using Session is straightforward. Launch the app on your Chromebook after installation. With the Session app open, find and click the “Create Session ID” button to create a new account.
When you select the “Create Session ID” button, the Session app will auto-generate a secure, anonymous, and private user account. Remember to store it in a safe, secure place. Select “Continue” to proceed to the next page.
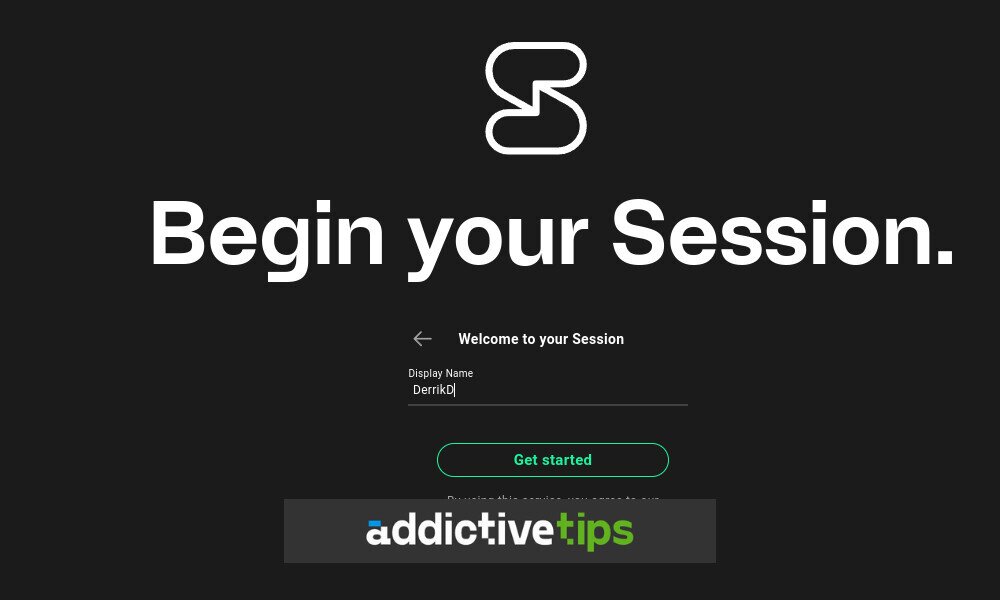
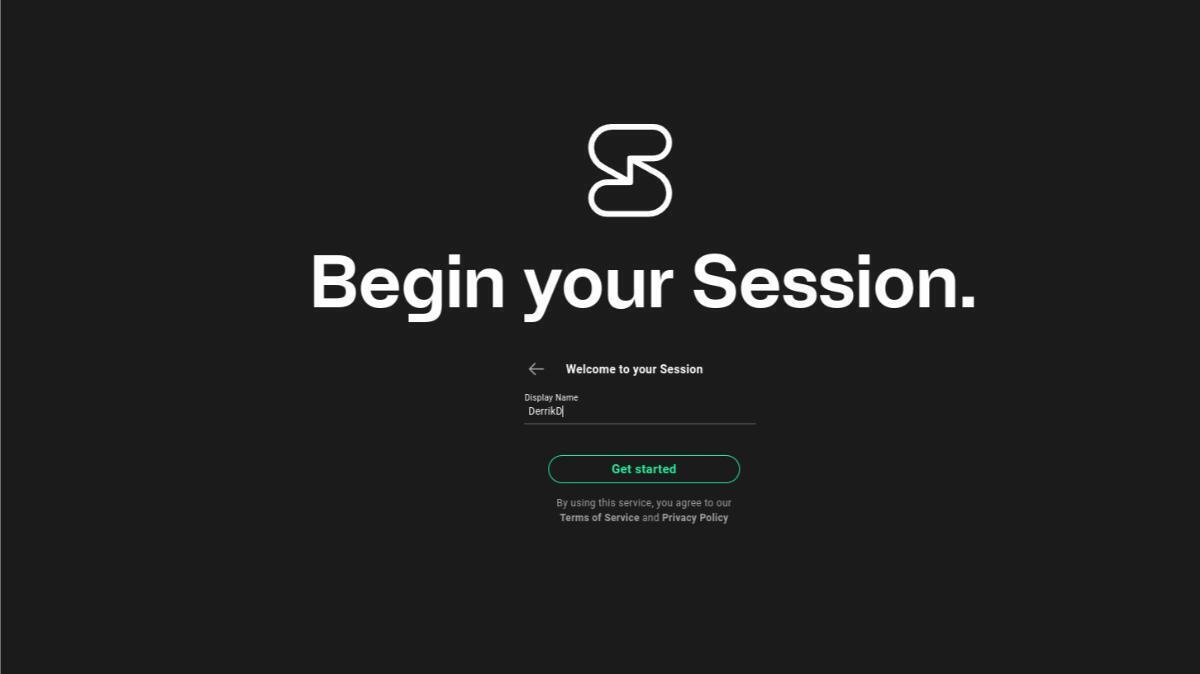
On the next page, the Session app will prompt you to enter a display name. This name will be visible to others when they message you on the Session app, so choose a display name you’re comfortable with. After entering your desired display name, click “Get Started.”
Clicking “Get Started” logs you into Session. The app will then ask you to “Reveal your recovery phrase.” Make sure to reveal it and save it in a secure place.
With your recovery phrase safely stored, you can start using Session to chat with family and friends. To start a chat, click the green “+” icon. Then, choose “New Message” to create a new message, “Create Group” to start a new group, or “Join Community” to join a Session community.
Other Stuff to Know
Session Messenger is a new kind of messenger that may be unfamiliar at first. Fortunately, Session offers extensive documentation to answer most questions. Access this documentation by visiting the official website.
